The Welsh 3000s challenge | A complete guide to Wales’ toughest day hike
The Welsh 3000s is possibly the most challenging and iconic day hike in Wales.
I have attempted the challenge three times, failing on my first attempt before succesfully completing it twice.
In 2021, I tackled it with a group of three others and called it a day on the roadside in the Ogwen Valley.
in 2022, I completed it solo in 14 hours 42 minutes whilst vlogging the entirety of it.
In 2023, I tackled it from north to south (Starting on Foel Fras and finishing on Snowdon) with a group of 2 others in 10 hours 54 minutes.
Calling upon my three attempts at the challenge and over a decade of experience hiking in Snowdonia, I have created this detailed guide on the Welsh 3000s, outlining what the challenge is, how to prepare for it, and the best way to complete it.
I also have included everything from images, maps, GPS co-ordinates, and GPX routes.If there’s anything that isn’t included on this blog, then feel free to drop me an email or a DM on Instagram.
Good luck and happy hiking.

What are the Welsh 3000s?
The Welsh 3000s are the 15 mountains in Wales that have a height of 3000 feet or more.
All of the peaks are situated in Snowdonia National park and are spread across three mountain ranges: The Snowdon Massif, The Glyderau, and The Carneddau.
The Snowdon Massif
1. Crib Goch, 3028ft
2. Garnedd Ugain, 3494ft
3. Snowdon, 3559ft
The Glyderau
4. Elidir Fawr, 3031ft
5. Y Garn, 3106ft
6. Glyder Fawr, 3284ft
7. Glyder Fach, 3261ft
8. Tryfan, 3011ft
The Carneddau
9. Pen yr Ole Wen, 3208ft
10. Carnedd Dafydd, 3425ft
11. Carnedd Llewelyn, 3490ft
12. Yr Elen, 3156ft
13. Foel Grach, 3202ft
14. Garnedd Gwenllian, 3038ft
15. Foel-Fras, 3090ft
What is the Welsh 3000s challenge?
The challenge is to summit all 15 peaks within 24 hours. The 24-hour time limit starts when you reach your first peak and stops as soon as you reach the last.
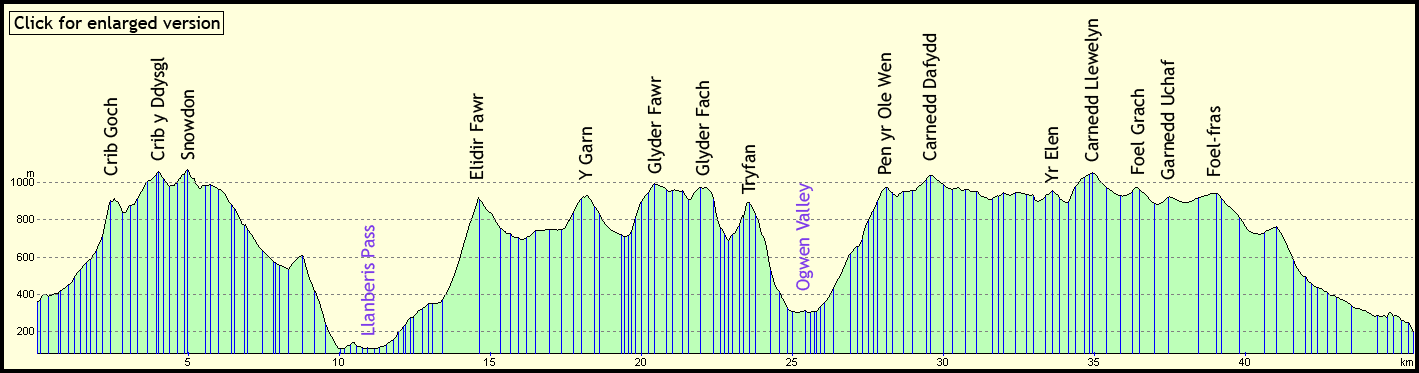
From the first peak to the last the challenge is around 38-42km in length and involves 3,100m of elevation gain.
However when you factor in the hike up to the first peak and the descent down from the last peak, the challenge is over 50km in length and involves nearly 3,800m of elevation gain.
How difficult is the Welsh 3000s?
In a short answer it is extremely difficult.
The hike is over 50km in length and involves nearly 4,000m of elevation gain.
Although you don’t need to be a fell runner, you should be a very fit and experienced mountain walker.
At a bare minimum you should have
A very good base of aerobic fitness
Plenty of experience of hiking in the mountains for long periods (6-8+ hours)
Experience tackling grade one scrambles
A good level of navigational skills.
You should have also previously hiked all three mountain ranges involved in the challenge (Snowdon, Glyderau, and the Carneddau).
This way you will not only understand the physical demands of the challenge but also have prior experience and knowledge of the route.

The distance from Crib Goch to Foel Fras in KM

When to attempt the Welsh 3000s chellenge?
There is no perfect time of year to take on the challenge as the weather will play a pivotal role in determining if you complete it, the time it takes, and what type of experience you have.
Depending on your fitness levels and the type of experience you would like to have, I would recommend taking on this challenge between the start of April and the end of September.
In theory the ideal date to tackle the Welsh 3000s would be around the summer Solstice (21st June).
As this is the longest day of the year you will have around 17 hours of daylight to hike in. In addition, the temperature shouldn’t be too hot as it won’t be the height of the Welsh summer.
The best advice I can give is to be flexible with your dates.
Taking on this challenge in the wrong conditions will not only be a drain on both energy and morale, but potentially dangerous.
The perfect conditions would be a dry overcast day, with great visibility, and a small amount of wind.
However being Wales and given the unpredictability of the mountains, this is extremely unlikely.
You will probably have to compromise on one of the above, but make sure that isn’t visibility.
Unless you’re a sadist, no one enjoys hiking 50km and not being able to see a thing.
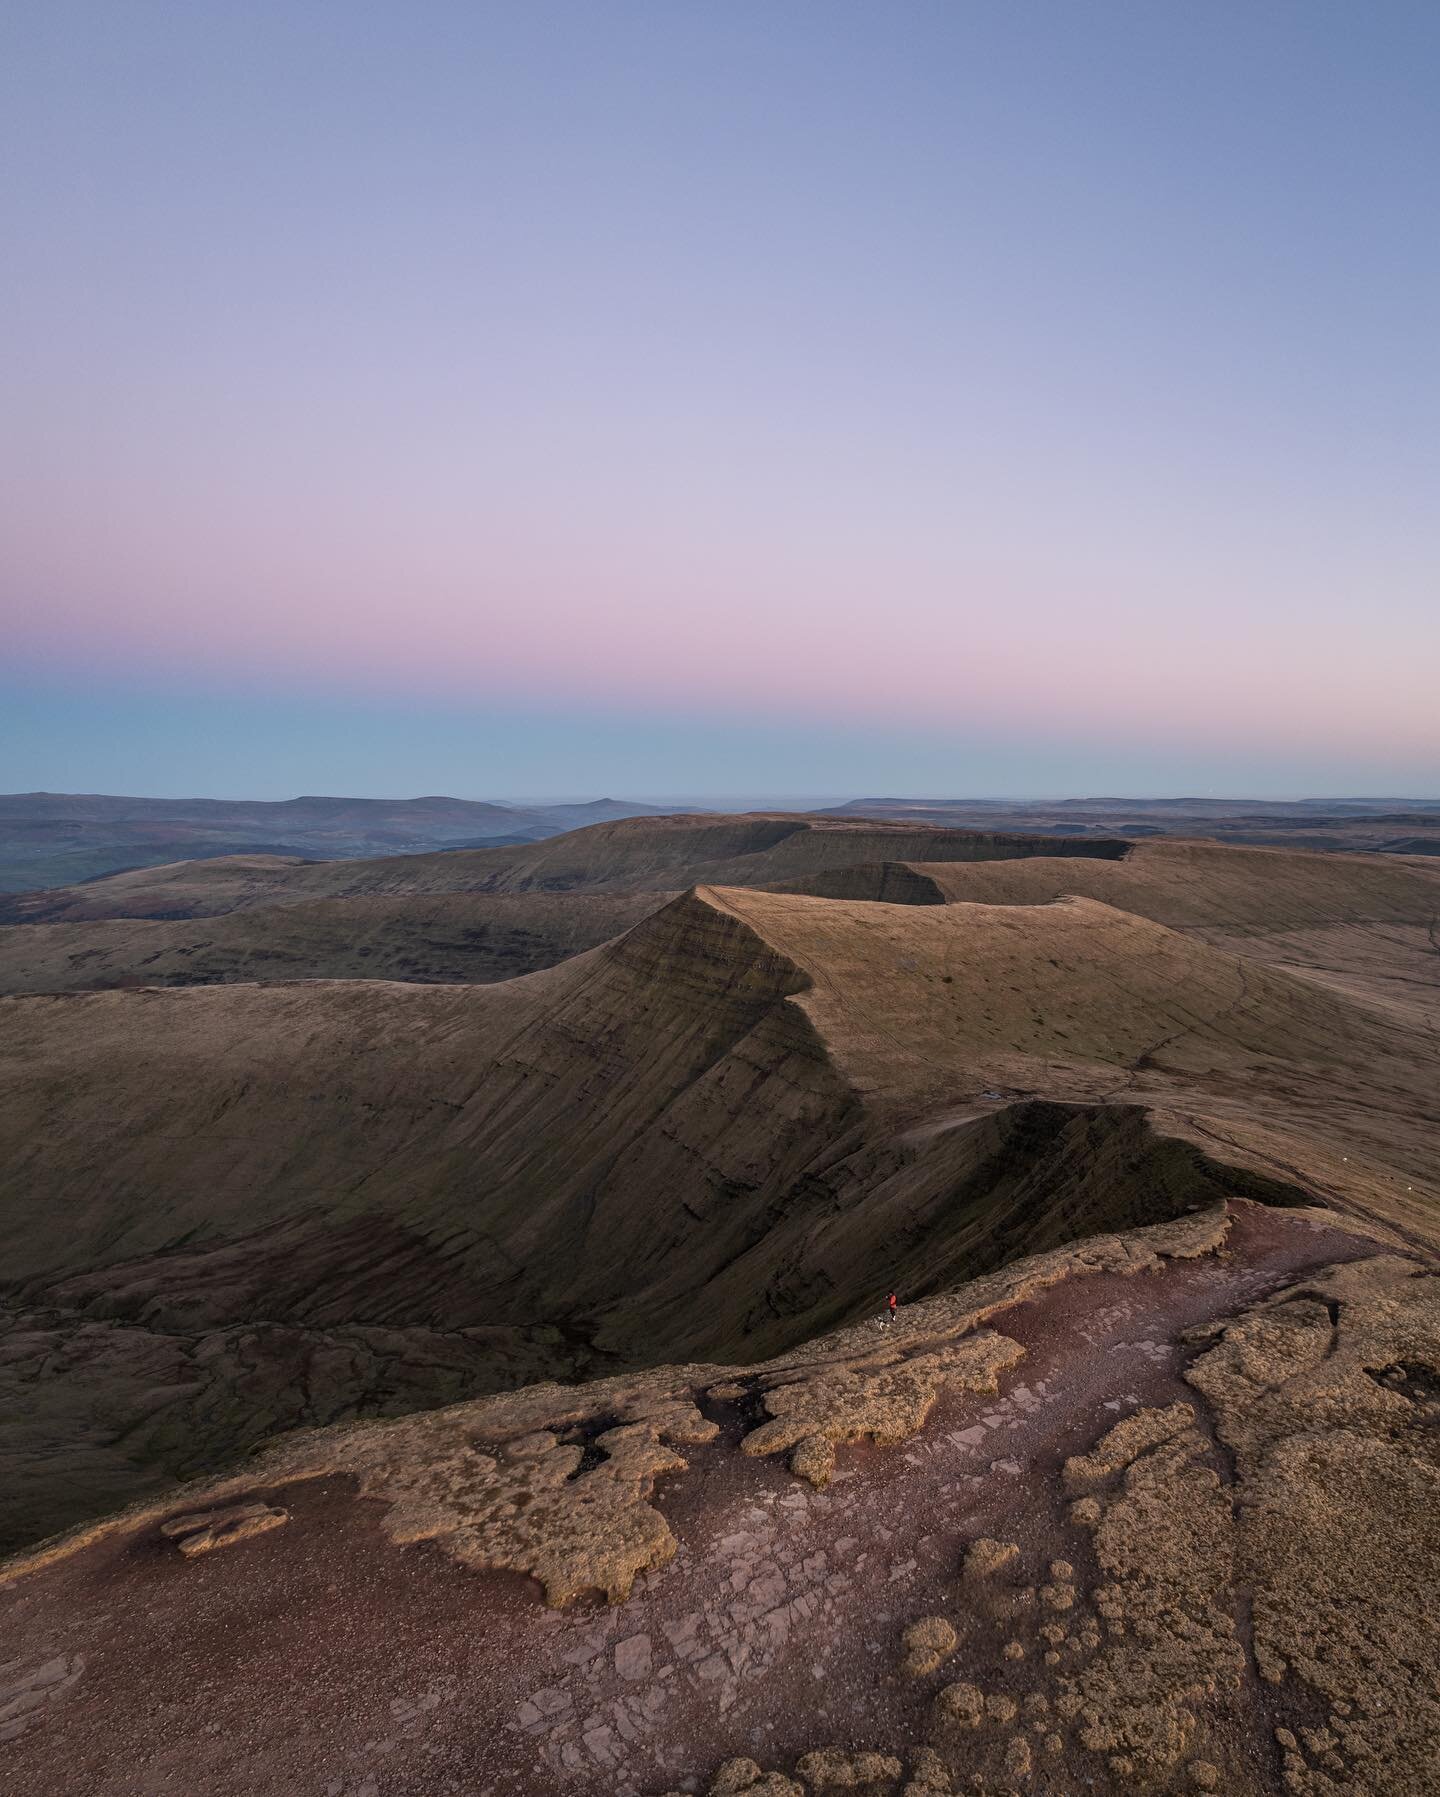
Part of what makes this challenge so special is the landscape and views in encompasses.
Being able to soak in the glorious mountain views not only distracts you from the discomfort of the challenge, but makes the entire experience more enjoyable and memorable.
If you’re worried about hiking in the dark, I would recommend taking on the challenge when there is a full moon. This way if you do end up hiking after the sun sets you have some form of additional light to help illuminate the route.
What is the Welsh 3000s route?
There are three ways in which you can tackle the Welsh 3,000 Challenge which I have briefly outlined below.
If you wish to try and break the official record of 4 hours 10 minutes and 48 seconds set by Finlay Wild in 2019, then you must start the challenge on the summit of Snowdon and finish on Foel Fras.
Start on Snowdon and finish on Foel-Fras (South to North)
The classic route which begins on Yr Wyddfa (Snowdon) the summit of Wales highest peak. You can either choose to hike up in the morning to start the challenge or camp/bivvy on the summit the night before.
Pros of bivying on include; being breaking up the route so it is slightly less demanding on the day, and potentially not having to tackle Crib Goch in the dark.
The cons include having to carry your camping gear and extra food up and down Snowdon, alongside probably not getting a good night’s sleep. Although you probably won’t get a good one anyway.
I have not done this route yet but I will be using it for my next attempt. A link to the route on OS maps can be found here.
Start on Crib Goch and finish on Foel-Fras (South to North)
This is the shortest route of the three and the one which I took for my successful solo attempt in 2022.
The clock would start on the ridge of Crib Goch, you would then pass over Garnedd Ugain, before summiting Yr Wydffa and then dropping down to Nant Peris.
Although it is shorter (and could be considered easier) than starting on the summit of Snowdon, it may mean you may have to ascend and navigate Crib Goch in the dark.
This ridge is no joke so please consider your own ability and weather conditions before attempting this route.
A link to the route on OS maps can be found here.
For a full description of the route which begins on Crib Goch and finishes on Foel Frascheck out my separate blog post below.
Start at Foel-Fras and finish on Snowdon (North to south)
I took this route for my successful attempt in 2023. I initially thought is was going to be easier than the usual south to north route because the the climbs would be slightly less demanding in this direction. However I was definitely wrong.
Climbing Snowdon after over 35km and nearly 3000m of elevation nearly broke me. I was in a dark dark hole which I nearly didn’t escape from.
The pros of this route are:
You can run/speed hike the Carneddau while you a fresh. This is delightful and will make you feel that you are making great time.
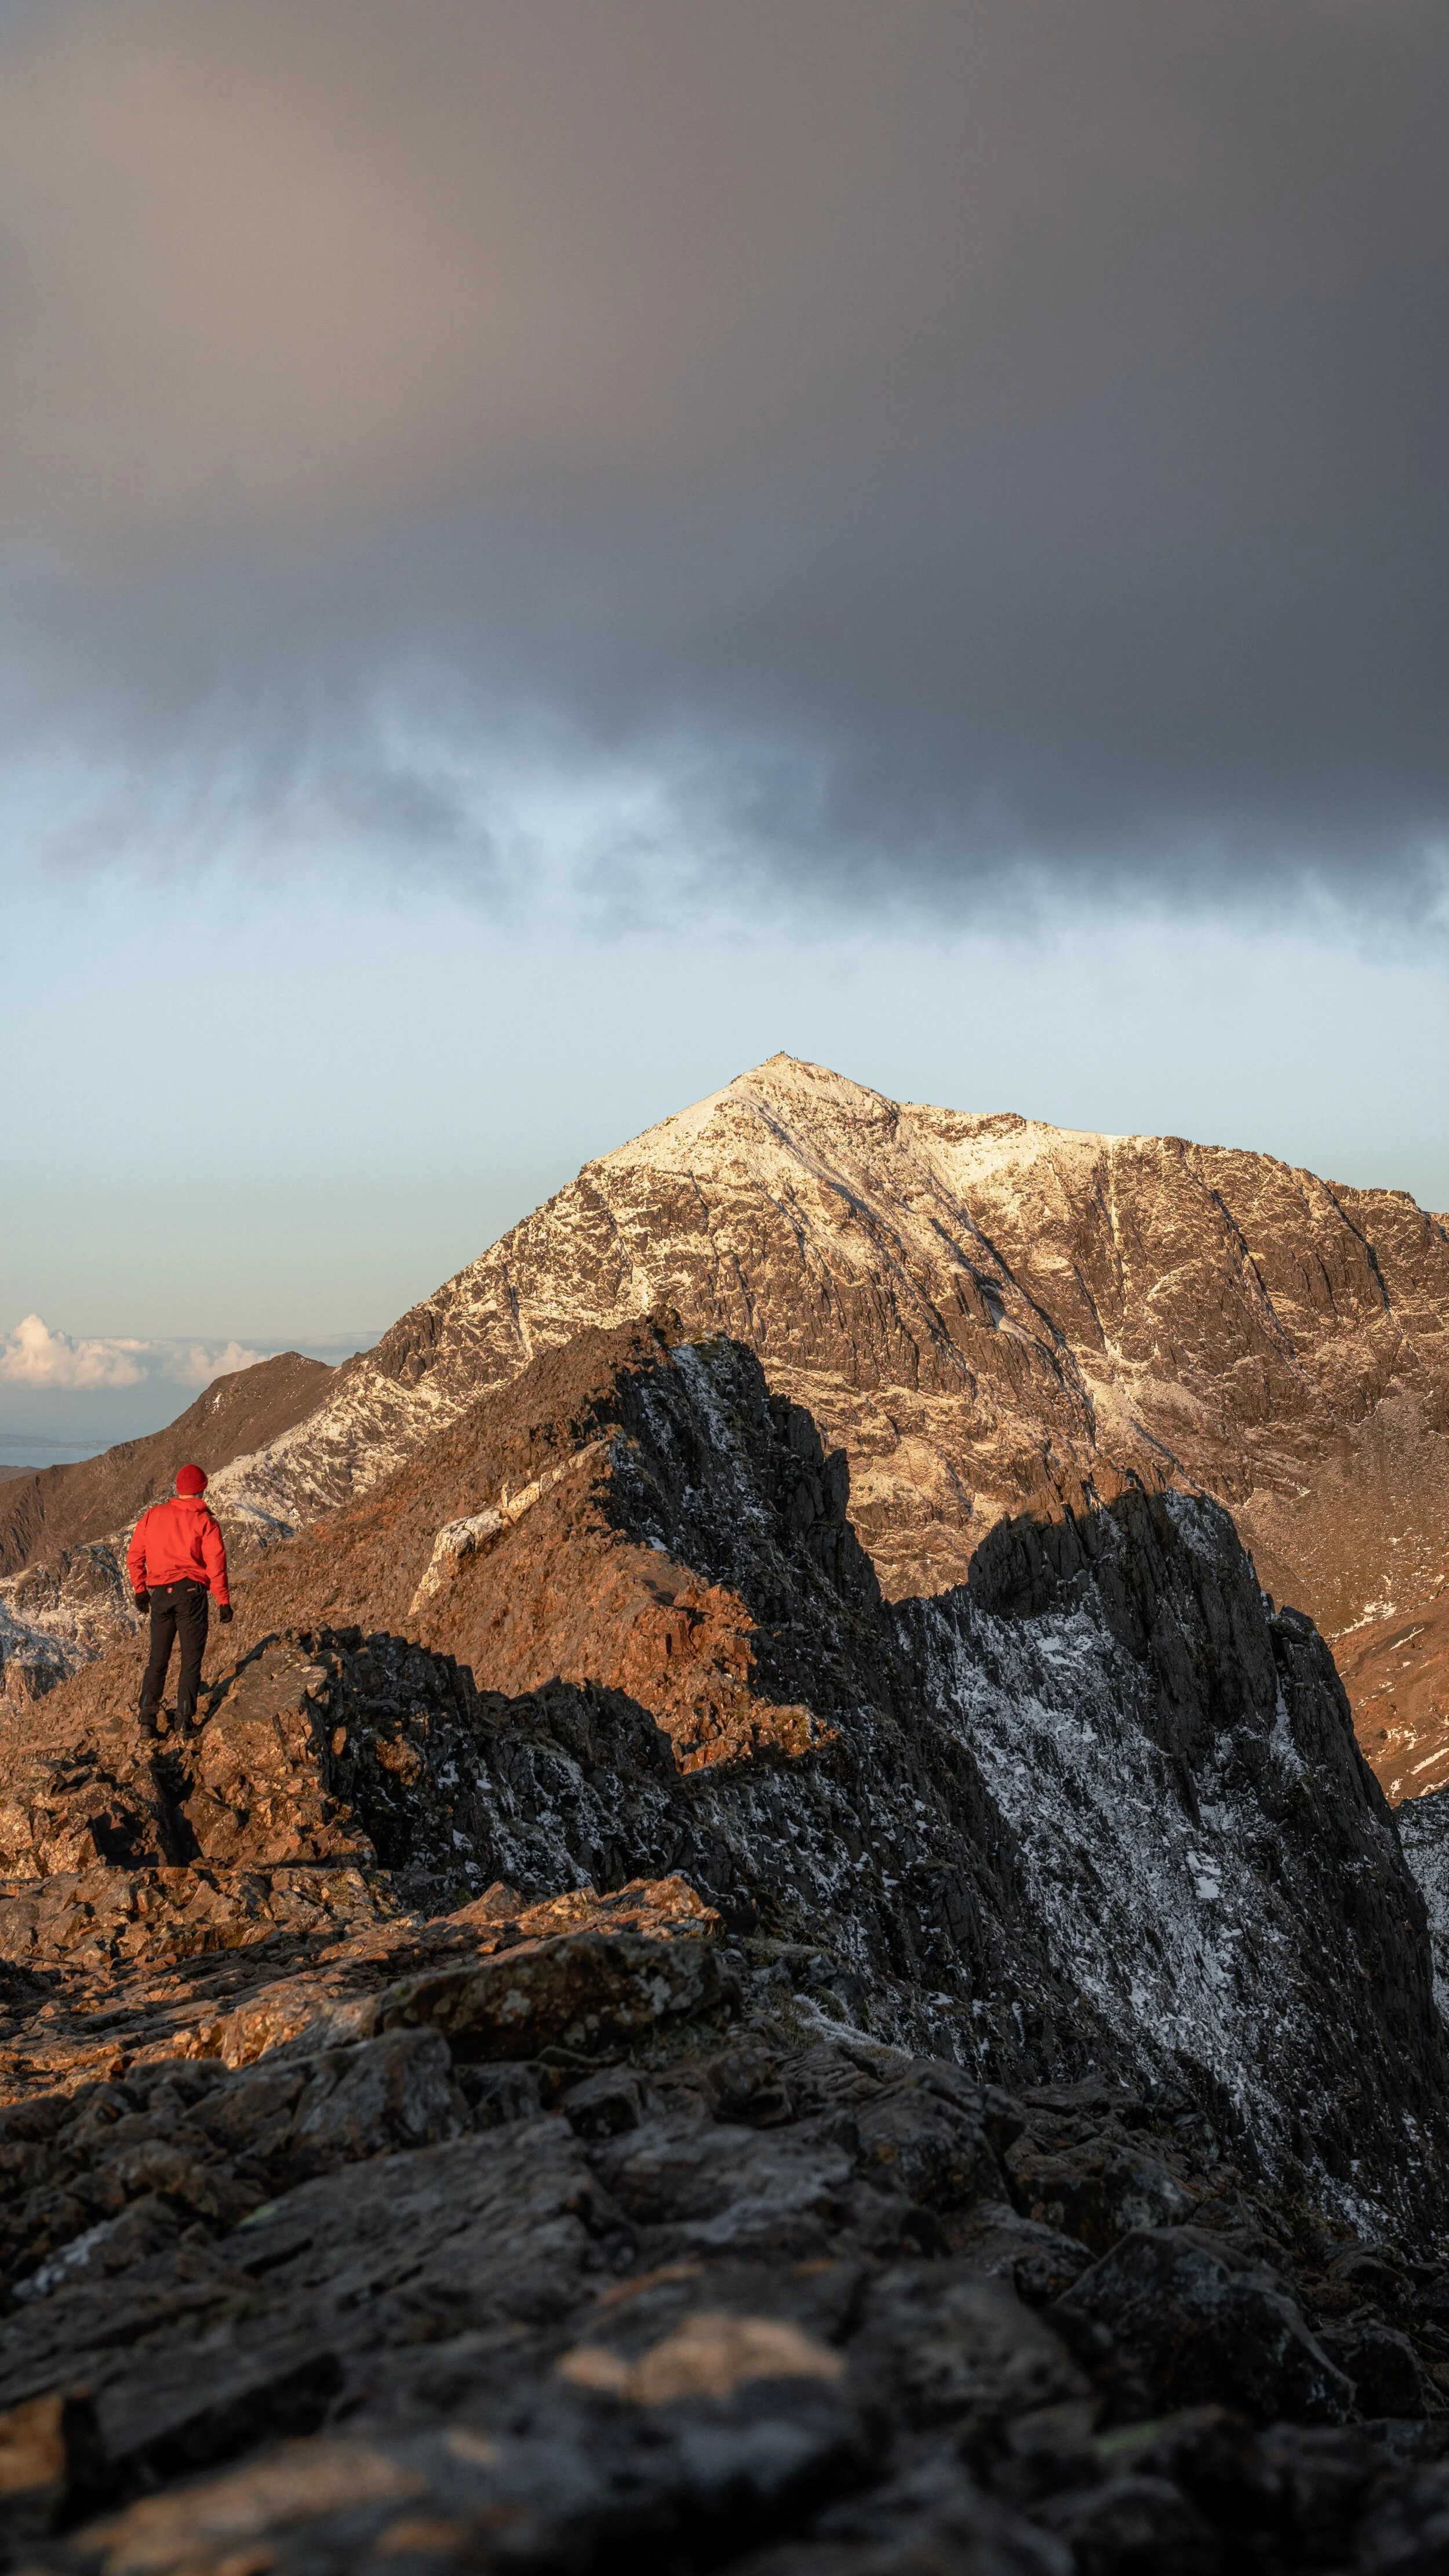
You get to finish on Snowdon, which has the best view of all the peaks
When you finish, you will be far closer to civilisation - You have the option of descending down to Llanberis or the Pen-y-Pass. Both of these are not only have served by public transport but also have accommodation nearby.
The cons of this route are:
You have to climb up to Crib Goch last - this is a horrifically steep, scree filled ascent which makes climbing up to Elidir Fawr feel like a walk in the park.
You have to navigate Crib Goch when you are very fatigued and potentially in the dark.
You have to descend Snowdon once you have finished - Descending the Llanberis path with severely blistered feet is the worst mountain experience of my life
You have to drive back to the arse end of nowhere to pick up your car - not ideal if you are tired and just want something to eat.
A link to the route on OS maps can be found here. What route you take off Snowdon will be up to you, and isnt included in the below distance.
Deviations in the Route
There are couple of different deviations in the routes, depending on which you mountain you pick to start on.
If starting on Yr Wyddfa, you can take two routes off Crib Goch;
Traverse the full length of the ridge and descend down its north ridge
Turn around at the middle of the ridge and descend down the gulley
I have only ascended the north ridge of Crib Goch so I can’t comment on the gully.
I would recommend taking the west ridge of Tryfan, as it offers the best balance between length and difficulty. Don’t go down the north face, as its very technical.
You have two options to ascend/descend Pen yr Ole Wen
The Western end of Llyn Ogwen (close by to the Ogwen Cottage): This is the direct route. it is steeper, more technical, and will shorten your route by just under a km
The Eastern end of Llyn Ogwen: This is slightly longer, less technical, although still involves some scrambling.
For my successful attempt in 2022 I ascended from the eastern end, and in 2023 I descend the same route. On hindsight i think the more direct route from the western end of Llyn Ogwen would be better. It is shorter, and although it is more technical, is no worse than Tryfan.
As there is more scrambling it would bring your upper body into play, taking some strain off your legs. Also it will allow you to pass by the Ogwen Visitor centre which has a toilet and a café, which could save you from two stash drops (more on that below)

Where does the Welsh 3000s start?
If you are tackling the route from south to North (recommended), then you will officially start the challenge either on the summit of Yr Wyddfa or Crib Goch.
Unfortunately teleportation hasn’t been invented and there are no lifts, so you will have to use your legs to reach the summit and start from one of the car parks at the base of the mountain.
I would recommend starting at the Pen-y-Pass car park.
You can start from other places but the Pyg track is the shortest route with the least elevation gain to the summit or Yr Wydffa (5.4km/775m elevation gain). It is also the starting point for Crib Goch.
Ideally you will want to be dropped here or if you are starting later in the day, catch the sherpa bus service
You can park at the Pen y pass but it is pre-booking only during the busier summer months (£25 a day) and gets booked up extremely quickly. Outside of the summer months the Pen-y-Pass is operated a first come first served basis, costing £10 for 24 hours.
If you cant be dropped or secure a space at the Pen-y-Pass then the next closest place to park is in the official lay-bys just past to the Pen Y Gwryd Hotel. This costs £4 for all day parking and will add an extra 1.8km and 90m of elevation gain to your walk. From here the walk up to the Pen-y-Pass should take around 20 minutes if you follow the road.
Alternatively you could park and start at the base of the Rhydd Du path, it costs £6 all day and has toilets. The hike to summit of Snowdon is 6km with 914m of elevation gain.
Where does the Welsh 3000s Finish
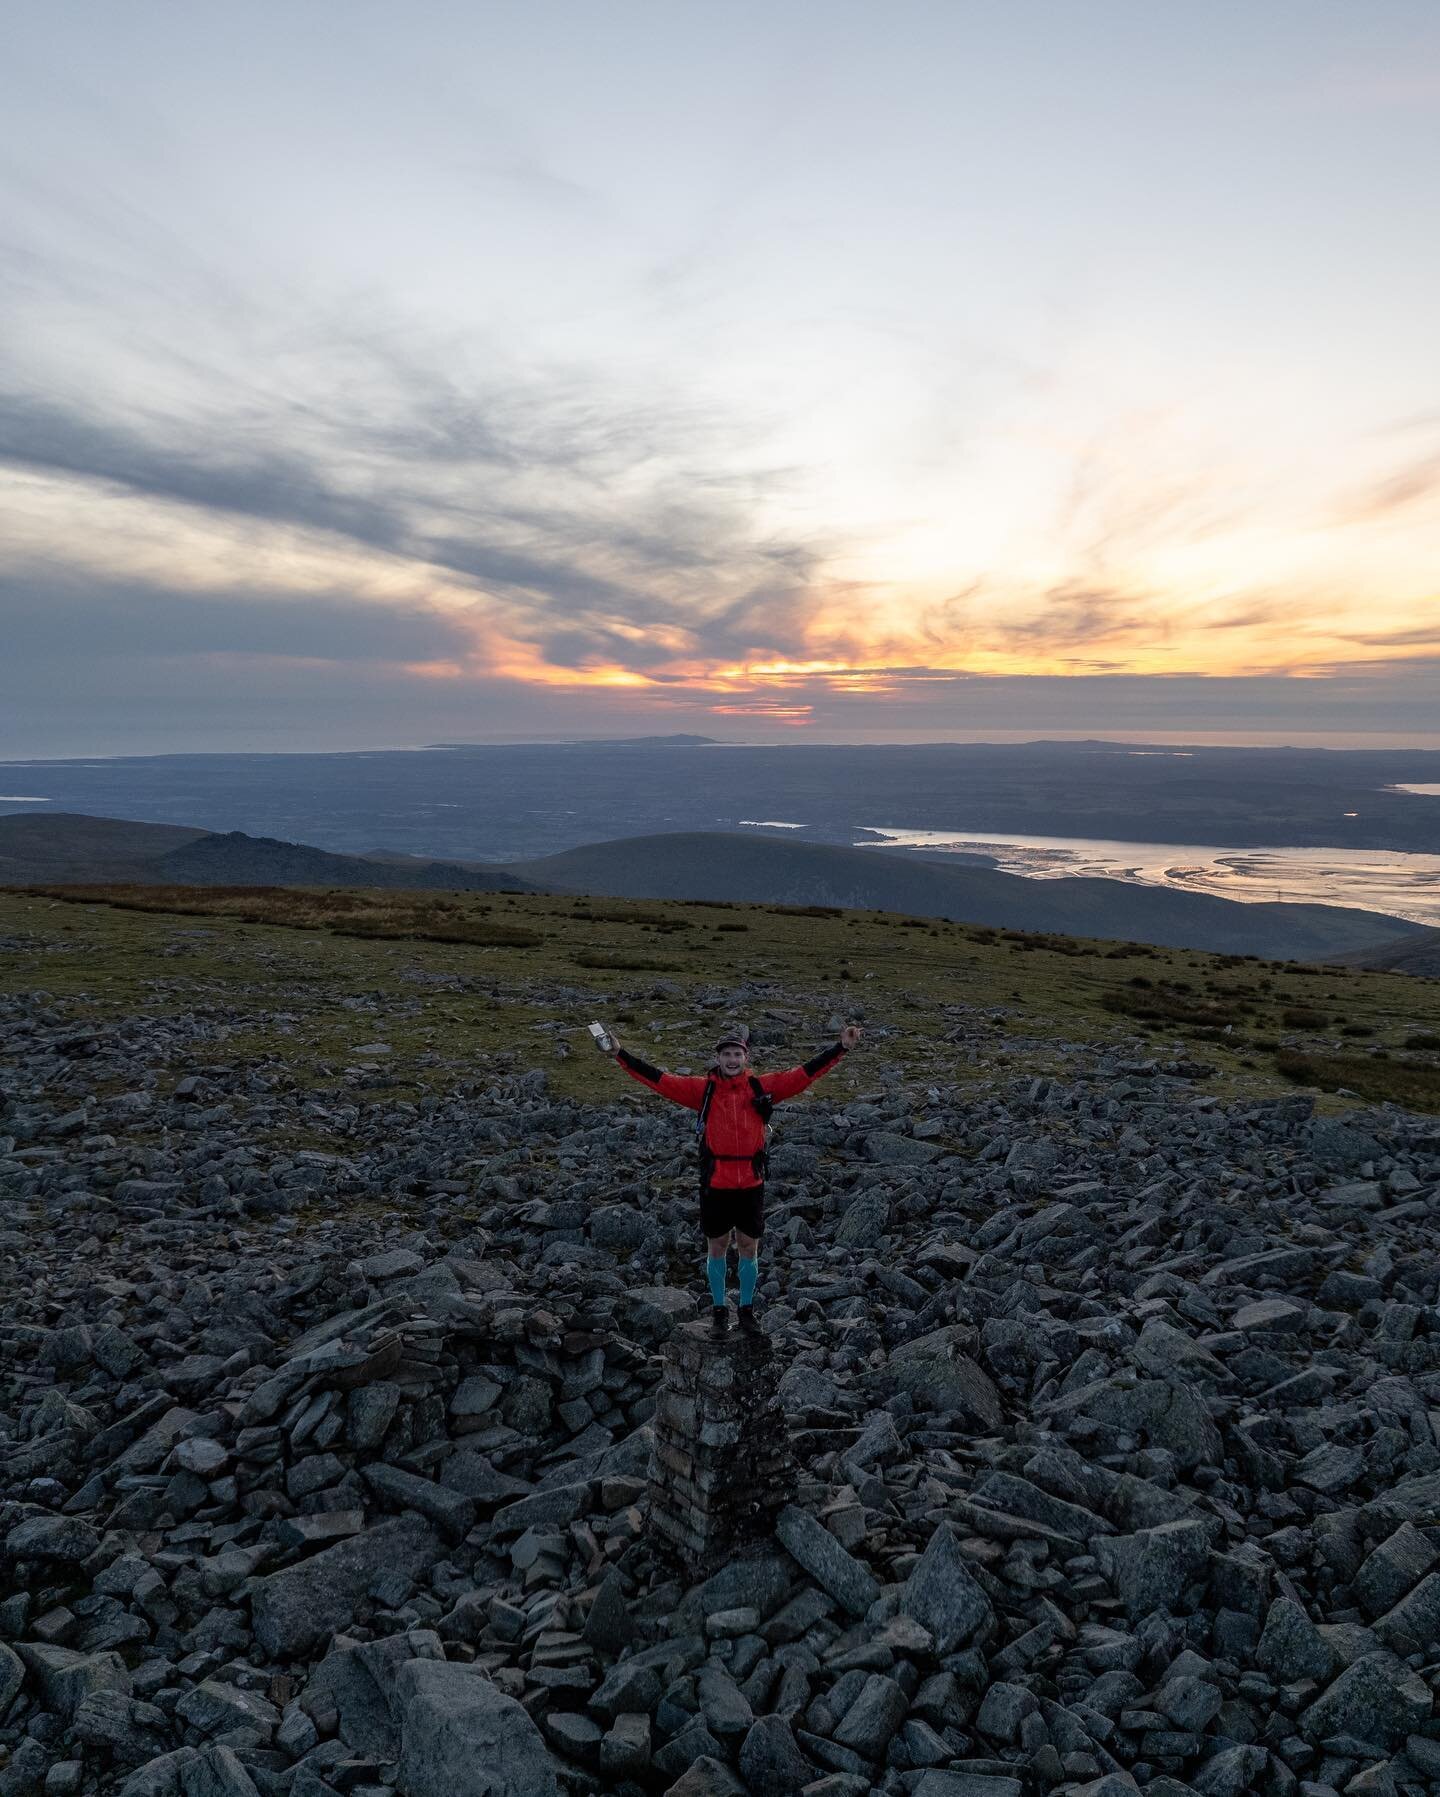
If you are tackling the route from south to north, you will finish the Welsh 3,000s challenge on the summit of Foel Fras.
From this summit you have the option to descend down to two separate car parks which are located on opposite sides of Foel Fras.
Of the two I would recommend finishing at the car park above Aber Falls.
This is because the route back is very easy to navigate and it is also closer to both the Pen-y-Pass and a McDonalds.
How to reach the car park from Foel Fras?
From Foel Fras head north for one mile, making the descent down to the saddle beneath Y Drum.
Once at the saddle, Llyn Anafon should be located down in the valley below you to your east (left hand side).
From the saddle simply make a B-line down to the lake. The decline is very gentle, and the grass is extremely spongy so I literally just legged it down, falling over several times.
Once at the lake there is a wide bridleway which will slowly descend for 3.8km back down to the car park above Aber Falls. By having a bridleway to follow it means you can switch off mentally and just plod on back to your car.
Also if you are being picked up, it gives that person the option to hike up and meet you at the lake. My partner did this when she supported me.
A word of warning the car park here extremely small and only has room for around 8 cars, so either drop it off the night before or get there super early.
Alternatively you can park at Bwlch y Ddeufaen .I don’t have any experience of this route although it’s slightly shorter than the one to Aber falls,

The route from Foel Fras down to the car park above Aber Falls.
logistics of the Welsh 3000s
Because of the length and one-way nature of the route, there are serval logistical issues you need to consider before you start the challenge.
Where are you going to park?
How are you going to get back to the start point?
Are you going to carry all your food or are you going to re-supply?
Have a support vehicle
This is the easiest and most practical option which requires the help of a dedicated individual. They can drop you off at the Pen-y-Pass and can pick you up from the finish point.
They can also meet you at the two road crossings in Nant Peris and the Ogwen Valley to top up your supplies alongside providing moral support.
Having a support car also means you can change your clothes and carry a lighter pack as you will be able to drop off and pick up gear between the three mountain ranges.
Take two cars
Park one at the car park at the finish above Aber falls and park one at one of the start points for hikign up Yr Wydffa. If taking two cars I would recommend dropping off a car the night before to preserve some sleep.
This option not only requires more planning, the Pen-y-Pass is pre booking only in the summer months and the Aber Falls car park is very small, but also involves driving after completing the challenge which can be dangerous.
I would also stash drop some food and supplies at both check points in Nant Peris (near the Vaynol Arms) and at the eastern end of Llyn Ogwen on the side of the A5.
This will mean you have a lighter pack which will save your energy in the long run.
Completing the challenge with a single car
You could complete this challenge with one car, but it would make things extremely difficult.
You would either have to pre-book some form of accommodation or a taxi, or coincidentally finish your challenge at the same time as someone else and hope they are generous enough to give you a lift.
If you are going for the single car option, I would tackle the route from North to south.
The car park above Aber falls is a significant distance from civilisation and signal is very poor, so trying to get back from here would be a recipe for disaster.
By finishing on Snowdon you have the option to hike down to Llanberis where there is signal, food, and accommodation.
Alternatively you can hike down the Pyg or the Ranger track to the Pen-y-pass where you will find toilets and a YHA hostel, so if you didn’t have signal you can use their phone to call a taxi.

Tryfan and the Ogwen valley
Are there places to re-supply on route?
The route is made up of three mountain ranges which are separated by two roads, both of which have places which you can refill your water at. Depending on what route you take up or down Pen yr Ole Wen will depend on if you access to a café. However I would still recommend stash dropping supplies if you dont have a support car, so you can save on pack size and weight.
The A4086 separating Snowdon from the Glyderau
This road passes through Nant Peris, which is the start point for the ascent up to Elidir Fawr.
If you have a support car, I recommend that they meet you at the car park behind the Vaynol Arms as you will pass this pub regardless of the route. If not, I would recommend stashing food and supplies in one of the fields behind the pub in order to get you through to the Ogwen Valley.
You can refill your water at the roadside as there is tap built into the wall opposite the Llanberis mountain rescue centre.
The Ogwen valley
If you have a support car, I recommend they meet you on the roadside of the A5 next to Llyn Ogwen at this car park, as this is where you will come off the mountain. Just note that the valley can get extremely busy, especially on weekends, so you may have trouble finding a space.
If you dont have a support car, what route you take up Pen yr Ole Wen will depend on if you need to stash drop supplies or not.
If you decide to take the direct route up the mountain, starting from the western end of Llyn Ogwen (close by to the Ogwen Cottage) then you will pass by the Ogwen Visitor centre. Here you will find toilets and refreshments kiosk that sells hot and cold snacks, which is usually open between 9am and 4pm, with the opening times extended in the summer.
If you ascending up the less technical eastern end of Llyn Ogwen then there is nowhere to pick up supplies so I would recommend stashing both food and water on the side of the A5 to get you through to the finish point.
If you did want to refill your water or use the toilet, there are facilities available at Gwern Gof Uchaf campsite. Heading here will add an extra kilometre to your route.
-
This will depend on the time of year and the weather in which you are taking on the challenge.
The key theme is that your gear is lightweight, comfortable, functional, and has been tried and tested in the mountains.
Stick with gear you have used before and certainly don’t go breaking in new boots on this walk.
I would recommend you wear and pack the following:
Sturdy and comfortable hiking or trail shoes with good grip
Waterproofs: I always carry a waterproof jacket and packable over trousers
layering system: wear/carry a minimum of 3 top half layers
Synthetic or Merino base layer (T-shirt)
Mid layer (Fleece or hoodie)
Outer shell (Wind breaker or waterproof)
A Hiking/ Navigation app with the route downloaded for offline use: I use and recommend OS Maps
GPS device with the route downloaded (or Map and compass)
Power bank and charging cable
Headtorch
Plenty of fluids and high-energy snacks
Gloves, hat, and face buff for cooler conditions
A sun hat and sun cream
Good socks - Ones that are breathable and dont cause blisters - Do not wear grip socks as I did on my 2023 attempt, as your feet will end up completely f*cked
Other things to consider
First aid kit – I took blister plasters and painkillers but also consider an emergency blanket
Camera - if you have good visibility then the views are worth capturing
Toilet paper & hand sanitiser – When you’ve got to go, you’ve got to go. Just make sure it’s a appropriate place, away from water, and you don’t leave your toilet paper on the mountain.
Lightweight hiking poles – Helps with both the ascents and descents.
Compression socks - Helps with circulation and hides my calves.
A change of clothes – A nice morale boost. I changed my shoes, socks, and shorts at Nant peris as they were very wet. I then swapped my top at the Ogwen valley as it stank.
-
Below is a list of all the hiking gear (clothes, footwear, and accessories) I currently use and recommend.
I have also included links to all of the products where possible. Some of these are affiliate links, which means I receive a small commission if you purchase an item after clicking on one of the links. This comes at no additional cost to yourself and helps to support my website and my ability to continue to create content.
Base layers
The purpose of a base layer is to wick sweat away from your skin to keep you dry alongside offering protection from the elements. The type of base layer I wear will depend on the season and temperature. I will usually wear merino wool or a synthetic material (polyester), avoiding cotton.
Columbia Zero Rules Technical T-Shirt - A great cheap options for day hikes
Icebreaker Merino Long Sleeved hoodie - My go to base layer for spring, summer, and autumn hiking. It’s lightweight, quick drying, breathable, and because it is made of merino, has odour control. I have worn this hiking multiple days in a row in summer in Canada, Madeira, The Dolomites, and UK and it is yet to let me down.
Mid layers
The purpose of a mid layer is to provide warmth and insulation. Even if I dont wear them while I am hiking, I will always carry them in my bag as an extra layer. They often come out when I reach a summit or if the conditions get colder
Simond Merino Wool Zip Hoodie - A great value merino mid layer which is comfortable, lightweight, stretchy, and wont smell. It also has elasticated thumb loops, a close-fitting hood, and three zip pockets.
Decathlon Forclaz MT500 Down Jacket - Essential for the colder months, wildcamping, and when you are soaking in the views up on the summit. It is £85, lightweight, non-bulky, easily packable, and thanks to its 700 FP down fill, is rated to -10 degrees Celsius.
Outer shell
The purpose of an outer shell is to protect you from the wind and the rain. No matter the season and weather I will always carry one just in case. I recommend getting a outer shell which has a hydrostatic head rating of at least 10,000mm.
Columbia Ampli-Dry II Shell Jacket - Waterproof, lightweight, functional, and packs down well, so I can easily stuff it into my bag if I get too hot. It also has breathable stretch shell fabric with underarm zipped ventilation.
Quechua Lightweight Waterproof Jacket MH500 - Unbelievable value at £80 and has a hydrostatic head rating of 25,000mm
Columbia Loop Trail II Windbreaker - My go to choice in the summer and for trail running
Lower half
Columbia Colour Block Hiking Shorts - They are lightweight, quick drying, stretchy, and have zipped pockets.
Patagonia Terrebonne Joggers - I take these on through hikes & wild camps, they are super light, comfortable, quick drying, & great for the evenings.
Montane Tenacity Hiking Pants - Lightweight, comfortable, water resistant softshell hiking trousers with 4-way stretch
Rab Men's Downpour Eco Pants - Lightweight (225g) over trousers which pack down super small.
Footwear
Darn Tough Vermont Merino Micro Crew Socks - Moisture wicking, odour control, breathable, well cushioned and have a lifetime warranty.
Columbia Montrail Trinity Ag II - The comfiest summer hiking and trail running shoes I have ever worn. The break in period is non-existent. I wore them for my 6 day through hike through the Dolomites, Snowdon 6 challenge, all around Madeira, and for 190km of hiking around the Canadian Rockies.
Adidas Terrex Free Hiker 2 GTX - My go to for wetter conditions. They are very comfortable, durable, offer great grip and stability, are waterproof, and also light enough that I could even trail run in them if needed. I also wore them for my eight day trek up to Kilimanjaro.
Backpacks
Deuter Unisex Ascender 13 Trail Running Backpack – My go to for trail running and hiking challenges
Deuter Speed light Pro 25 - My go to for summer hiking. It’s comfortable, extremely lightweight (630g), and big enough to fit all my gear.
Deuter Speed Lite Pro 30 - My go to for winter hiking or if I need more space. I wore this for my 6 day through hike across the Dolomites.
Deuter Air contact Ultra 50+ 5 - My go to for wildcamping, backpacking. It is very lightweight (1.3kg), comfortable, functional, and supportive.
Equipment & Accessories
PETZL Swift RL Headlamp - Essential for hiking, especially around sunrise or sunset, alongside wildcamping & astrophotography. This provides 900 lumens of brightness at only 100 g and is rechargeable. The Everbeam H6 Pro is a great cheap option at £15,
OS Maps Premium Subscription - My go to app for hiking. I use this for planning and following hikes on my phone. the premium subscription allows me to download & use maps offline, alongside the ability to print off to-scale paper maps to use as a backup.
Silva Walking Poles - Lightweight, collapsible, quick locking, and comfortable on the hands.
Portable Power bank – Essential for any hiker, especially if you rely on your phone for navigation. I recommend one with at least 10,000 mAh of power.
Forclaz MT500 stretch gloves - Lightweight, practical, functional, and warm. They are also stretchy, clip together when not being used, and you can use your phone with them. At £13 they are bargain.
Forclaz Foam Seat Pad – Weighs 60g, can fit in the side of your bag and doubles up as mat to stand on when getting changed after wild swimming
Mini Crampons/ Micro spikes – The best investment I’ve made for winter walking. These are a set of chains with 18 small spikes connected to a thick elastic rubber which can be pulled over any footwear. They are perfect for hiking in snowy and icy conditions when crampons would be overkill as they are much easier to walk in, and are far lighter and easier to carry.

How to fuel for the Welsh 3000s?
I joke that the Welsh 3000s is two challenges, a hiking one and an eating one. The truth is hydration and nutrition is integral to completing this challenge and shouldn’t be underestimated.
Without sounding like a budget David Goggins, your body is capable of much more than you imagine. If you fuel it properly and have the mental resilience to carry on going when things are tough, you will be amazed what it is capable of.
What and how much water to drink?
How much will depend on:
The weather
Your physiology (I’m a sweaty hiker so I need more fluid than normal),
Your fitness levels and how long you expect to spend on each mountain,
How much you drink before you start.
You’re going to sweat and loose plenty of salts while doing so. For that reason I recommend you use some form of electrolytes to replenish what you’ve lost and prevent overhydration and cramp.
I’d recommend using precision hydration electrolyte tablets which you can just drop into a bottle of water and are easy to carry. Also consider using a isotonic sports drink or carb powder to help stay hydrated and take on extra calories and energy.
Below are some rough estimates of how much you’ll need.
Before you start – 500-750ml of fluid with electrolytes to make sure you don’t start dehydrated
Snowdon – 1-2 litres of fluid
Glyderau - 2-3 litres of fluid
Carneddau – 2-3 litres of fluid
Remember that that a litre of water weighs roughly 1kg. As there are places to refill water at both Nant peris and the Ogwen Valley, I would advise not carry it all with you from the start.
I’d also advise consuming 500 -1,000ml of water with some electrolytes at both Nant Peris and Ogwen valley. This will not only keep you hydrated but will mean you won’t have to carry as much water with you over the mountains.
You can get bottles which allow you to safely refill water from streams and rivers, however there aren’t too many water sources up on the mountains, so I’d advise carrying your water.

The summit of Glyder Fawr
What to eat?
The secret here is make sure you consume something before you start, at both checkpoints, and eat frequently when you are on the mountains.
Although you may not be running the challenge, I would class the 3,000s as an ultra-style event as you covering 50km and hiking for anywhere between 10-20 hours.
During my attempt in 2022, my Garmin watch said I burnt over 6,000 calories during the 17 hours I was hiking for, which equates to around 350 calories an hour
Without going into the science of things “Research findings support the consumption of 1 gram per kilogram of bodyweight per hour for men, and 0.8 grams per kilogram of bodyweight per hour for women during ultra events”
As an 80kg male I was aiming for around 60-80g of carbs and around 250-300 calories per hour.
What you eat is down to personal preference and should be food that you have tried and tested on hikes before. Don’t rely solely on sugary snacks as your body will just end up crashing. In addition you may end up with stomach issues.
I’d recommended calorie dense foods, which have good mixture of carbohydrate sources alongside some protein. Also consider salty foods which will help replenish the salts you would have lost.
The key for me was eating something every 45 minutes to an hour, even if didn’t feel like it. This was to keep my energy levels high and prevent hitting the dreaded wall or ‘bonking’.
Below is what I consumed on my successful attempt in 2022:
Overnight oats with protein - before I stared at 4am
3 bananas
4 snickers bars
3 cliff bars
2 battle bites protein bars
A pack of Haribo giant strawbs
A pack of Haribo tangfastics
2 SIS energy gels
A pack of Welsh cakes
2 cans of Fanta
2 double sausage and egg baps – At Nant Peris
A king Pot noodle and a pack of cooked prawns – At Ogwen valley
Bag of sausage rolls
Lidl hazelnut doughnut
4 servings of High 5 carb powder – Around 200g of carbs

Where to stay for the Welsh 3000s challenge?
Now unless you live in Snowdonia you are going to have to factor in two nights’ accommodation to complete this challenge.
Where you sleep is down to a few factors including; personal preference, what options you have available, what time you plan on starting the challenge and when you think you will finish.
Driving any significant distance after this challenge would be utterly stupid so please don’t entertain that idea.
The night before my successful attempt in 2022, I stayed in my VW campervan in a layby on the side of A4086 beneath the Glyders, I also slept in the van after I completed it.
On my successful north to south attempt in 2023, I slept in the van at the Aber Falls car park and slept in the van the night after.
If you don’t have a vehicle to sleep in or any mates nearby, there are several affordable accommodation options throughout the park including hostels and campsites.
I would recommend this Miners cottage at the base of Snowdon in Nant Peris.
Located at the base of Elidir Fawr, you will actually pass this cottage on the route, meaning you can pop in and grab some resupplies, change, or even have breakfast!
It sleeps 6, and has a sauna. I have used it for the Welsh Three Peaks challenge and I loved it.
Alternatively you could consider the YHA Hostel at the Pen y Pass or If you’d like to support this website, you can Book your accommodation using Booking.com and Sykes Cottages. These come at no extra cost to you, but help keep this site running.
The view from Y Garn
Reflections, summary, and final pieces of advice
If you get the right conditions and have put the training in, the views are phenomenal and the challenge one that will live long in the memory.
You will endure highs and lows but given the magnificent array of mountainous landscape which you are treated to, it makes everything worth it in the end.
Below is a summary of the 12 tips which I can offer anyone attempting the Welsh 3,000’s.
Save it for a good day – If you can, be flexible with dates so you can take this on in the best conditions possible. Poor conditions can be both energy and morale sapping alongside dangerous. One non-negotiable for me would be visibility, It impacts both navigation and views which has a huge impact on motivation.
Make sure you are fit enough – Rack up the mountain miles. You should be comfortable hiking and scrambling in the mountains on long distance hikes (8+ hours) which have significant amounts of elevation gain (1,500- 2000m)
Have experience hiking the entirety of the route – Break it down into 3 separate hikes across the 3 different ranges and use it as training days. It will not only improve your fitness but give you and understanding of both the challenge and the route.
Get your logistics on point – If you have a support vehicle, identify the locations and what times (roughly) they will meet you. If you are doing a two-car strategy, drop the car off and stash drop supplies the night before, and remember than the Pen-y- pass is pre-booking only in the summer.
Have the route downloaded offline on a proper hiking app – and also you know how to use it. I’d recommend OS Maps.
Have the correct gear – Essentials include appropriate footwear, waterproof jacket, backpack, extra layers, head torches, a map, and a power bank.
Hike with people on the same level as you - If you’re doing it with a friend or group, make sure they have a similar fitness level, and you understand what time you aim to complete it in. If one person is significantly faster or slower than the other, it’s going to be frustrating for both people and will take the enjoyment out of the challenge.
Eat little and often – Eat something before you start, at both check points, alongside eating snacks every 45-60 minutes. Depending on your weight you should aim for 0.8-1 gram of carbs per kilo of bodyweight, and around 200-350 calories an hour.
Stay on top of your hydration – Don’t start dehydrated and look to carry between 1.5-2.5 litres of fluid per mountain range. Consume plenty of fluid at the two road crossings, where there are taps and consider using electrolytes and sports drinks to replace salts and keep energy levels up.
Don’t linger too long on the summits – Use each summit as a chance to rest, refuel, and hopefully enjoy the views, but don’t linger too long. Five minutes on each peak equates to extra 75 minutes, 10 minutes is 2.5 hours.
Break the challenge down – The scale of the challenge can be overwhelming. Break the hike down into the three mountain ranges, then each range into separate peaks. Give yourself realistic time targets for each range and each peak. This gives you something to aim for and makes the hike seem more manageable.
Know your limits – Park your ego and don’t be afraid to pull the plug if things aren’t going your way. The mountains will always be there and you don’t want to end up hurting yourself or having to be rescued.

Help support my website
Congratulations, you have gotten to the deep end of my detailed guide to the Welsh 3000s.
I created and run this website in order to help inform, amaze, inspire people (for free) to get outside and explore the adventurous side of the UK.
Although I do run some google ads, I have limited them in order to make your experience on this website far more enjoyable.
If you’d like to support this website, you can use the affiliate links below to book your accommodation or transport. These come at no extra cost to you, but help keep this site running.
Book your vehicle using Discover Cars
Book your accommodation using Booking.com and Sykes Cottages
If you are feeling generous you can also Buy me a Coffee to say thank you, and give me a follow on social media.
Thank you, and if you have any questions, leave them in the comments below or drop me an email!
If you would like a full breakdown of the route alongside a recount of my successful attempt, check out my blog post below.
For more travel, hiking, & photography inspiration around Wales check out my in-depth guides to each of my favourite Welsh regions below.

Find me on Instagram