
A complete Pacific Northwest Road Trip Guide (Washington & Oregon)

A Pacific Northwest road trip is the ultimate mountain meets coast adventure.
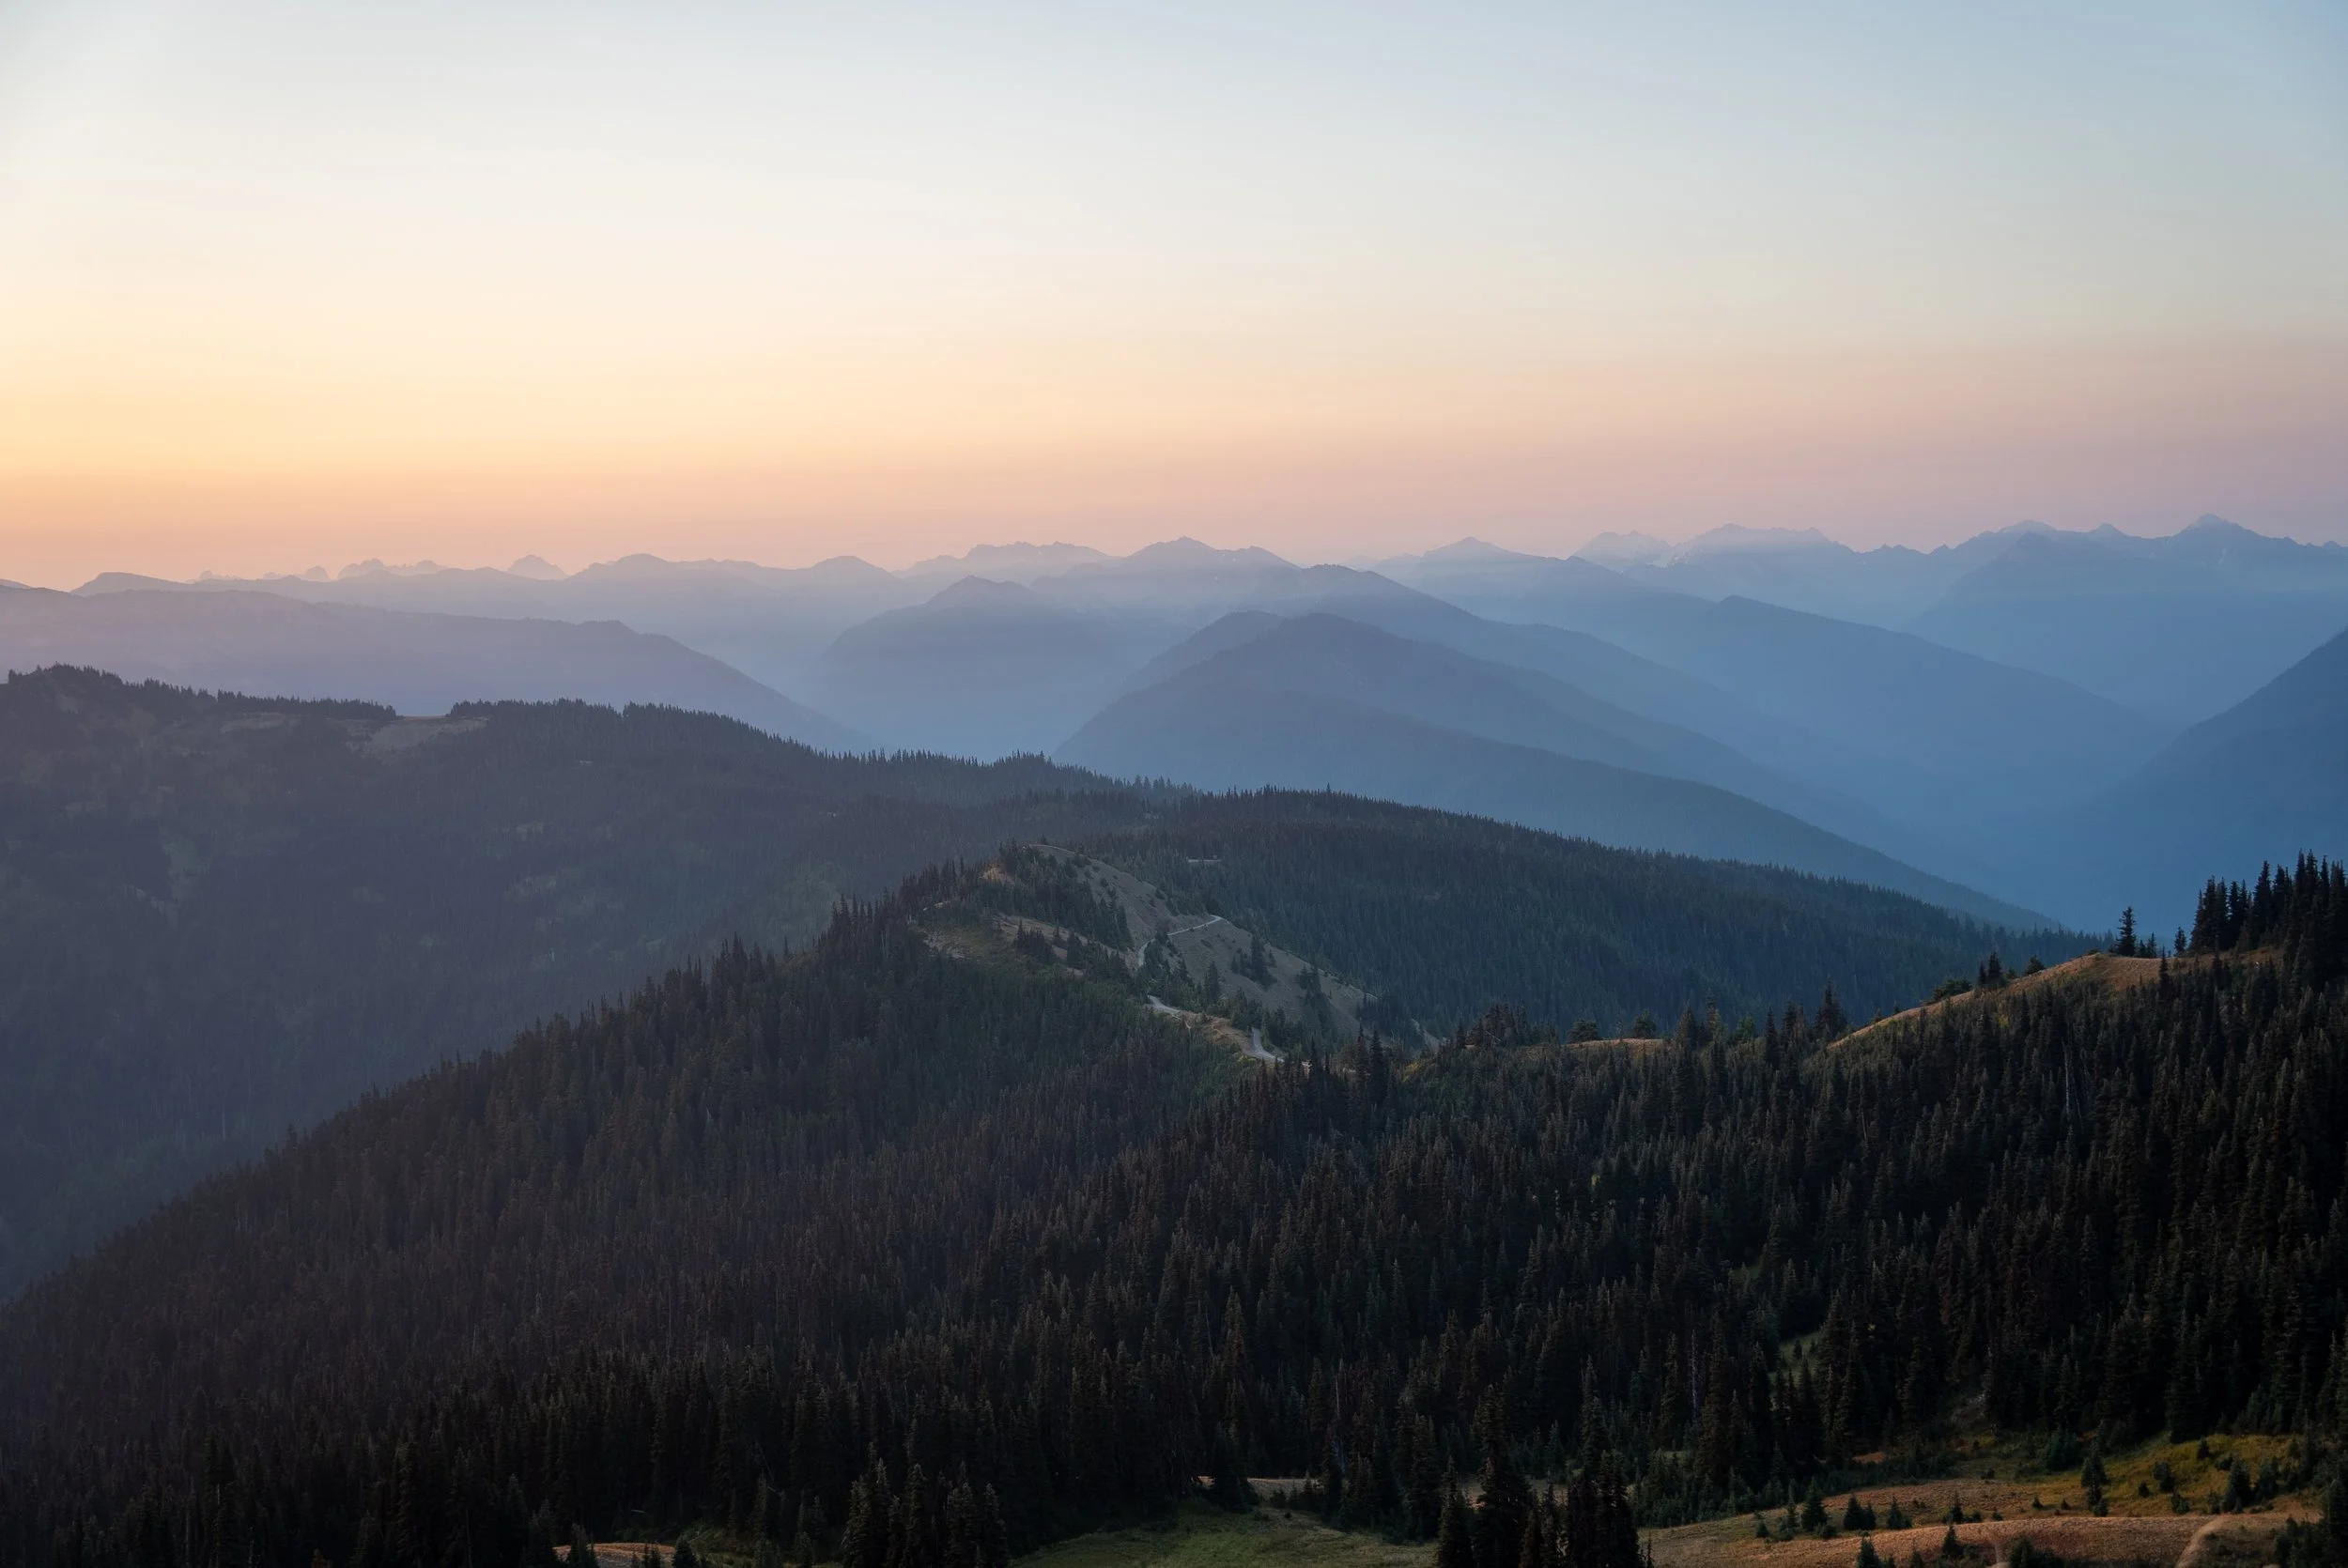
It is a journey through misty rainforests, wild beaches, snow-capped volcanoes, and turquoise alpine lakes. Stretching across Washington and Oregon, this route offers endless hiking trails, scenic drives, and some of the most photogenic landscapes in the USA.
My wife and I undertook a two-week road trip through these two incredible states in late September 2025 to celebrate our first anniversary. We lucked out with the weather, but honestly, it was the sheer variety of landscapes that blew us away
In this Pacific Northwest road trip itinerary, I share our two-week journey, from Olympic National Park to Columbia River Gorge and everything in between. We travelled in late September 2025 to celebrate our first anniversary and were blown away by the sheer variety of landscapes along the way.
This comprehensive guide combines our personal experience with detailed research, local tips, and travel advice to help you plan your own Pacific Northwest adventure. Below, you’ll find everything you need , from permits and passes to driving times, camping spots, and must-see destinations across the PNW.
If you’re dreaming of a Pacific Northwest road trip loop that connects the region’s most stunning natural areas, this guide has you covered.
I hope this guide helps bring your own adventure to life. If you have any questions, feel free to message me on social media, and if you found this useful, consider supporting me by sharing it or using one of my affiliate links.

Key information on this blog
This blog is best used as a flexible guide rather than a fixed schedule. I’d recommend adjusting it to fit your own interests, energy levels, and the season you’re traveling in.
That said, if you decide to follow the route exactly as we did, then you’re in for a pretty unforgettable trip.
We started and finished the loop in Seattle, which is the only Roadsurfer depot in Washington or Oregon (more on them below, spoiler: I’d 100% recommend them).
That said, if you’re hiring a vehicle from a different provider, you could easily begin and end in different cities depending on your route and flight options.
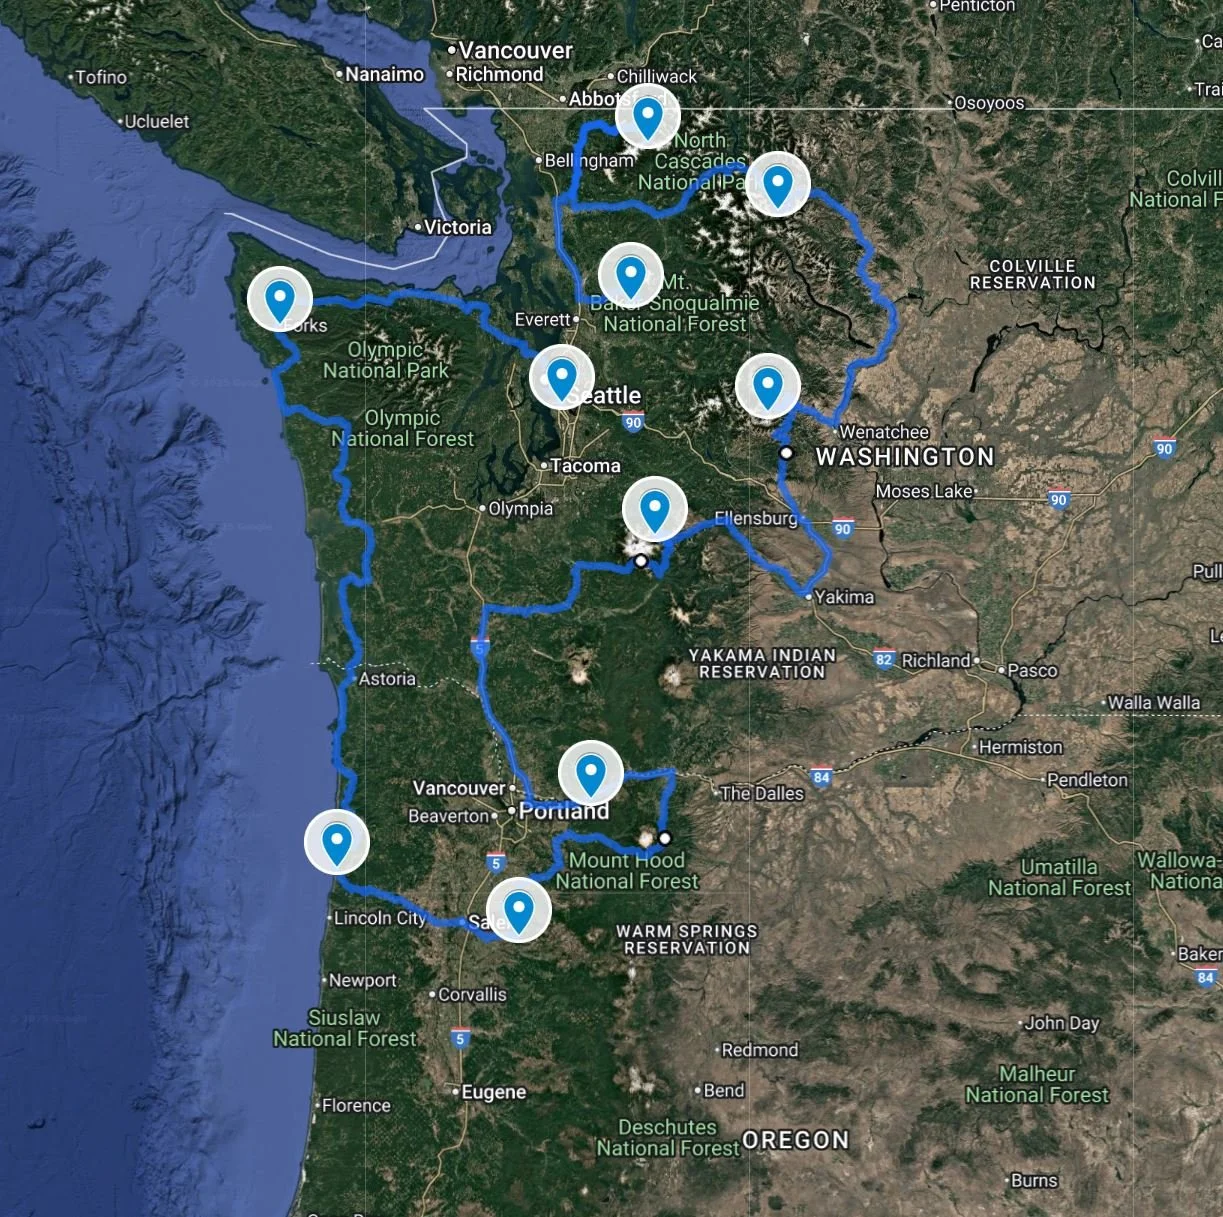
The itinerary loops through Washington and Oregon, w completed the trip in an anticlockwise direction, starting in Olympic National Park, though it works just as well clockwise.
I’d originally planned to go clockwise but ended up reversing the route due to wildfire activity near the North Cascades and Mount Rainier , something to keep an eye on if you're traveling in summer or early fall.
This itinerary is very adventurous and active, focusing heavily on the outdoors and hiking.
I hiked nearly every day (sometimes twice), while my wife took a few well-earned rest days. Most of the hikes fall into the easy to moderate range (5 to 12 km and 200 to 700 m of elevation), with only a handful pushing into longer or more challenging territory. I’ve also included plenty of alternative ideas for those looking to mix it up, including scenic drives, viewpoints, beaches, and local stops.
Because we love being in the mountains (especially looking at mountains from other mountains), we focused more time in Washington than Oregon. While we could have added southern Oregon to the loop, we opted to leave it out in favor of more quality time in fewer places, less time on the road, more time on the trails.
That said, this route still covers a lot of ground: roughly 1,900 miles over 15 days.
It sounds like a lot, but it never felt exhausting or rushed. The longest driving day was around 6 hours, with most days sitting between 2 and 5 hours, often broken up with scenic stops or short hikes. Sharing the driving made a big difference too, so I highly recommend splitting the load if you can.
Places you’ll visit on this road trip
Olympic National Park, Washington
Northern Oregon Coast
Silver Falls State Park, Oregon
Mount Hood & Columbia River Gorge, Oregon
Mount Rainier National Park, Washington
Okanogan –Wenatchee National Forest / Leavenworth, Washington
North Cascades National Park, Washington
Mount Baker, Washington
Mount Baker–Snoqualmie National Forest / Snoqualmie, Washington
Seattle, Washington
It does not visit the following places, however they can be added to fit your schedule or if you have longer than 2 weeks.
Southern Oregon Coast
Crater Lake, Oregon
Bend, Oregon
Pacific Northwest FAQ’s
-
The Pacific Northwest is best explored by campervan or car, depending on your travel style and budget.
In my opinion the best way to undertake this road trip would be in a Campervan.
It offers the most flexibility, alongside being significantly cheaper and easier than booking accommodation. In addition it is also the more adventurous and liberating option as you can wake up surrounded by nature. You can also cook your own meals to save costs and it’s easy to move between destinations without constant packing and unpacking
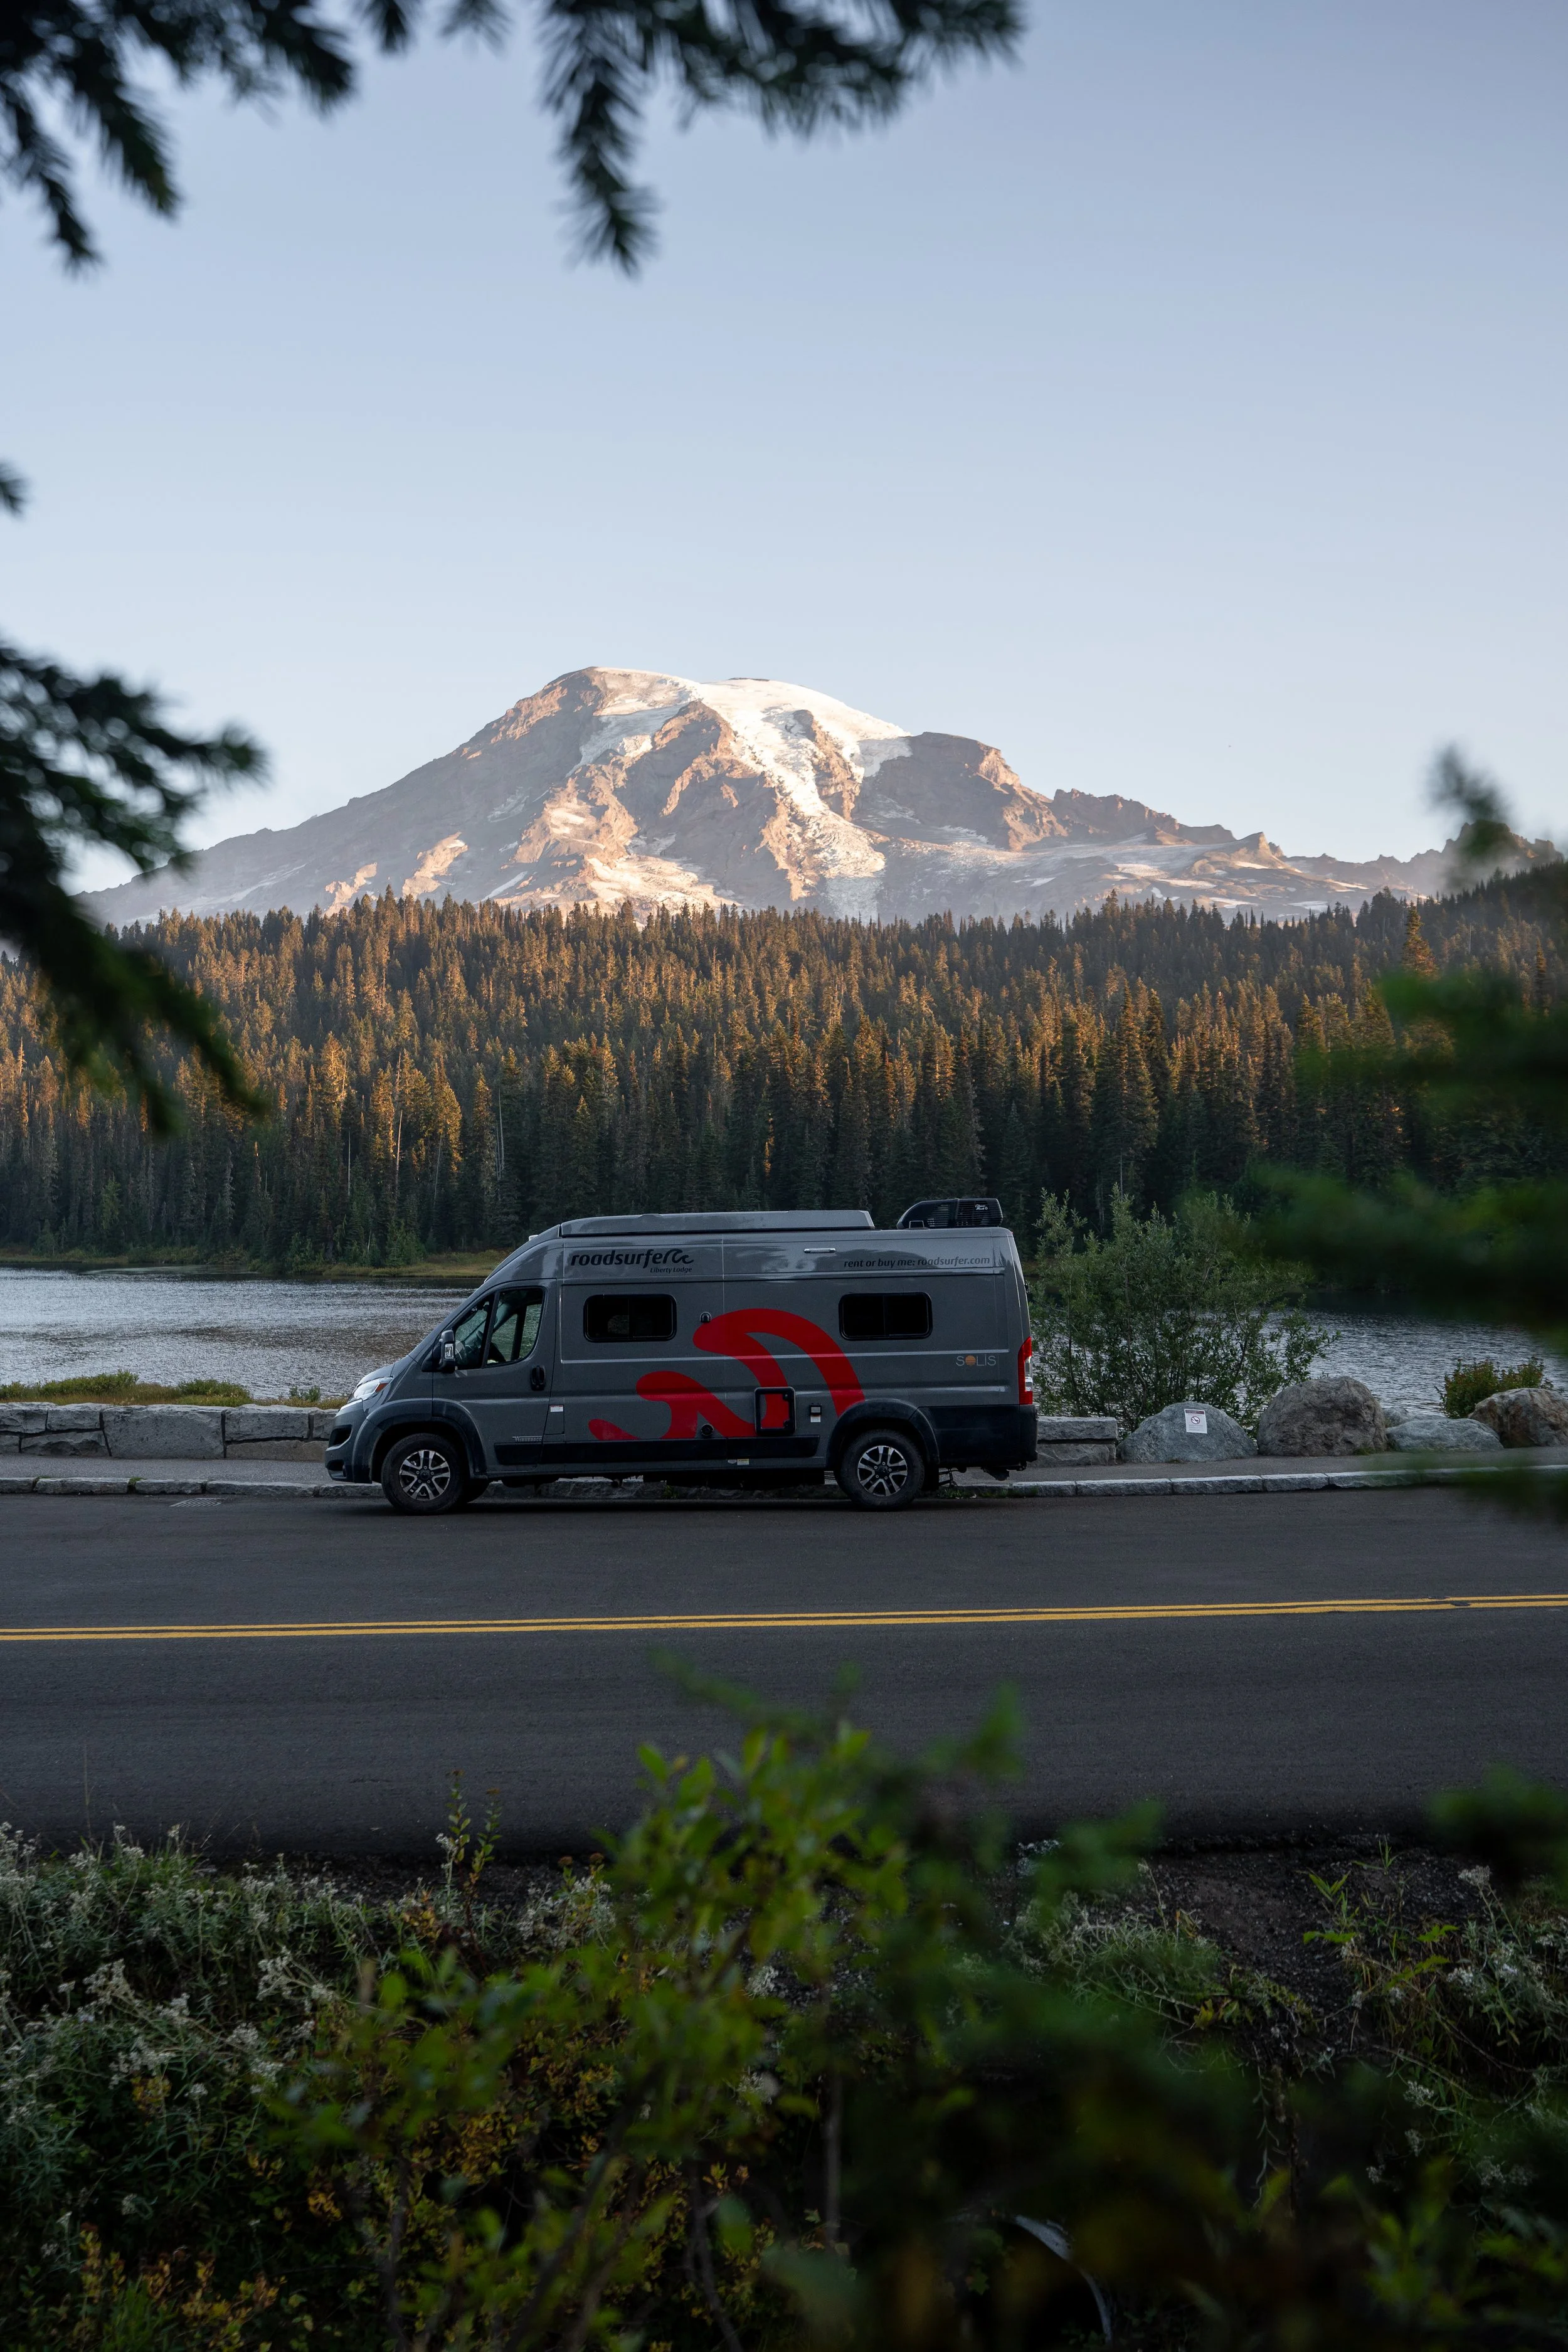
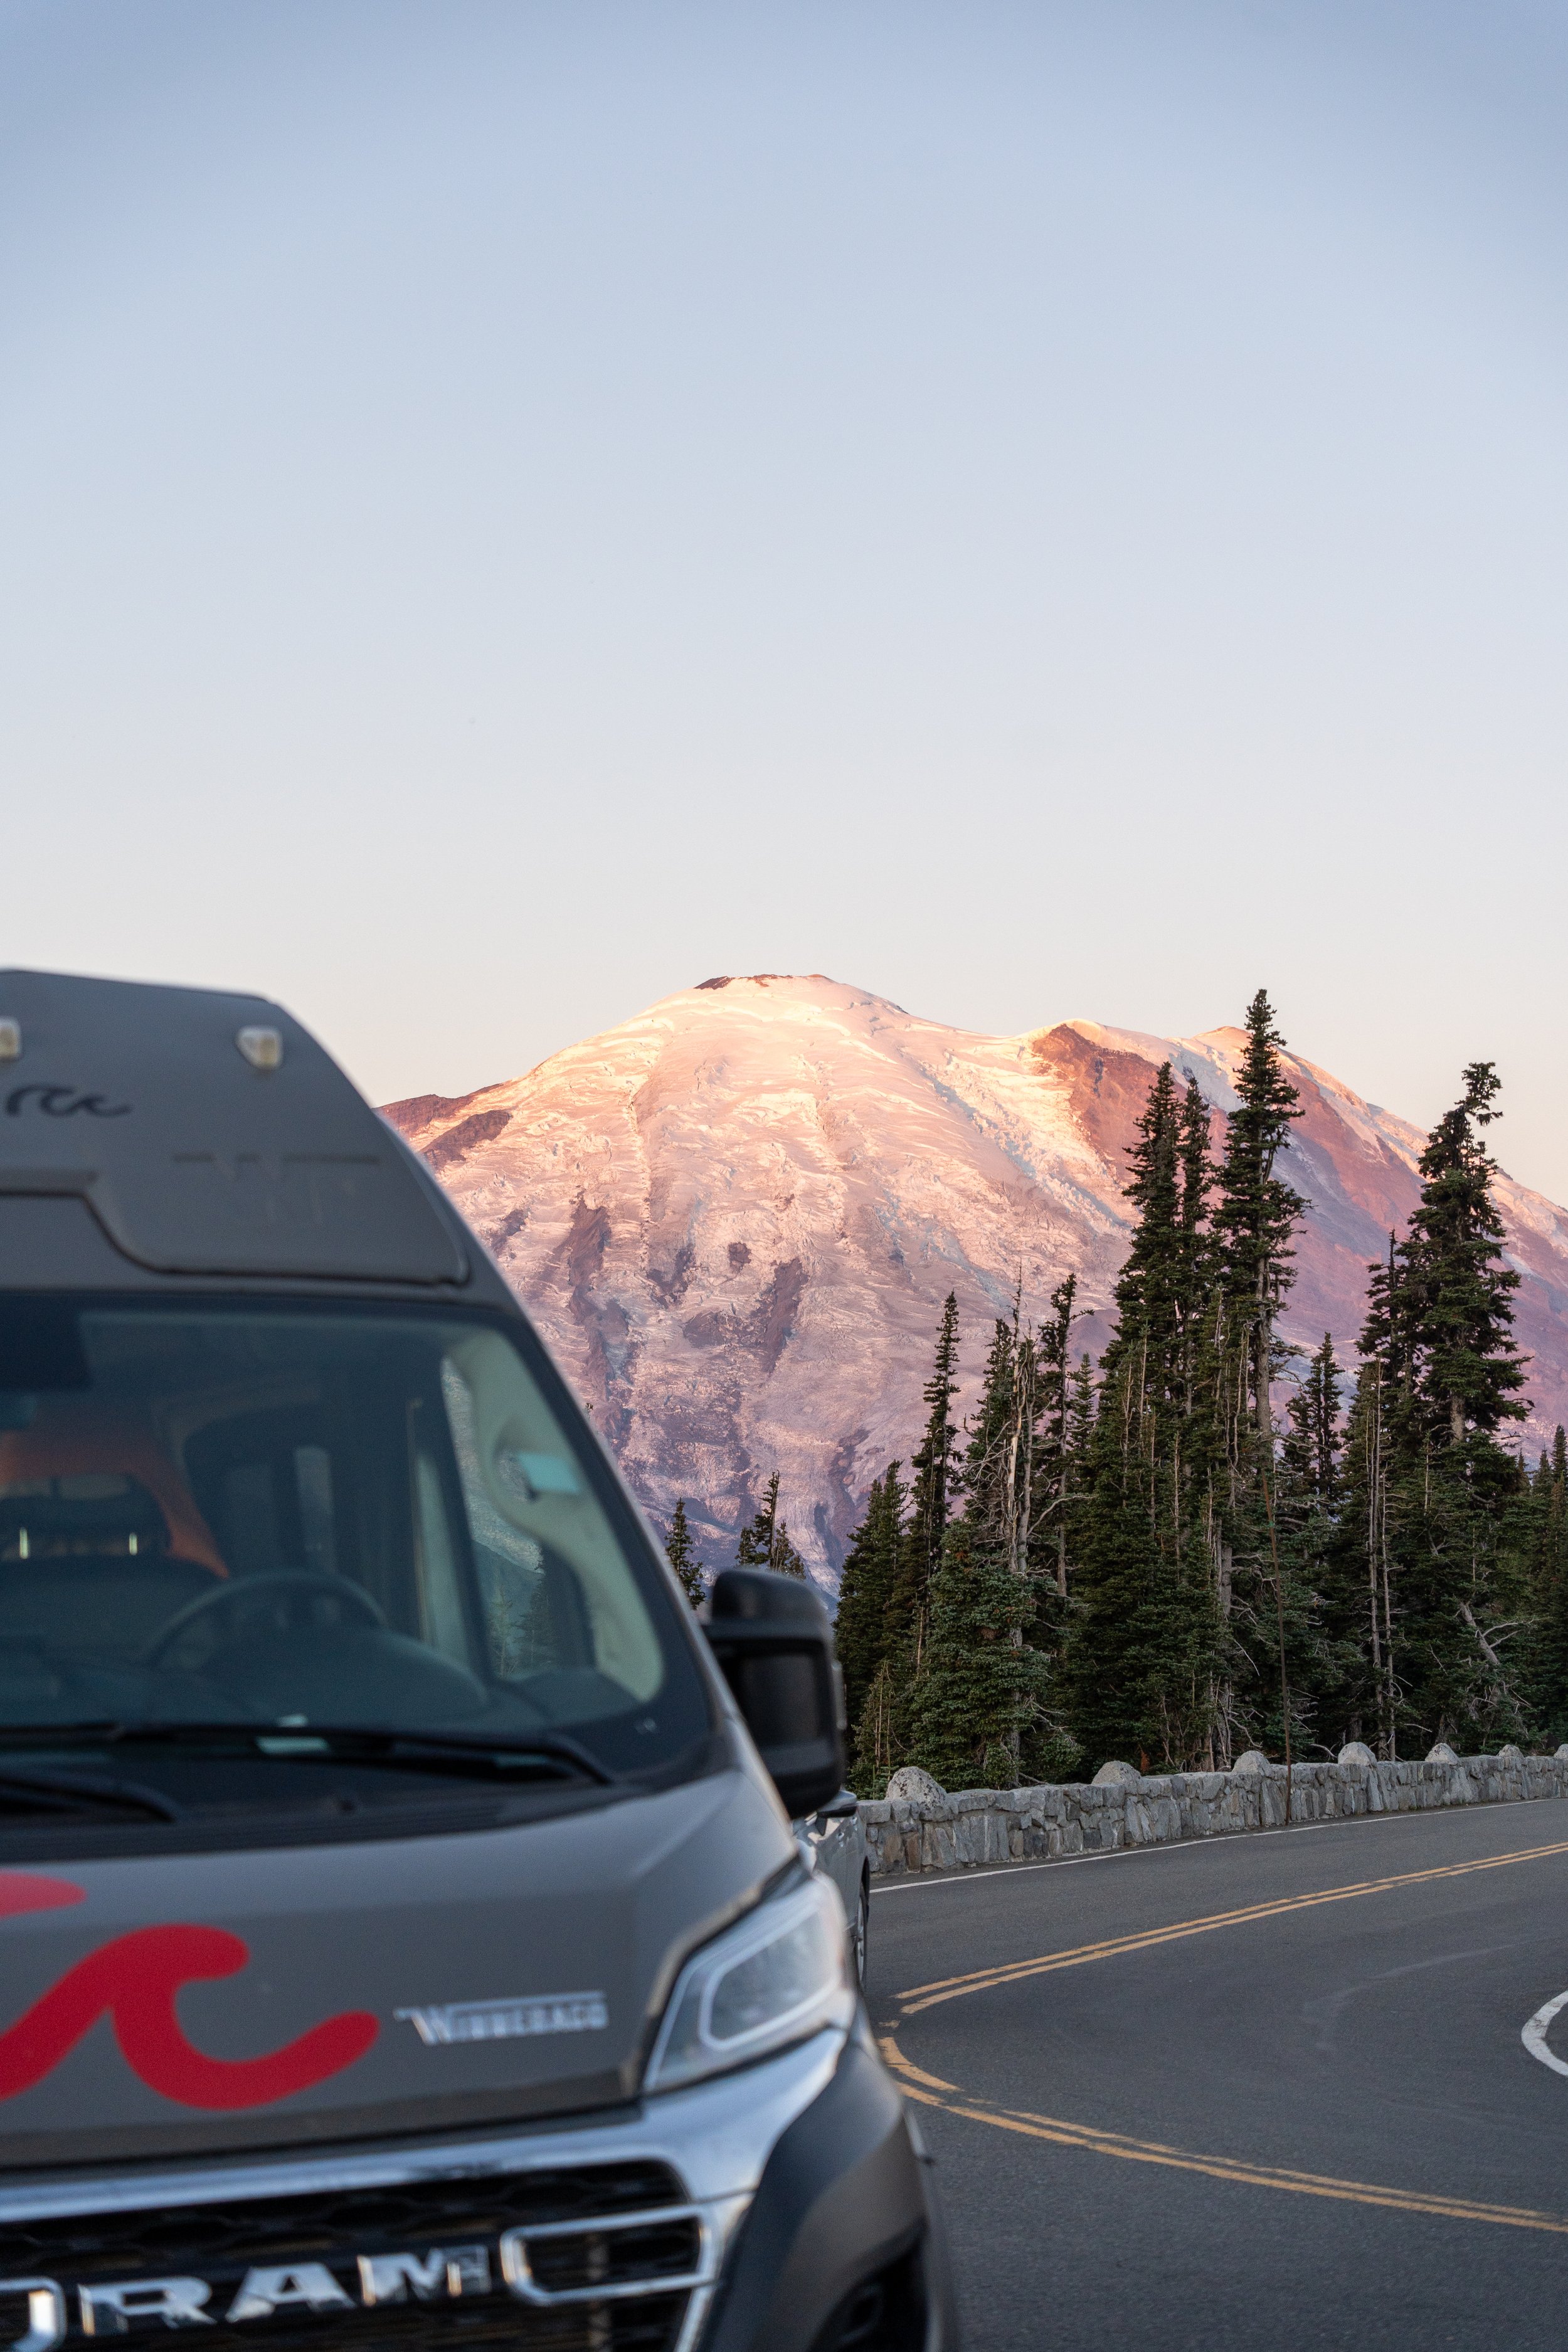
I used Roadsurfer for my trip and would definitely recommend that you do the same.
I have also used them for my road trip from Vancouver to Calgary, in Europe and also in the UK and have been almost faultless on every occasion.
They have recently opened in Seattle and have a fleet of different sized vehicles to choose from. They offer unlimited mileage (The road trip is over 2000 miles), a free second driver, and are pet friendly!
I had a liberty lodge RV ( what I also used in Canada) which is Ram Winnebago Solis.
It was incredibly spacious and it was the perfect companion on our road trip. Not only did it have everything we needed, but it was a please to drive alongside being reasonable size. This meant meaning it wasn’t a hassle to drive and we could park it in normal width space.
I also love that the van was a dark grey and the branding was dark and quite subtle, so much so that I got asked if it was my own van in serval occasions.
The automatic van can seat and sleep up to four people, and had everything we needed for the road trip including;
Two swivel seats alongside two fixed seats and a swivel table.
2 large sleeping areas (In the van and in the pop up roof)
Electricity connection and supply battery
Cruise control, reversing camera, Bluetooth, and Apple and android CarPlay
Spacious kitchenette area with a sink, two stove gas hob, fridge and lots of storage
Wet room a hot water shower and toilet
Parking Air conditioning unit which runs off a generator
Mosquito nets and black out blinds for all windows
Camping chairs, table and kitchen utility box.
Outdoor shower
Pick up in Seattle was incredibly easy, the depot is located a short journey from the airport and can be reached using the tram line. The staff were incredibly friendly and very helpful giving me suggestions for Seattle and the trip in general. The depot also has a help yourself section (including food and kitchen equipment) which other users have left and you can take with you.
The only thing which the van was lacking a proper frying pan, which we ended up buying from a Walmart for $15
You can get a discount on your next booking if you use the code ‘KNIGHT10’ for 10% off your next booking ( Valid until 31/12/25)
-
While you could tick off the highlights in 7-10 days, visiting the highlights of these two states (or just Washington) will require a significant amount of driving. We nearly covered 2,000 miles across 15 days.
The sweet spot for this itinerary is 2–3 weeks, which gives you time to balance driving days with hiking, sightseeing, and downtime.
With two weeks, you can comfortably visit all the main national parks and coastal regions at a relaxed pace. If you have three, you’ll have more flexibility to add rest days, wait out bad weather, or extend the road trip to explore more places in Oregon.
This blog focuses on a two week trip, but I do give suggestions on how to make it both shorter or longer.
-
The best time to visit the Pacific Northwest is between May to October, with each season offering a different experience:
May–June: Quieter and greener, with waterfalls at their fullest from spring melt. Lower-elevation trails are open, but snow can linger at higher passes. A good choice if you prefer lush forests to alpine hikes.
July–September: Peak hiking season. Expect long daylight hours, warm days, and the most reliable weather. Wildflowers bloom in the mountains, and almost every alpine trail is snow-free. This is also peak season for crowds so don’t expect solitude. Wildfires are also incredibly common, so your trip may have to be altered or you might not have the ideal air quality/visibillity.
Late September–October: This offers cooler temperatures and fewer crowds. However the weather can be quite varied, with wildfires still common and a higher chance of rain. Campsites do start to close as well so it can make finding accommodation more difficult. If you are looking for golden larches and autumn colours then early to mid October is the best time to visit.
Winter brings snow and closed passes, so I wouldn’t recommend visiting then.
We visited between the 10th and 25th September and lucked out with the weather.
We had almost two weeks of sunshine, with two mornings of rain across the entire trip. Aside from a foggy morning at Cannon beach and an afternoon and Mount Hood, the weather was almost perfect and we were able to see and do everything we planned.
There were however lots of wildfires, especially in the mountainous areas of Washington.
Because of these I decided to reverse the route, giving them time to calm ( which they thankfully did). The only days where smoke really affected our view was at Colchuck lake (Even then it wasn’t bad) and at on the last day in Mount Pilchuck.
-
You can just as easily rent a car and choose to camp, stay in accommodation along the route, or mix both options.
At first glance, renting a car is often cheaper than hiring a campervan — but your total costs will depend heavily on your sleeping arrangements.
If you're planning to camp, you can bring your own tent or pick one up locally and stay in the many campsites along the way. Expect to pay anywhere from $15 to $40 per night, depending on location and amenities.
That said, accommodation in national parks and remote areas is often limited, expensive, and books out quickly in peak summer. So while a rental car might seem like the budget-friendly choice, costs can quickly add up — especially if you need to book lodges, cabins, or motels last minute.
If you're leaning toward renting a car, I recommend using Discover Cars.
They compare a wide range of providers ( both local and international) and often have the best deals for road trips like this.

Things to know and do before you depart
-
Because you’ll visit multiple National Parks, national forests, and state parks on your road trip, it’s helpful to know which passes cover what.
America the Beautiful Pass ($80 Annual / $30 daily): Covers entry to all U.S. national parks and most federal recreation areas, including trailheads in national forests. It effectively replaces the Northwest Forest Pass for this route.
Northwest Forest Pass ($30 / annual): Required at some trailheads managed by the U.S. Forest Service if you don’t have the America the Beautiful Pass.
Discover Pass ($45 annual / $10 daily): Needed for parking at Washington State Parks and Department of Natural Resources (DNR) lands. You’ll only use it if you plan to visit state park sites such as Snoqualmie Falls.
Oregon State Parks Day-Use Fee: Some Oregon parks, including Silver Falls, charge a $10–12 daily parking fee (campers staying overnight are exempt).
I recommended just buying the annual America the Beautiful Pass.
It will not only cover almost everything in this itinerary but will save you money as you will most likely spend more than 3 days in national parks. There’s no need to pre-order it, as you can buy it on entry to any national park or at the visitor centre. For a full guide on park fees, see the Washington Trails Association article on passes.
Skip the Northwest Forest pass and Discover Pass as and just pay Oregon’s day-use fees when needed.
-
As of 2025, a timed-entry reservation is required to access both the Sunrise and Paradise Corridors between 7 a.m. and 5 p.m. This system helps manage peak season crowds and applies during the following windows:
Daily: July 11 – September 1
Weekends and holidays only: September 2 – October 5
Reservations are required for each vehicle and can be booked through Recreation.gov. If your trip includes a visit to Sunrise or Paradise during these dates, it’s worth reserving your pass as early as possible to avoid disappointment.
You can access Sunrise or Paradise without a reservation if you:
Enter on foot or by bicycle
Enter by vehicle or motorcycle before 7 a.m. or after 5 p.m.
Have a camping reservation at White River Campground*
* White River Campground is first-come, first-served. You can enter the campground before 7 a.m. or after 5 p.m. without a timed-entry reservation. However, if you arrive between 7 a.m. and 5 p.m., a reservation is required.
Timed-entry reservations do not guarantee a campsite, but once you've secured a site, your camping permit allows re-entry to the Sunrise Corridor throughout your stay
-
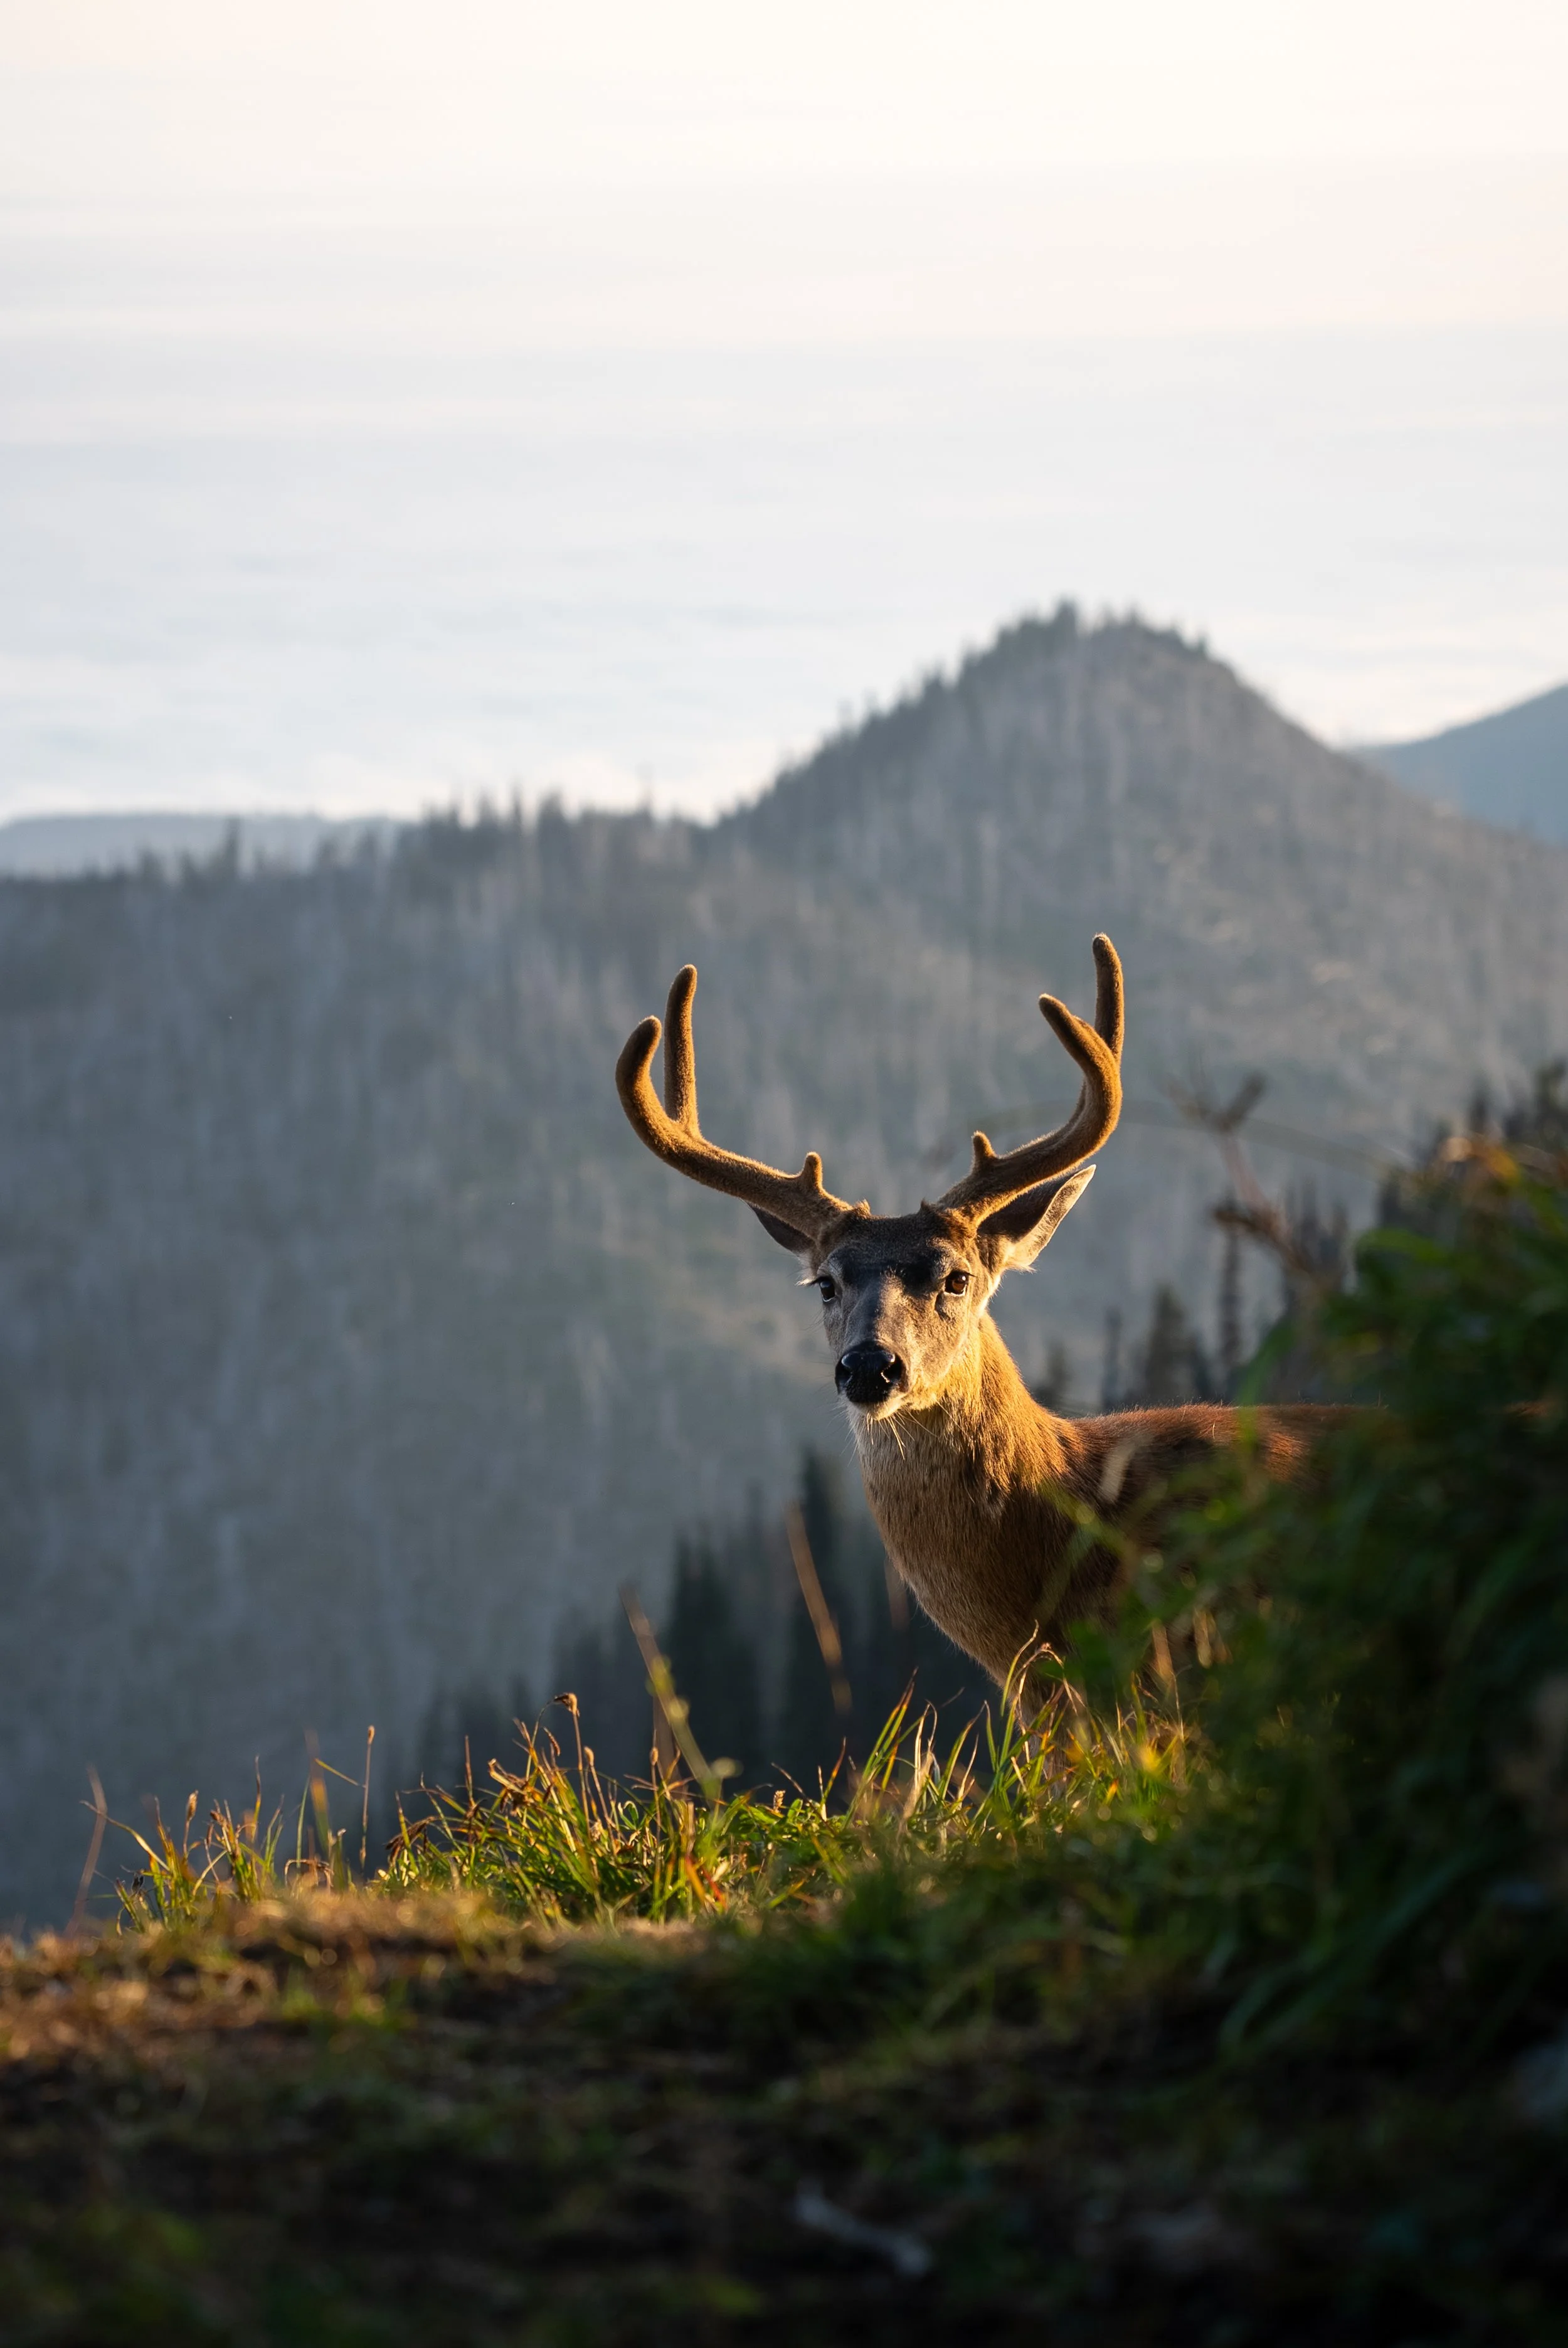
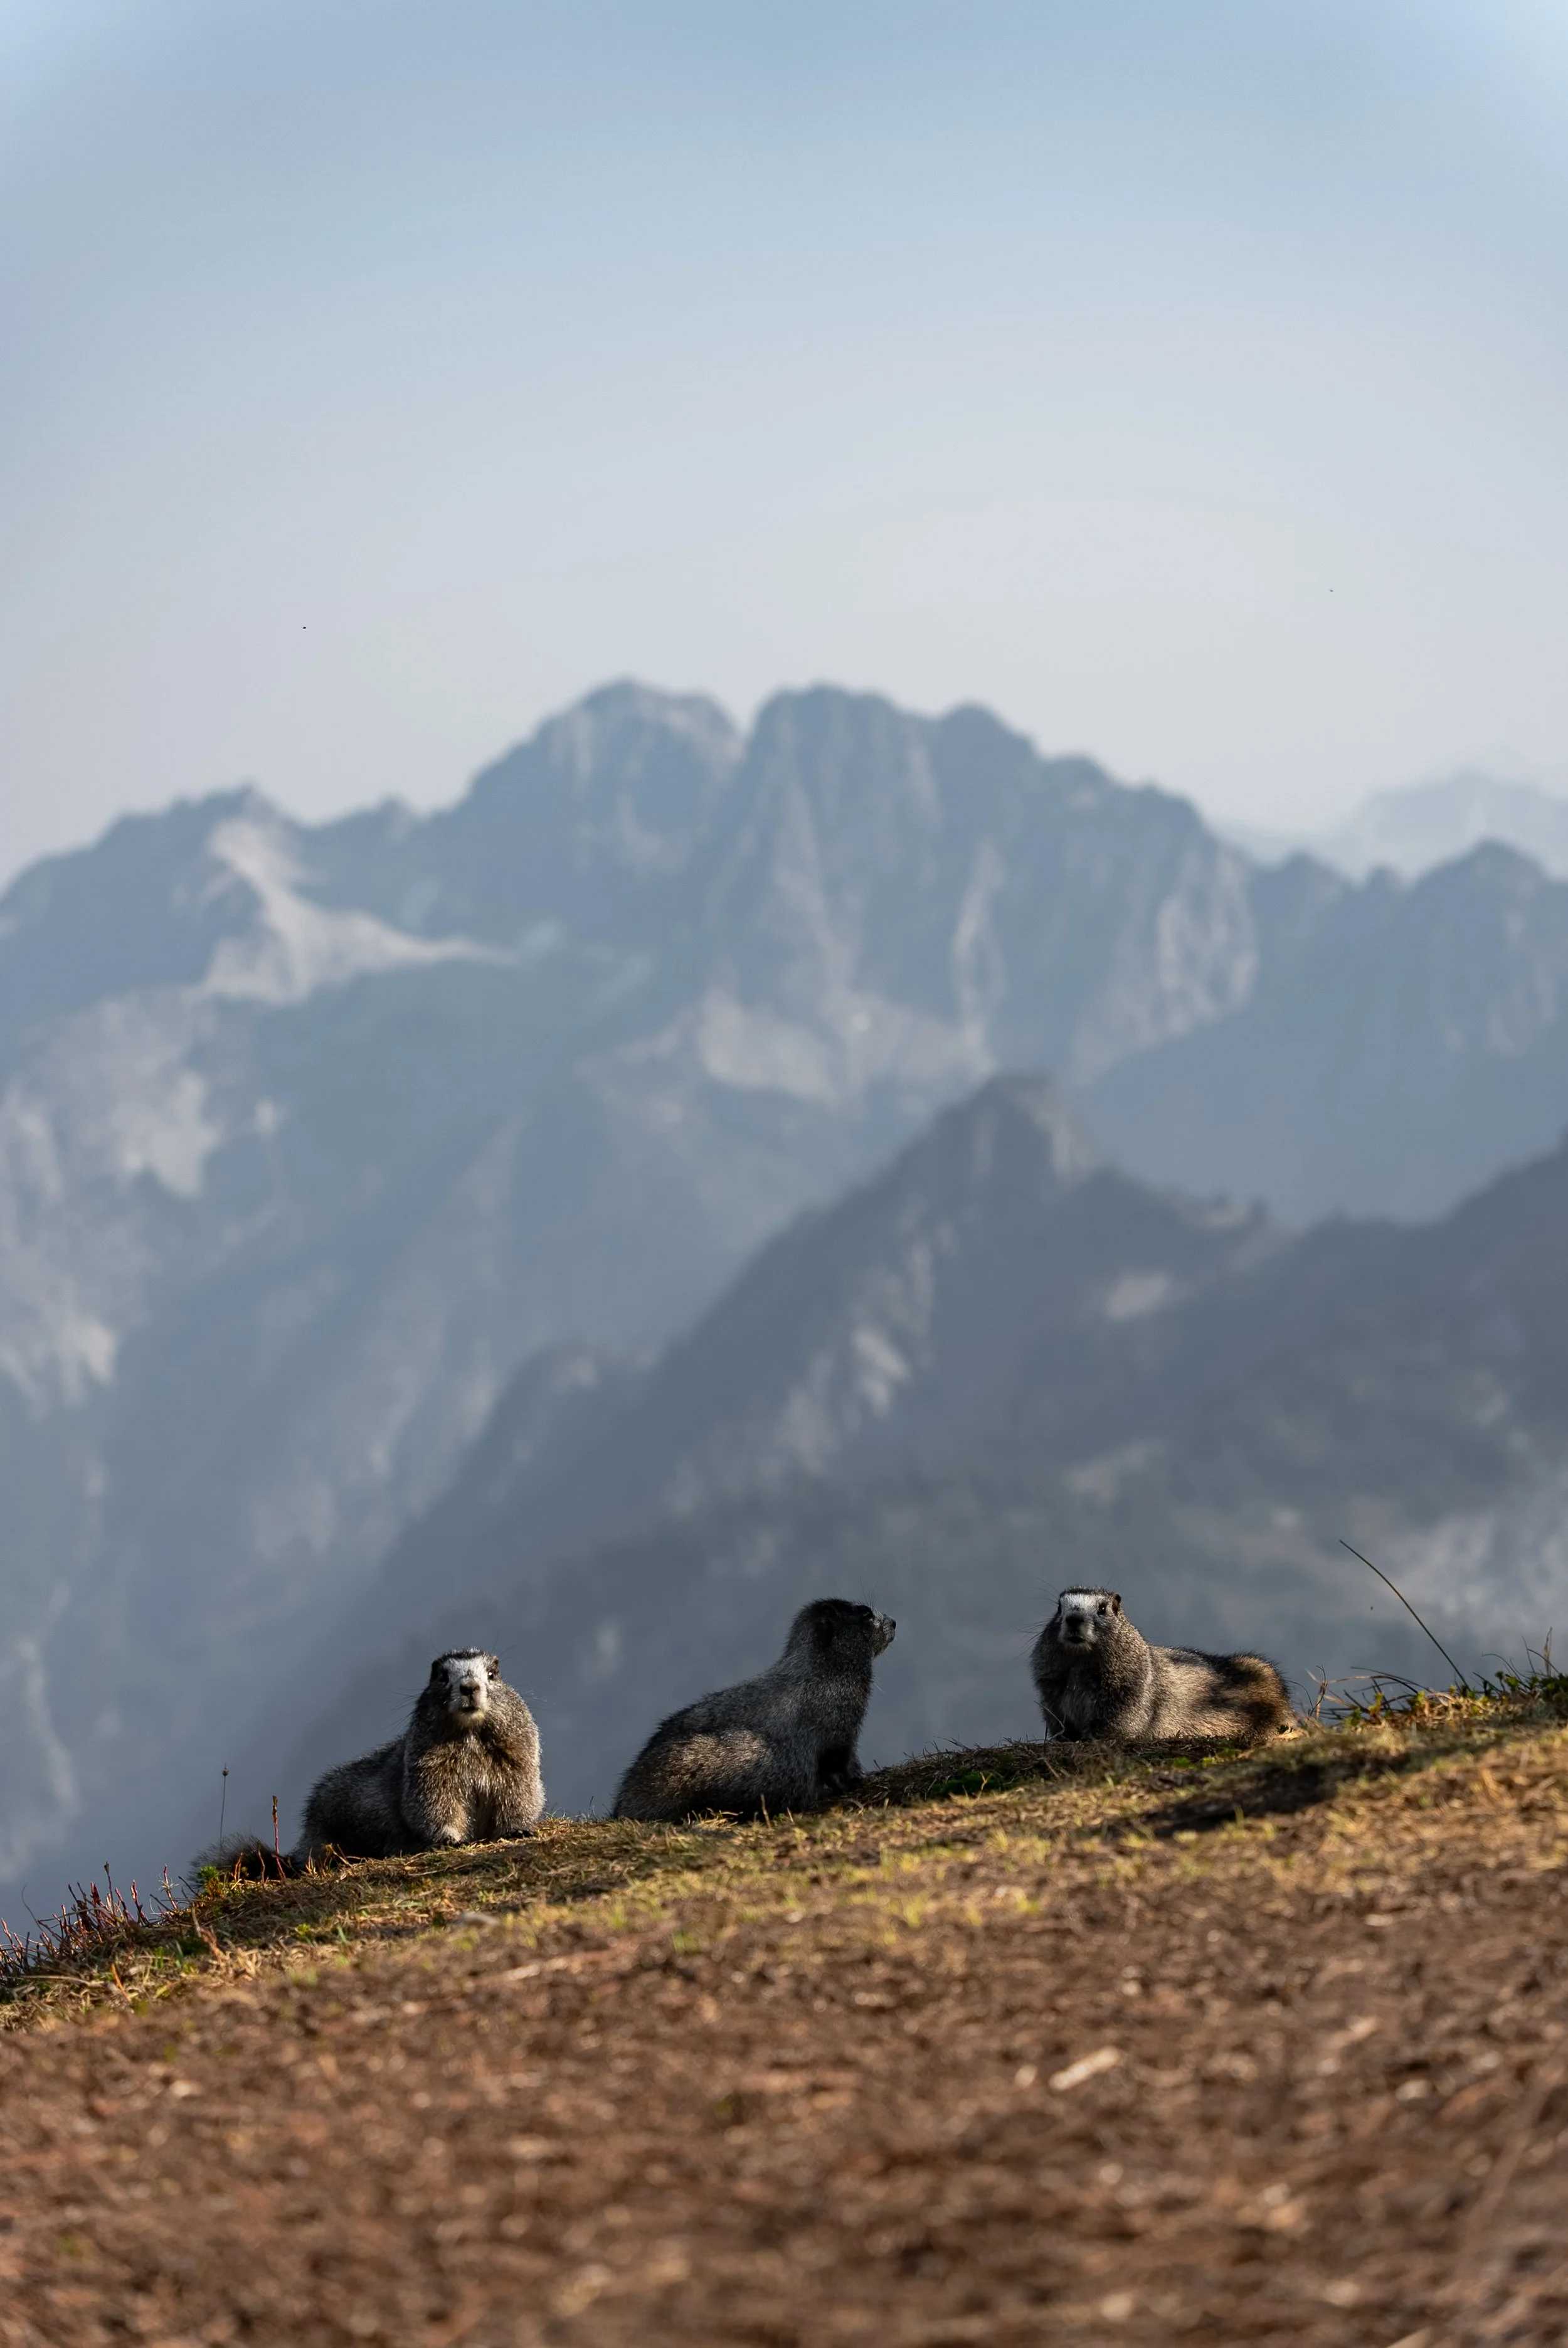
The Pacific Northwest is home to black bears, deer, elk, and mountain goats
Bears are generally shy, we saw one at Sahale arm in the North cascades and it was only interested in berries. Keep a clean camp, store all food in bear boxes where available, and never leave food unattended in vehicles or tents.
Mosquitoes can be intense near lakes (especially early summer), so pack repellent and consider a lightweight bug net if camping.
Ticks are rare but possible, do a quick check after hiking through grassy areas.
-
Driving in the Pacific Northwest is straightforward. Vehicles drive on the right-hand side of the road, and the majority of routes are clearly marked and well maintained. You’ll encounter a mix of scenic coastal highways, winding forest roads, and mountain passes.
A 4x4 or SUV is useful (but not essential) for reaching some trailheads that are located deep on gravel forest service roads, especially in places like Mount Baker, the North Cascades, and certain access points in the Olympic Peninsula.
We completed the entire route in a standard campervan and managed just fine, although we did have to take it slow on a few rough sections.
Always check for road closures or delays if you're heading into forested or alpine areas. Snow, landslides, or fire conditions can temporarily block access. Road works are also common in the shoulder seasons and affected us on numerous occasions.
The most frustrating was the (now completed) roadworks in Mount Rainier. We couldn’t make the 70 minute drive between Paradise and sunrise, instead we had to do a 4 hour detour up and round the entire national park
-
Before heading into remote areas, it’s a good idea to stock up on groceries and essentials in larger towns. Once you're in the mountains, grocery options are very limited and are often reduced to small convenience stores or expensive general shops with basic supplies.
Major resupply points along the route include: Port Angeles, Aberdeen, Astoria, Tillamook, Hood River, Enumclaw, Leavenworth, Wenatchee, Bellingham, and Seattle.
These towns usually have at least one large supermarket or wholesale option, so plan ahead and make the most of them when passing through.Stores worth bookmarking
Fred Meyer – A mid-range supermarket with good-quality fresh produce and in-store counters. It’s more expensive than others, but great for fresh food. We abused the in store sushi counter which was incredible. On Wednesdays they offer $6 rolls so it’s well worth going just for that.
Walmart – The best option for bulk buys and affordable pricing. You’ll find everything from produce and dry goods to household items and camping gear. Not fancy, but incredibly practical.
Top tip: If you’re planning to cook most of your meals on the road, stock up on versatile pantry items like oats, pasta, canned beans, and spices early on — some smaller towns don’t have much variety.
-
If you're traveling between June and October, it’s essential to monitor wildfire activity. Wildfires are common in the Pacific Northwest and can significantly affect your trip. (They caused us to change the direction of our road trip at the last moment). They can often lead to;
Poor air quality and low visibility
Road or trail closures
Full region evacuations or detours
Useful resources for up-to-date wildfire information include:
Map of Fire (great for visualising active burn areas)
Stay flexible and prepared to change your route or skip a destination altogether if conditions worsen.
-
If you're traveling during summer or holiday weekends, book your campsites as far in advance as possible. National Parks like Olympic, Mount Rainier, and Crater Lake are extremely popular and can book out weeks ahead, especially on Fridays and Saturdays.
Reservations can be made at Recreation.gov, which covers most U.S. National Park campgrounds.
If you prefer flexibility, try to at least secure bookings for weekends, as It will take a huge amount of pressure off your route planning.
If you dont want to pre-book, seek out first come first served campsites and try to get there as early as possible.
If you are struggling for accommodation, go and speak to the Rangers on duty. They will do their best to help find you a campsite or a place to stay. Some campsites offer up no shows after a certain time ( we got lucky with this at Silver state on a Saturday).
-
Mobile signal is unreliable in many areas of this trip, particularly in the mountains of Washington. While you can download offline maps in Google Maps, I also highly recommend Maps.me. This free navigation app allows you to download entire regions for offline use.
This is a free mapping service which allows you download entire regions for offline use. The app will show and allow you to search for toilets, fuel, places to eat, supermarkets, points of interest, mountains, alongside hiking trails. It also will allow you to navigate from place to place using vehicles and by foot. I have used it all over the world. It is particularly useful for hiking as it shows contour lines, hiking trails, viewpoints, and mountain peaks.
-
Even if you’re traveling in an RV or campervan, having a lightweight tent and basic camping gear gives you much more flexibility. It opens up the option to stay at backcountry campsites, and provides a backup if all traditional campgrounds are full. It also allows you to explore places where vehicle access isn’t possible, such as high alpine trails or hike-in-only wilderness zones.

Where to Stay on Your PNW Road Trip
Traveling through Washington and Oregon in a campervan offers a range of overnight options, from scenic park campgrounds to off-grid forest clearings. But knowing where you can actually sleep in your van (legally and comfortably) can get a little confusing as rules change depending on where you are.
In general, national and state parks require you to stay in designated campgrounds if you're in a vehicle. That means no pulling over at a trailhead or scenic overlook and calling it a night. Campgrounds typically charge between $20–$40 per night, depending on amenities and location. Outside of these protected areas, however, the rules loosen up and there are some fantastic opportunities for free camping, especially if you’re self-contained.
For the 11/15 nights of our PNW road trip, we stayed in our Roadsurfer campervan. Most nights were spent either in developed campgrounds or dispersed sites in national forests.
That said, we did treat ourselves to three nights of accommodation to break up the van life to recharge, do laundry, and celebrate our anniversary. On top of that, we spent one night at a Walmart parking lot ( classy but a last resort).
-
Before setting off on your Pacific Northwest road trip, I highly recommend downloading the following two camping apps. Both were absolutely invaluable during our journey, especially in offline mode when we didn’t have signal in the mountains or deep forest roads.
🏕️ The Dyrt
An all-in-one campground finder with over 500,000 listings across the U.S., The Dyrt is one of the best tools for planning and adjusting your camping itinerary. The free version gives you access to campground reviews, photos, site descriptions, and user tips. Dyrt PRO (about $36/year) offers
Offline maps
Public land overlays to show where BLM and USFS land begins (ideal for free camping)
Trip planning tools to map out your route
Camping discounts at hundreds of sites
Offline access alone saved us more than once in Washington’s backcountry. Even better, they offer a 30-day free trial of PRO, so you can use the full version just for your trip if you like.
🗺️ iOverlander 2.0
While The Dyrt focuses on campgrounds (paid and free), iOverlander is all about the real nitty-gritty road trip life. It’s a community-driven map of dispersed campsites, informal overnight spots, water fill stations, dump stations, and all sorts of other helpful resources for vanlifers and overlanders.
The info honest, and super practical, often updated by fellow travelers and even park officials. We found some amazing free pull-outs and dispersed spots through this app that weren’t listed anywhere else.
The free version lets you:
See user-submitted campsites (including photos, comments, and GPS coords)
Download one region at a time for offline access
The Pro version (around $6/month or $60/year) lets you download multiple offline regions and removes ads.
🧠 Tip: If there are two of you on this road trip and you want to save some money, split the regions, one person downloads Washington, the other Oregon. We did this and it worked perfectly.
-
Camping inside national parks like Olympic, Mount Rainier, North Cascades, or Crater Lake means using official campgrounds or backpacking zones. Vehicle camping is only allowed in designated campgrounds, meaning no sleeping overnight in pullouts, trailheads, or picnic areas. These campgrounds usually come with the basics: picnic tables, fire rings, restrooms (sometimes flush, sometimes vault), and bear-proof food storage.
Most sites cost between $20 and $35 per night, with RV hookups costing more (up to $50 or more in some locations). Reservations are strongly recommended, especially during summer, and can be made through Recreation.gov. Many of the most popular campgrounds open bookings six months in advance, and prime weekends can book out almost immediately.
Don’t forget that park entrance fees are separate. Most parks charge $30 per vehicle for a 7-day pass, though if you're visiting multiple parks, consider buying the $80 America the Beautiful pass, which covers entry to all U.S. national parks and federal lands for a year.
If you’re hoping for a spot without a reservation, some parks hold a few first-come, first-served sites, but get there early, and have a backup plan nearby.
-
Washington and Oregon state parks offer beautiful, well-maintained campgrounds that often include extra amenities like hot showers, flush toilets, and utility hookups.
Washington: In peak summer (mid-May to mid-September), a standard tent or van site generally costs $30–$40 per night. RV sites with hookups run higher. You’ll also need a Discover Pass for day-use access ($10/day or $45/year), though your camping reservation covers that for the nights you’re booked. Campsite reservations can be made through Washington.GoingToCamp.com, and they do recommend booking ahead for summer weekends.
Oregon: Slightly cheaper overall, Oregon State Parks charge about $20–$30 per night for basic sites, though there’s a surcharge for non-residents (usually around 25% more). Starting in 2025, Oregon began raising fees at its most popular parks during peak season, so expect rates closer to $30+ at places like Silver Falls or Fort Stevens. Book your stay at stateparks.oregon.gov. Day-use parking fees are now standard at many Oregon parks, around $10, but again, they’re included when you have a camping reservation.
Both states offer excellent access to nature, and state parks are especially handy when you want a night with solid amenities.
We stayed in the one at Silver Falls State Park in Oregon and it was excellent.
-
Dispersed Camping (Free Camping)
One of the absolute highlights of a road trip through the Pacific Northwest is the abundance of free camping on public lands — especially in National Forests and Bureau of Land Management (BLM) areas. This is called “dispersed camping,” and it allows you to camp outside of developed campgrounds, usually with no amenities and no fees.
We had some of our most peaceful nights parked down gravel roads in national forests. surrounded by trees, stars, and not much else. Some of our favorites were in Mount Baker–Snoqualmie and Olympic National Forests in Washington, and in Deschutes and Willamette National Forests in Oregon.
Key rules to follow:
Camp at least 100 feet away from water sources
Stay a maximum of 14 days in one location, then move at least 25 miles away
No toilets, trash bins, or water — pack everything out
Check for fire bans, especially in summer (propane stoves are often still allowed)
Use existing pullouts or clearings with stone fire rings, and avoid damaging vegetation. Practice Leave No Trace,
-
If you’re planning to go off-grid and backpack into the wilderness, you'll need to understand the permit systems in place for both national parks and designated wilderness areas in national forests.
National Parks: Overnight backcountry camping in Olympic, Rainier, North Cascades, and Crater Lake all require permits. These can be competitive, especially for bucket-list routes like the Wonderland Trail or the Olympic coast. Many parks use a lottery or timed-release system via Recreation.gov, with some permits available for walk-ins a day or two in advance.
Wilderness Areas: Popular spots like the Enchantments (WA) or Three Sisters (OR) require advance permits due to crowding, often allocated via lottery in late winter. Less trafficked wilderness areas often just require a free, self-issued trailhead permit. Rules vary, so always check the specific area's website.
Regardless of where you go, come prepared with proper gear, food storage, and safety knowledge. A bear canister may be required, and Leave No Trace ethics are essential.
-
Last-Resort Overnight Options
Sometimes you arrive late, everything’s full, or you just need a place to crash for the night. These aren’t glamorous, but they can be lifesavers:
Rest Areas: Legal in both WA (8 hours) and OR (12 hours) for sleeping in your vehicle. Tents are not permitted
Truck Stops: Chains like Flying J and Love’s allow overnight parking. Use designated areas, don’t take trucker spots, and check with staff if unsure. these usually offer 24-hour bathrooms, coffee, and sometimes showers.
Visitor Centers: Some small-town or highway visitor centers allow overnight parking. Always read signs or ask if open.
Walmart and Retail Stores: Some locations allow overnight stays. Just make sure to check the signs or to ask at the customer service desk. Park at the edge, avoid setting up camp, and try to support the store.
Casinos: Some offer free RV parking, with optional check-in at security. These are often well-lit and monitored.
If you use these options, arrive late, leave early, and keep things tidy. They’re not meant to be campgrounds. just safe places to rest when you need a night between destinations.

My two week ROAD TRIP
Below is the route we followed through Washington and Oregon. I’ve included detailed breakdowns for each destination, from the must-see highlights and scenic drives to optional detours, estimated driving distances, and alternative places to stay.
Where relevant, I’ve also shared what we personally did, including stops we loved, places we skipped, and what I’d do differently next time.
It’s worth noting that we ended up reversing our original route at the last minute. This threw off some of my driving time estimates and accommodation plans, and as a result, we made a few mistakes — including a couple of late-night drives I wouldn’t recommend. I’ve corrected these in my suggestions throughout the blog to help you avoid the same hiccups.
Route at a Glance
Olympic National Park, Washington
Olympic National Park, Washington
Northern Oregon Coast
Silver State Park, Oregon
Columbia River Gorge, Oregon
Paradise, Mount Rainier National Park, Washington
Sunrise, Mount Rainier National Park, Washington
Okanogan–Wenatchee National Forest, Washington
North Cascades, Washington
North Cascades, Washington
Mount Baker, Washington
Mount Baker, Washington
Snoqualmie National Forest, Washington
Seattle, Washington

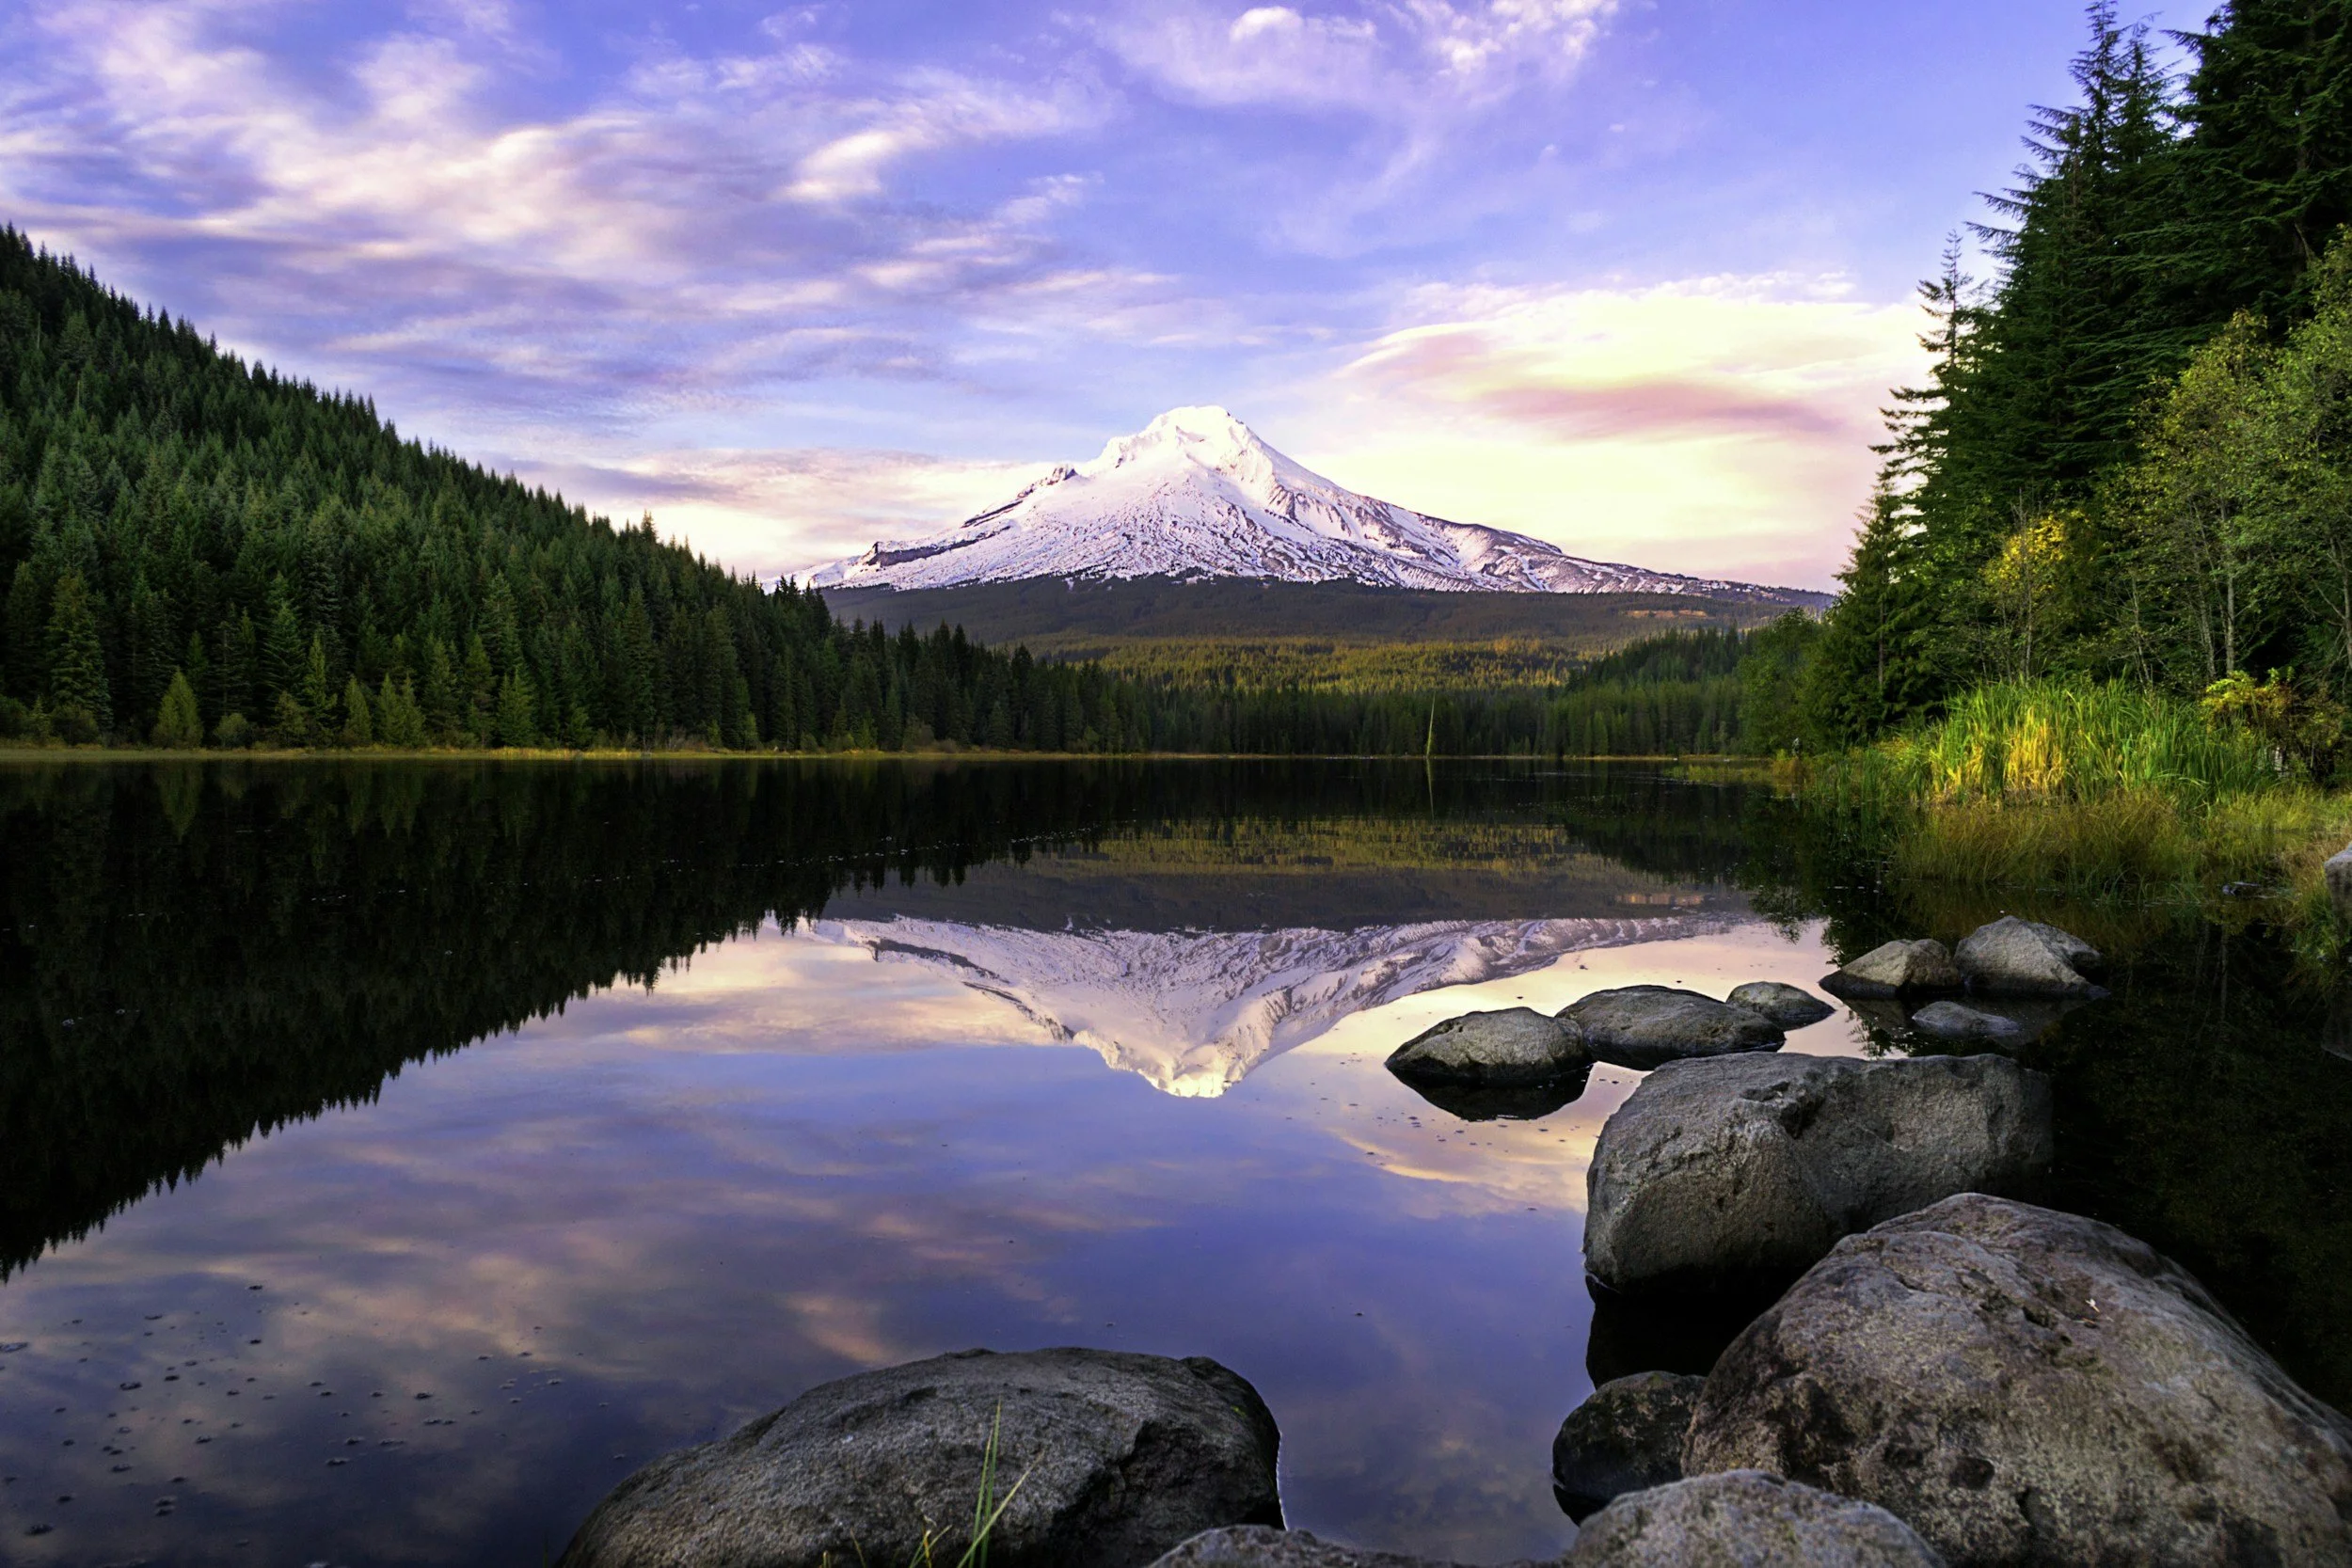
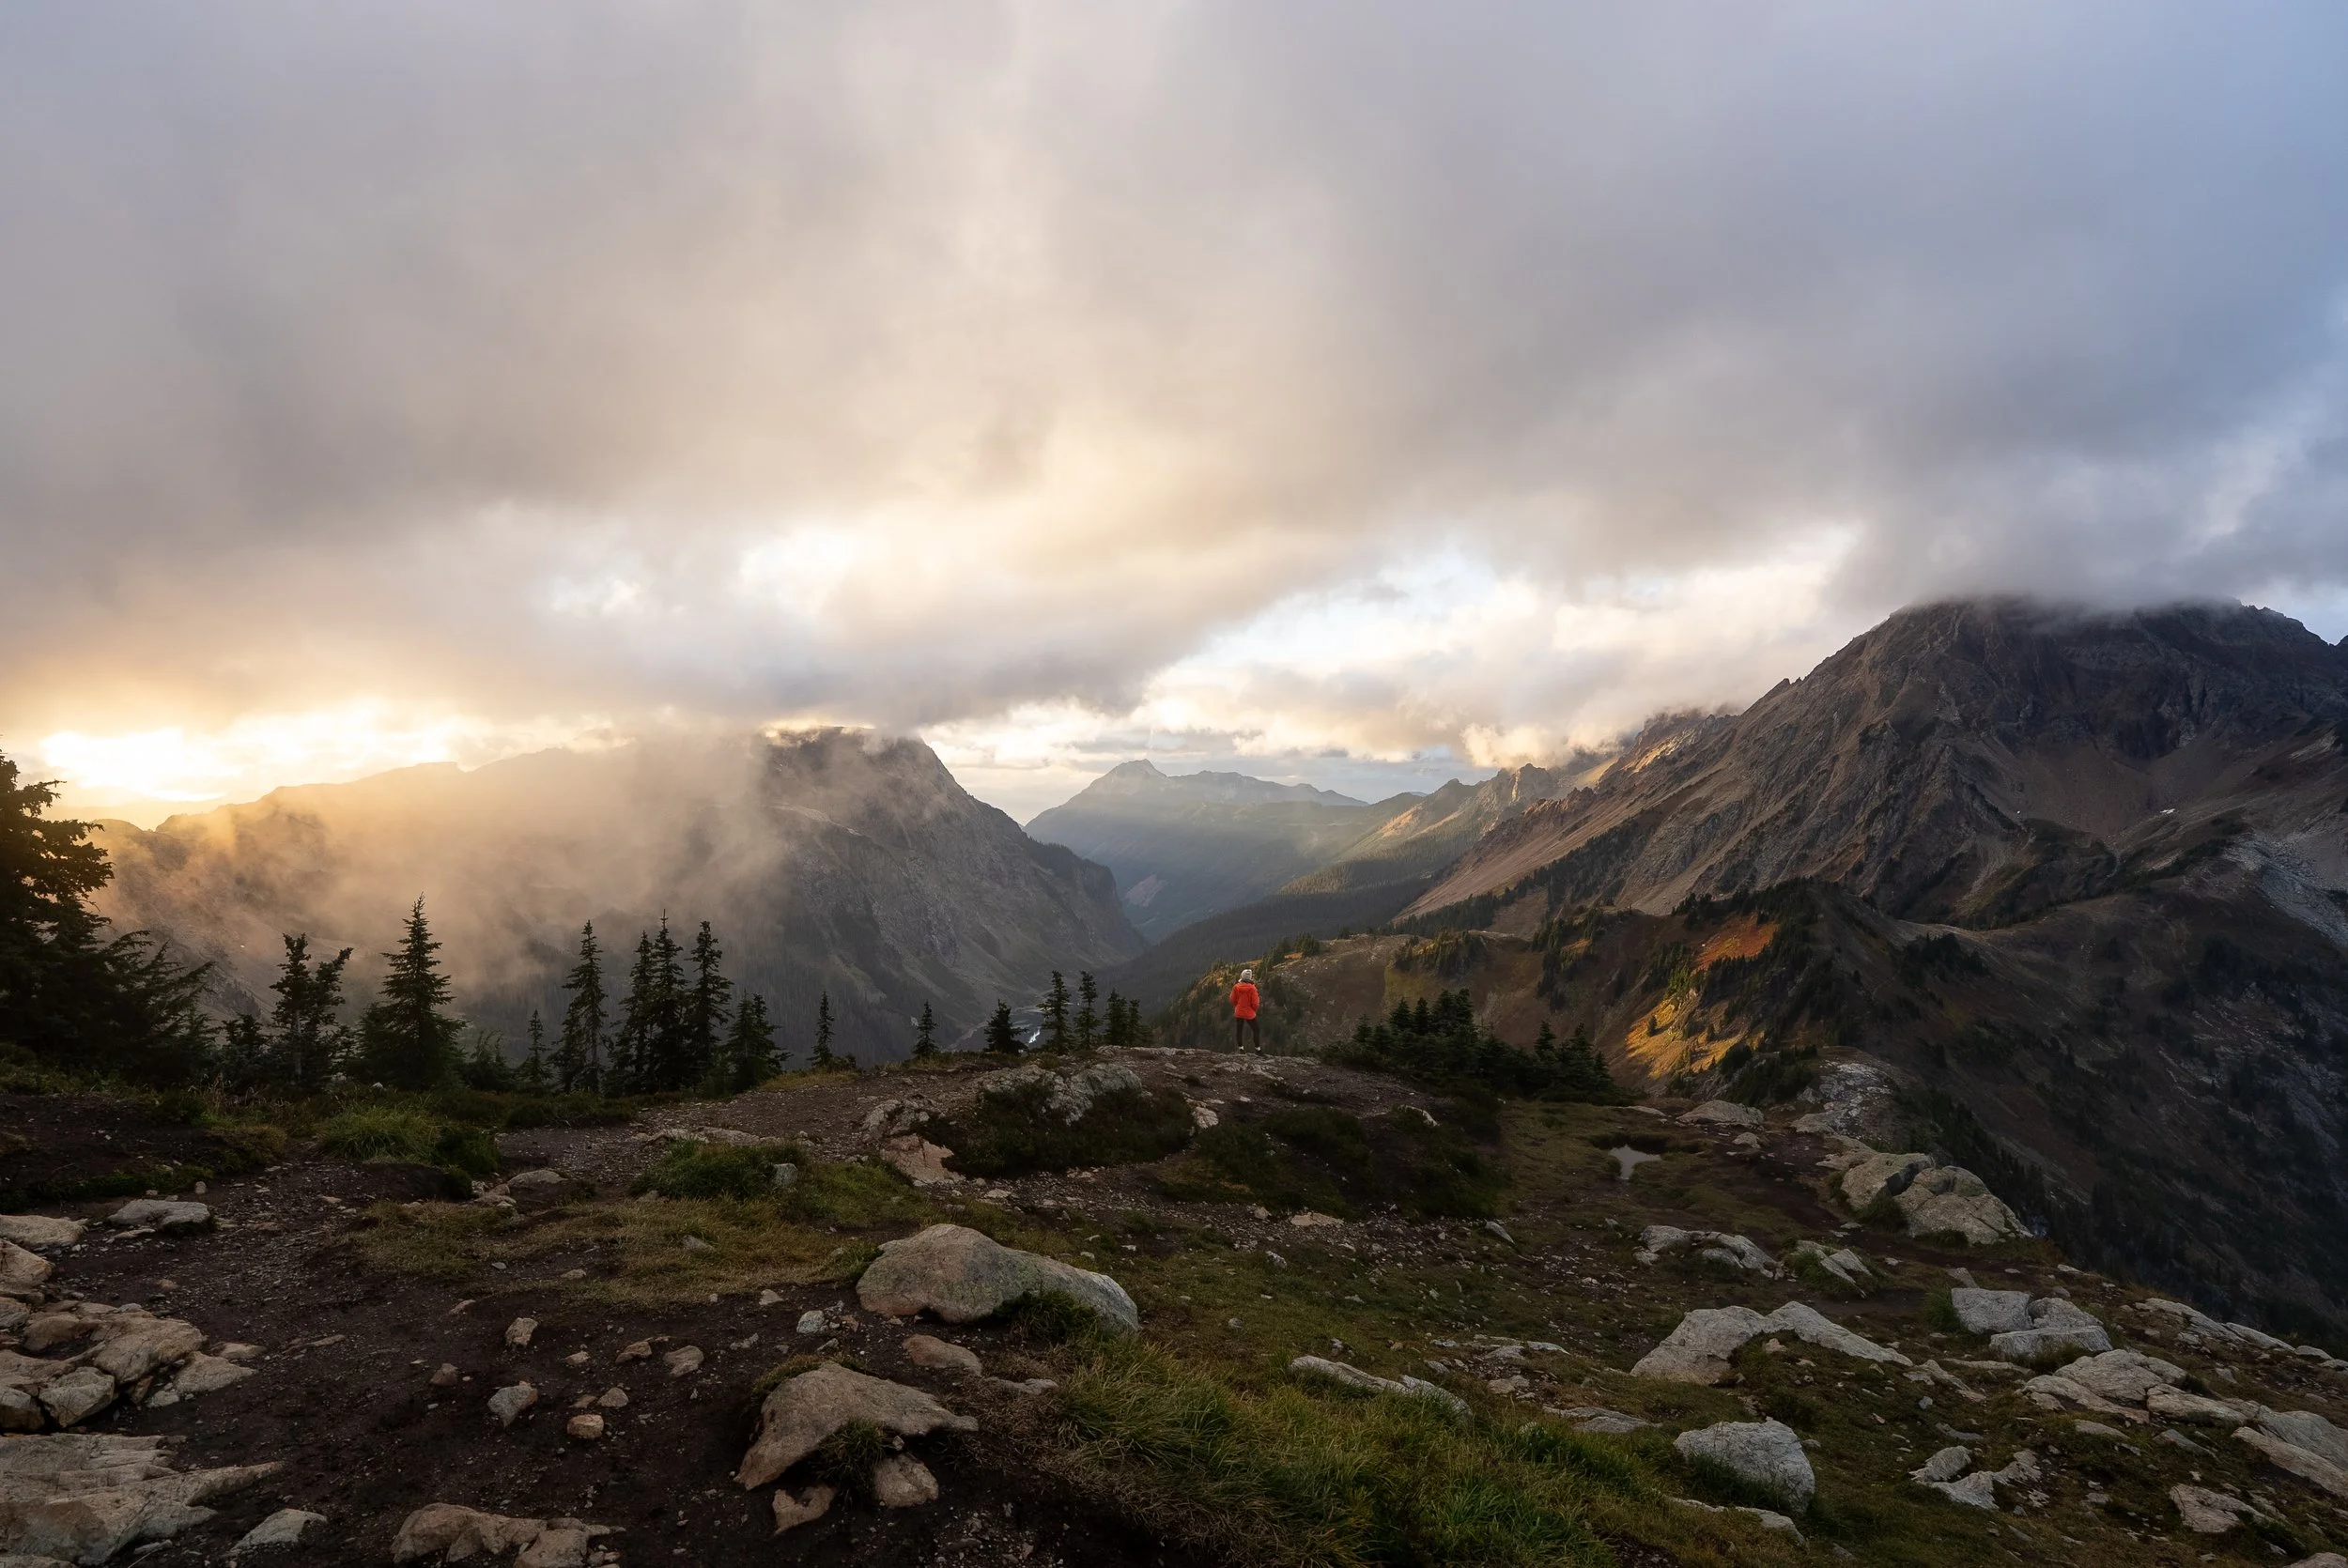
Days 1 & 2: Olympic National Park
The first two days of this trip are all about exploring the incredible Olympic National Park. I’d describe it as a mini version of the entire Pacific Northwest as its home to snow-capped mountains, lush mossy forests, alpine lakes, waterfalls, and wild coastline. It’s a great introduction to the region’s diversity and a brilliant way to get your legs moving and the endorphins flowing after the journey to Washington. Whether you’re heading on a hike, chasing waterfalls, or soaking in the endless views, Olympic sets the tone for the adventure ahead.
Must do and see
Forks - The rainy town made famous by Twilight. While it heavily leans into its vampire fame, it’s also a practical base and stopping point for the western side of Olympic. The novelty of it all was also quite funny (there was actually a Twilight festival there when we were passing) and my wife made sure we drove past Bella’s old house.
Hurricane Hill: A great hike for all ages and abilities, it is paved the entire way, offers incredible views and the chance to see wildlife. I would look to do this for sunrise or sunset for the best experience.
Hike Details: 5.5km / 252m / Easy / 2-3 hours / All trails

Mount Storm King - One of the park’s most iconic (and most leg-burning) hikes. It’s a steep old grind up through the forest with epic views over Lake Crescent at the top. The final section involves ropes and a scramble across steep, slippery (dusty) terrain . Because of this it won’t be for everyone and should only be attempted in dry weather. It’s great option for sunset if you’re okay hiking down with a headlamp.
Hike Details 6.5 km return / 650 m / Hard / 3–4 hours / AllTrails
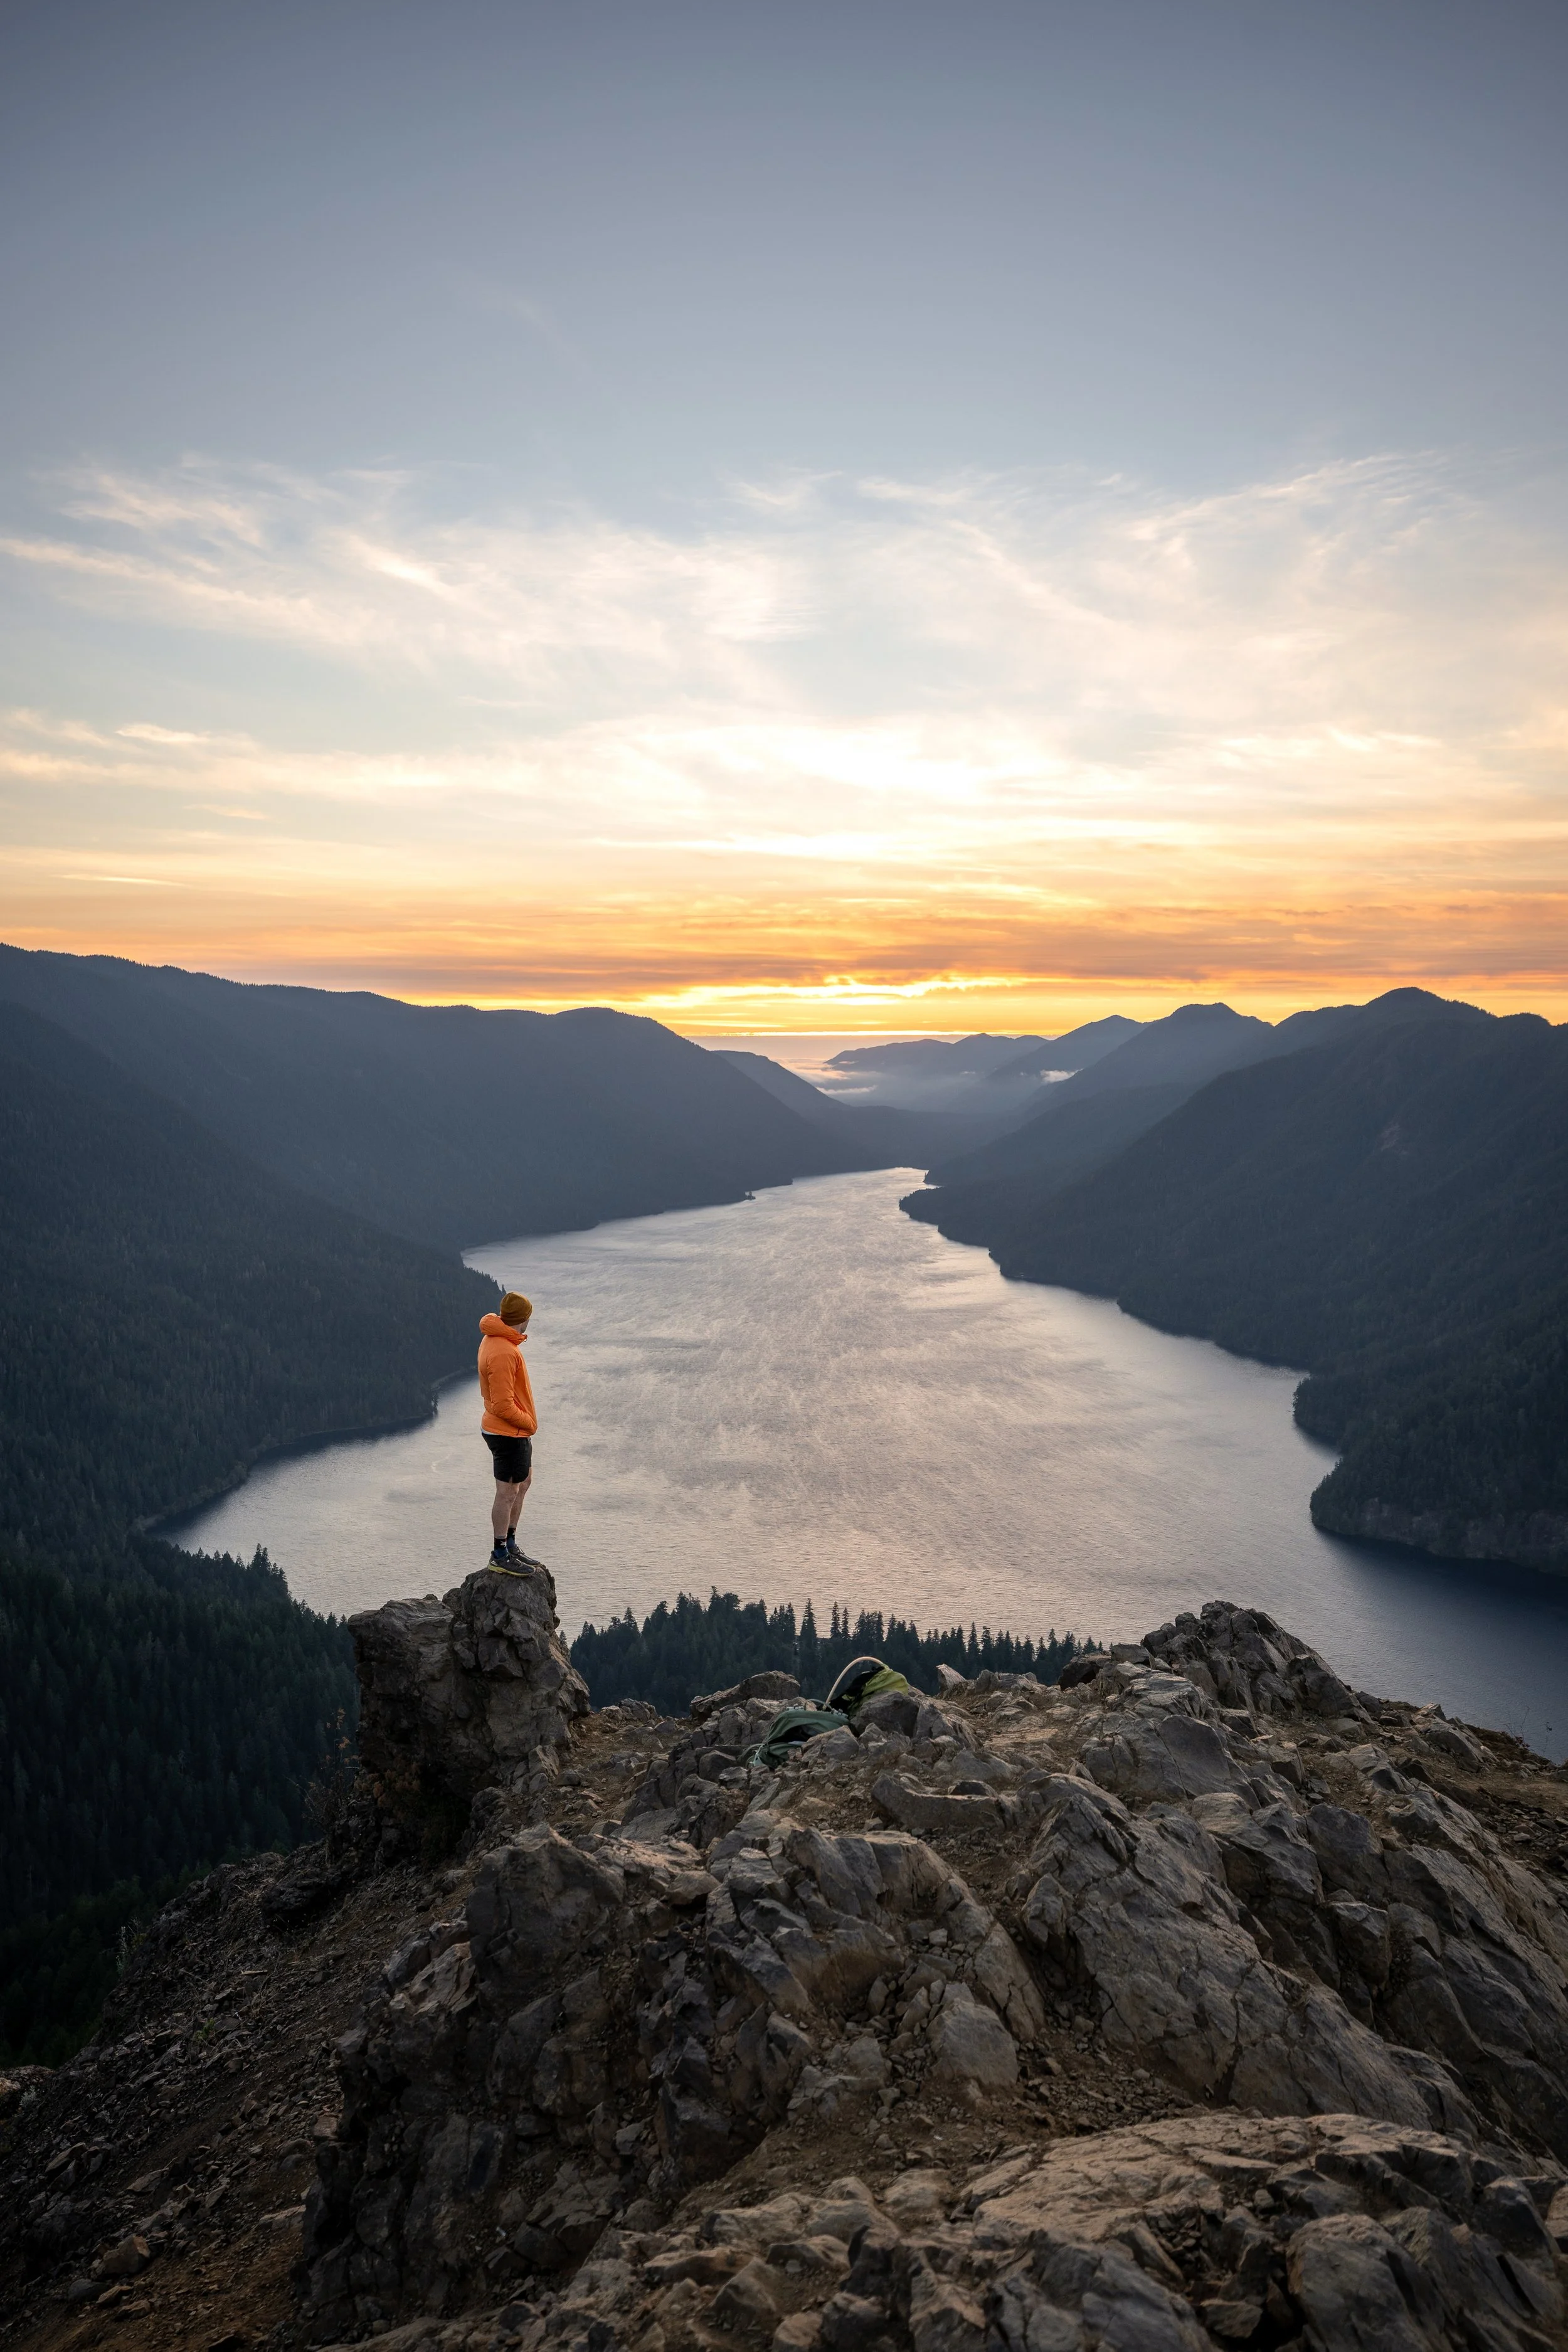

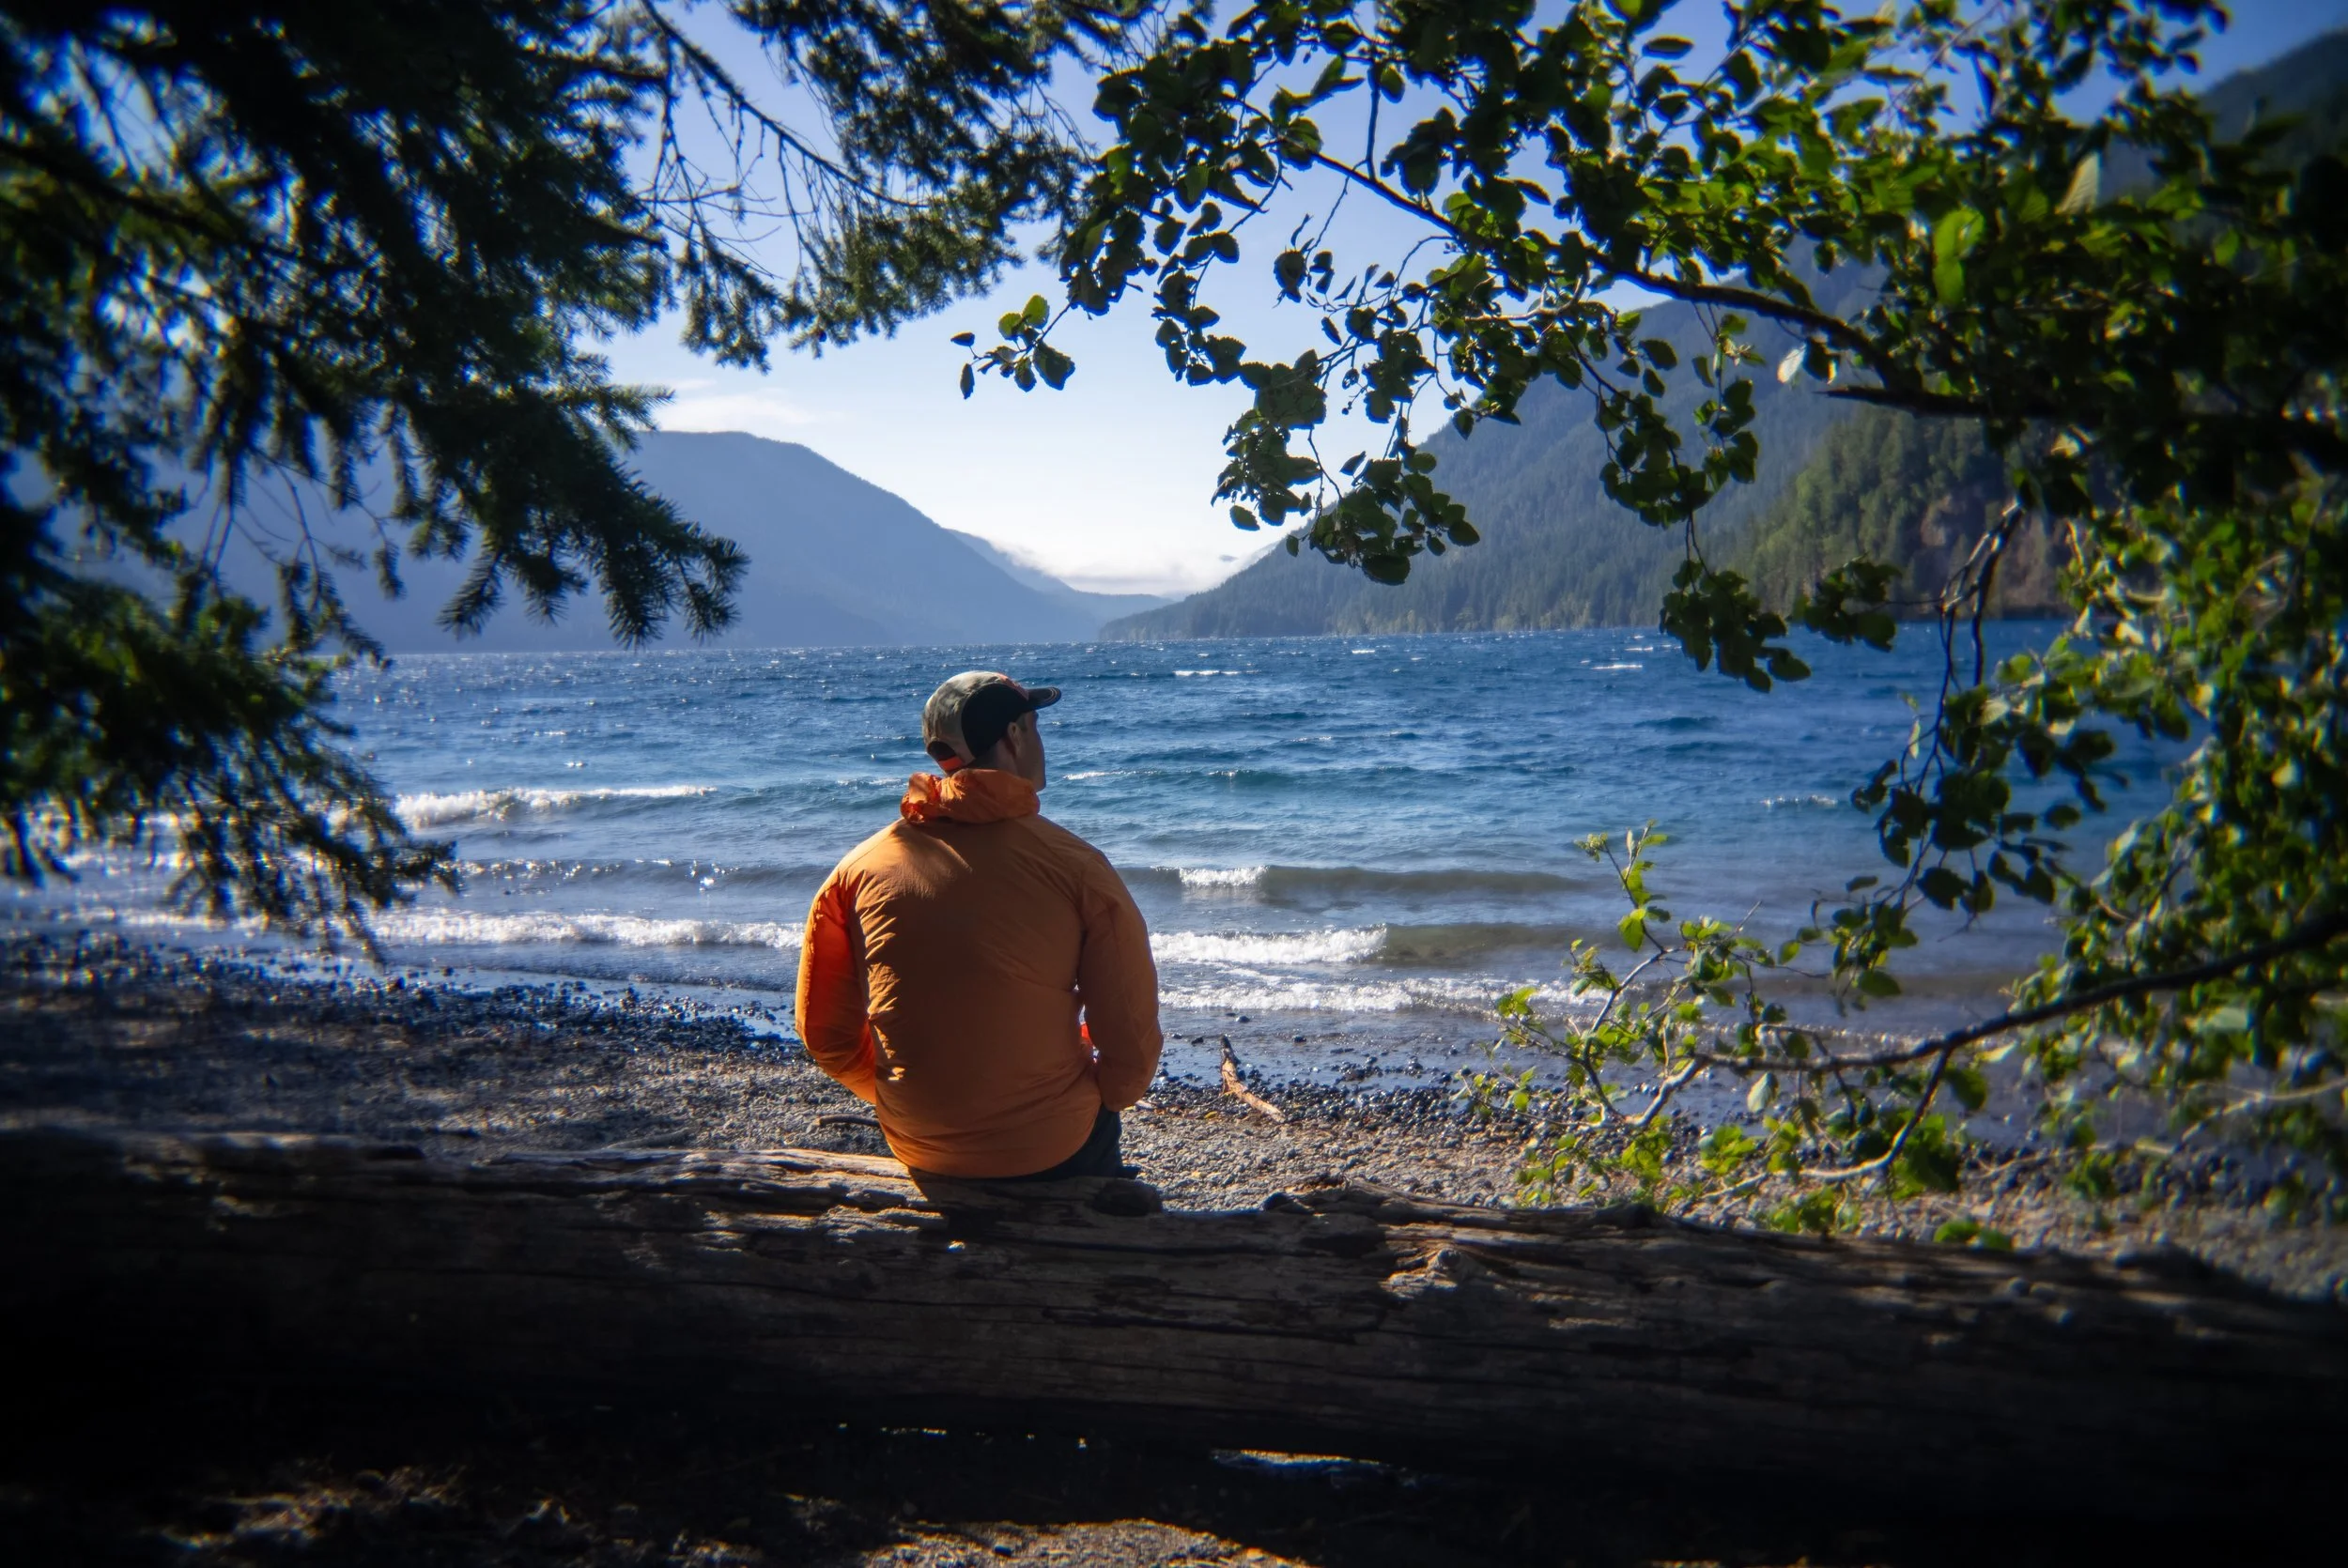
Lake Crescent - A scenic stop and a perfect place for a swim if the weather’s warm. The lake is crystal-clear and surrounded by steep, forested slopes. There’s a small swimming dock near Lake Crescent Lodge and it makes a great lunch or rest stop even if you’re not staying overnight.
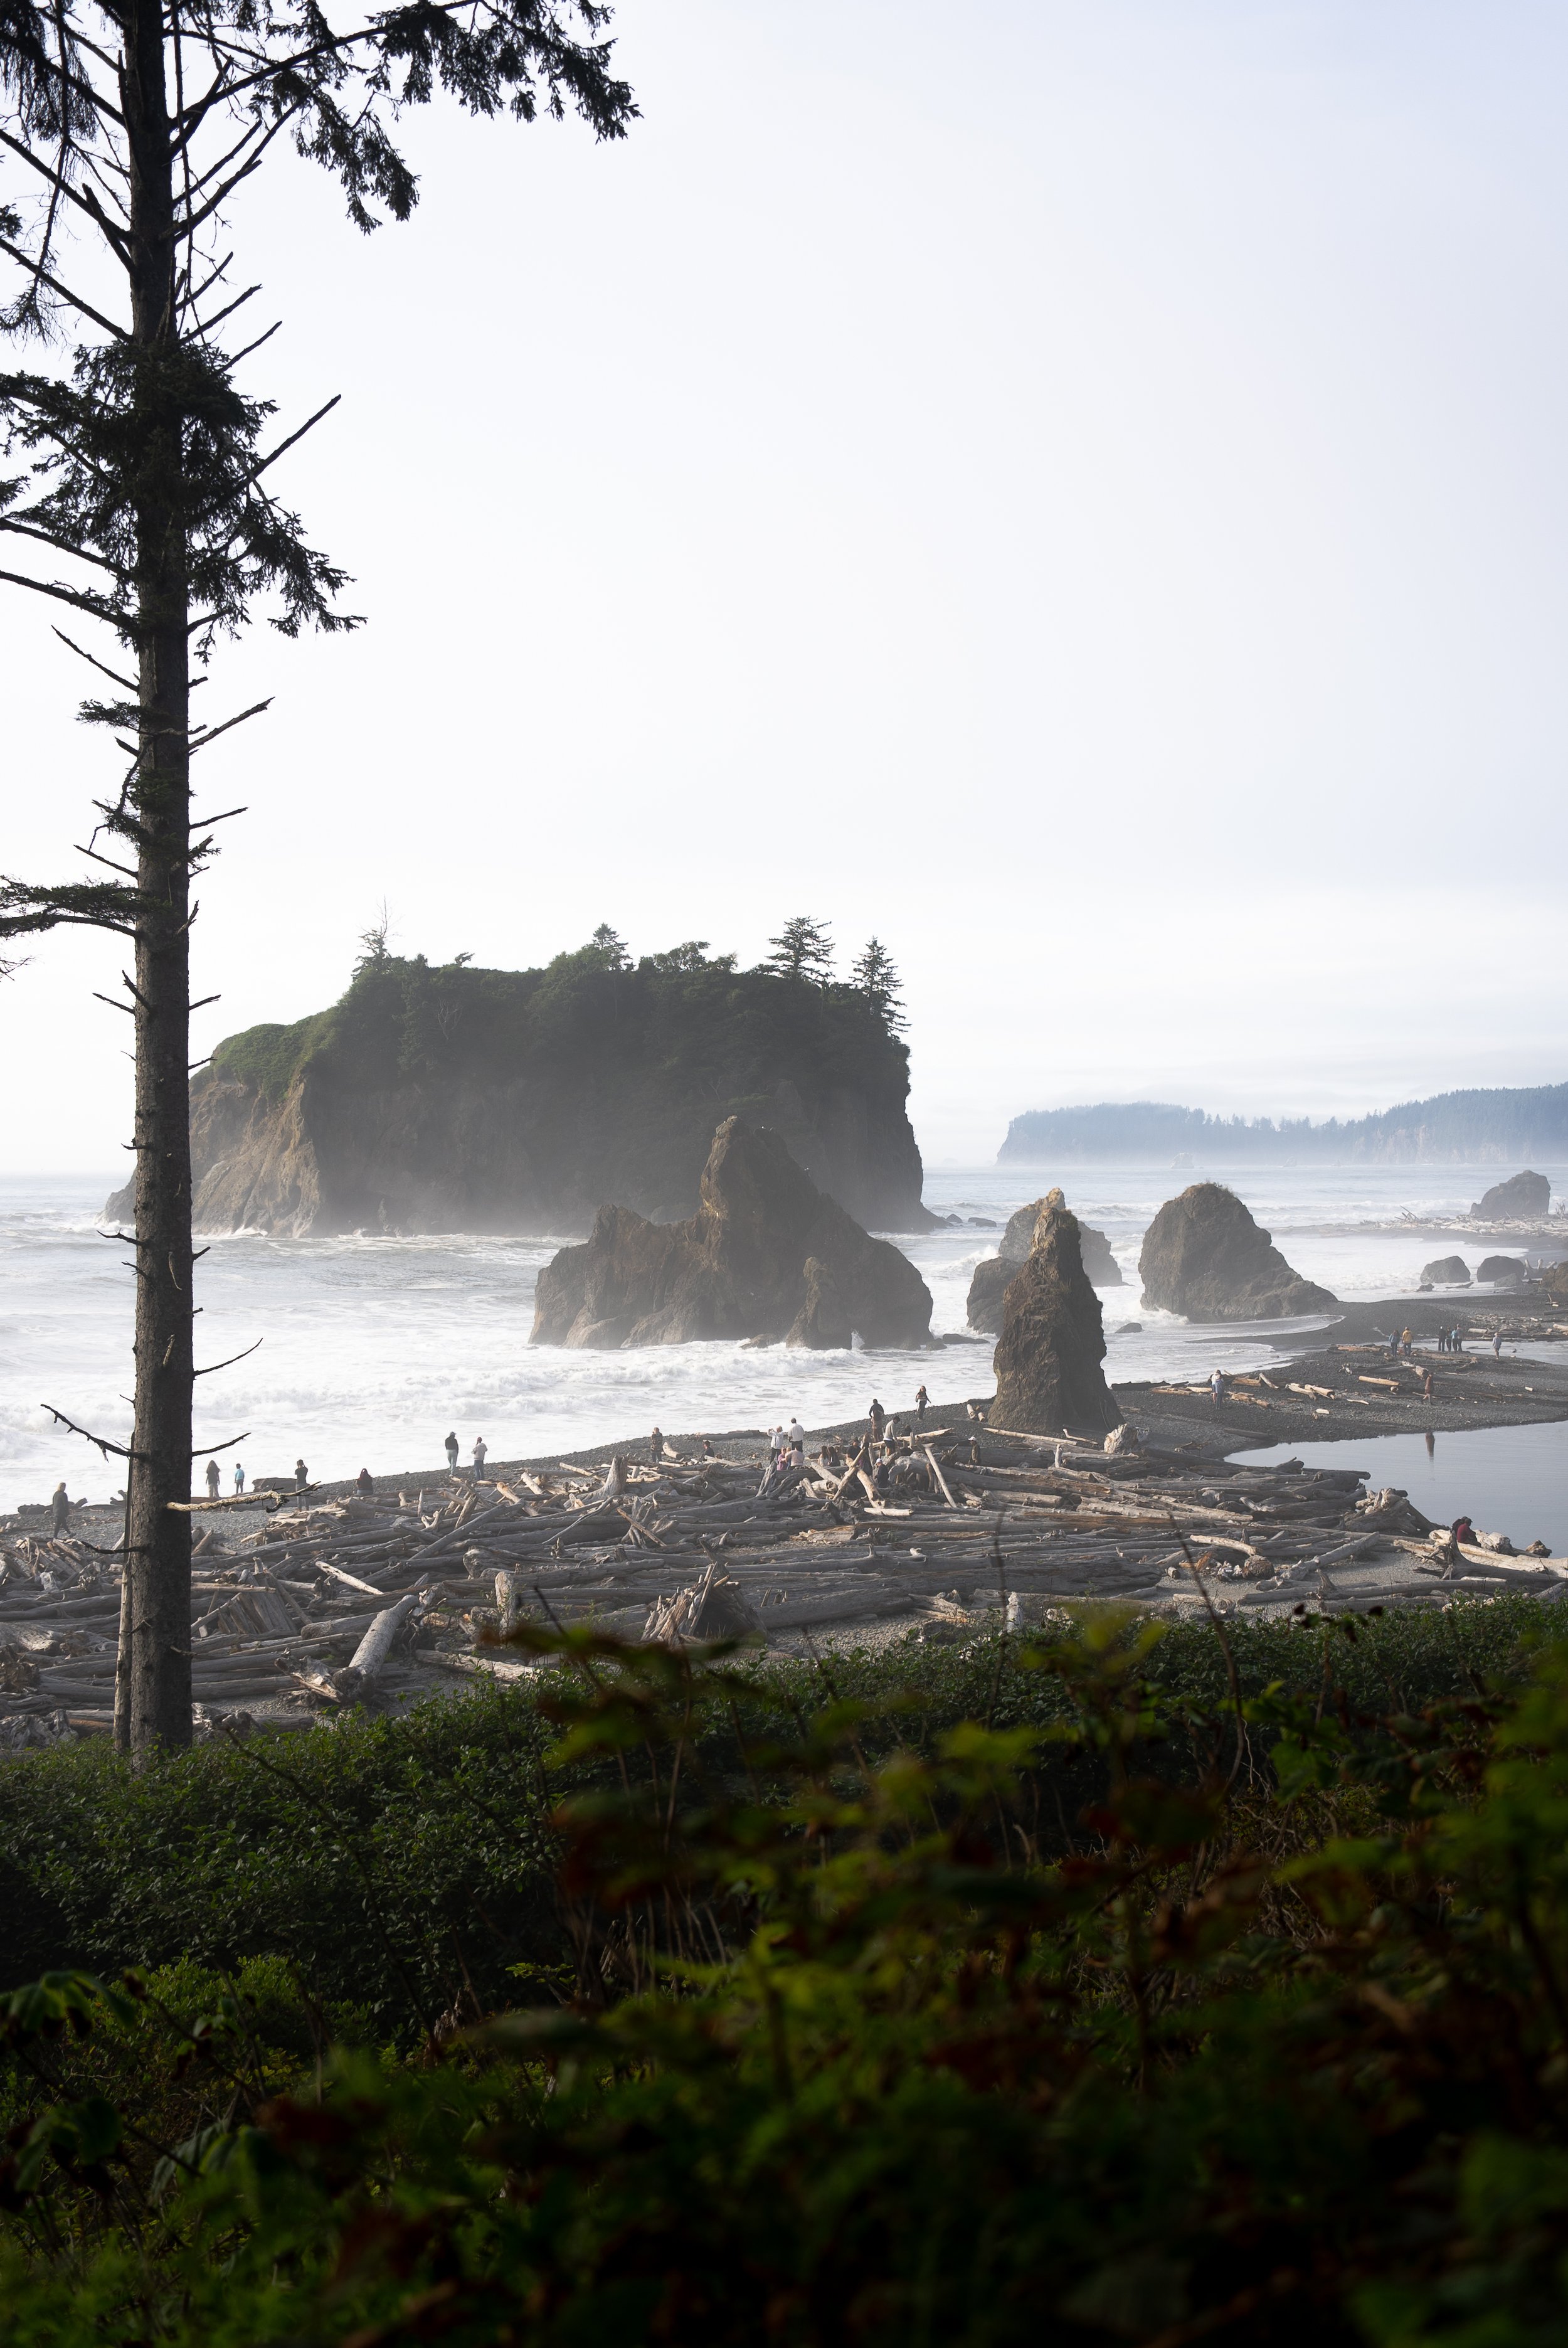
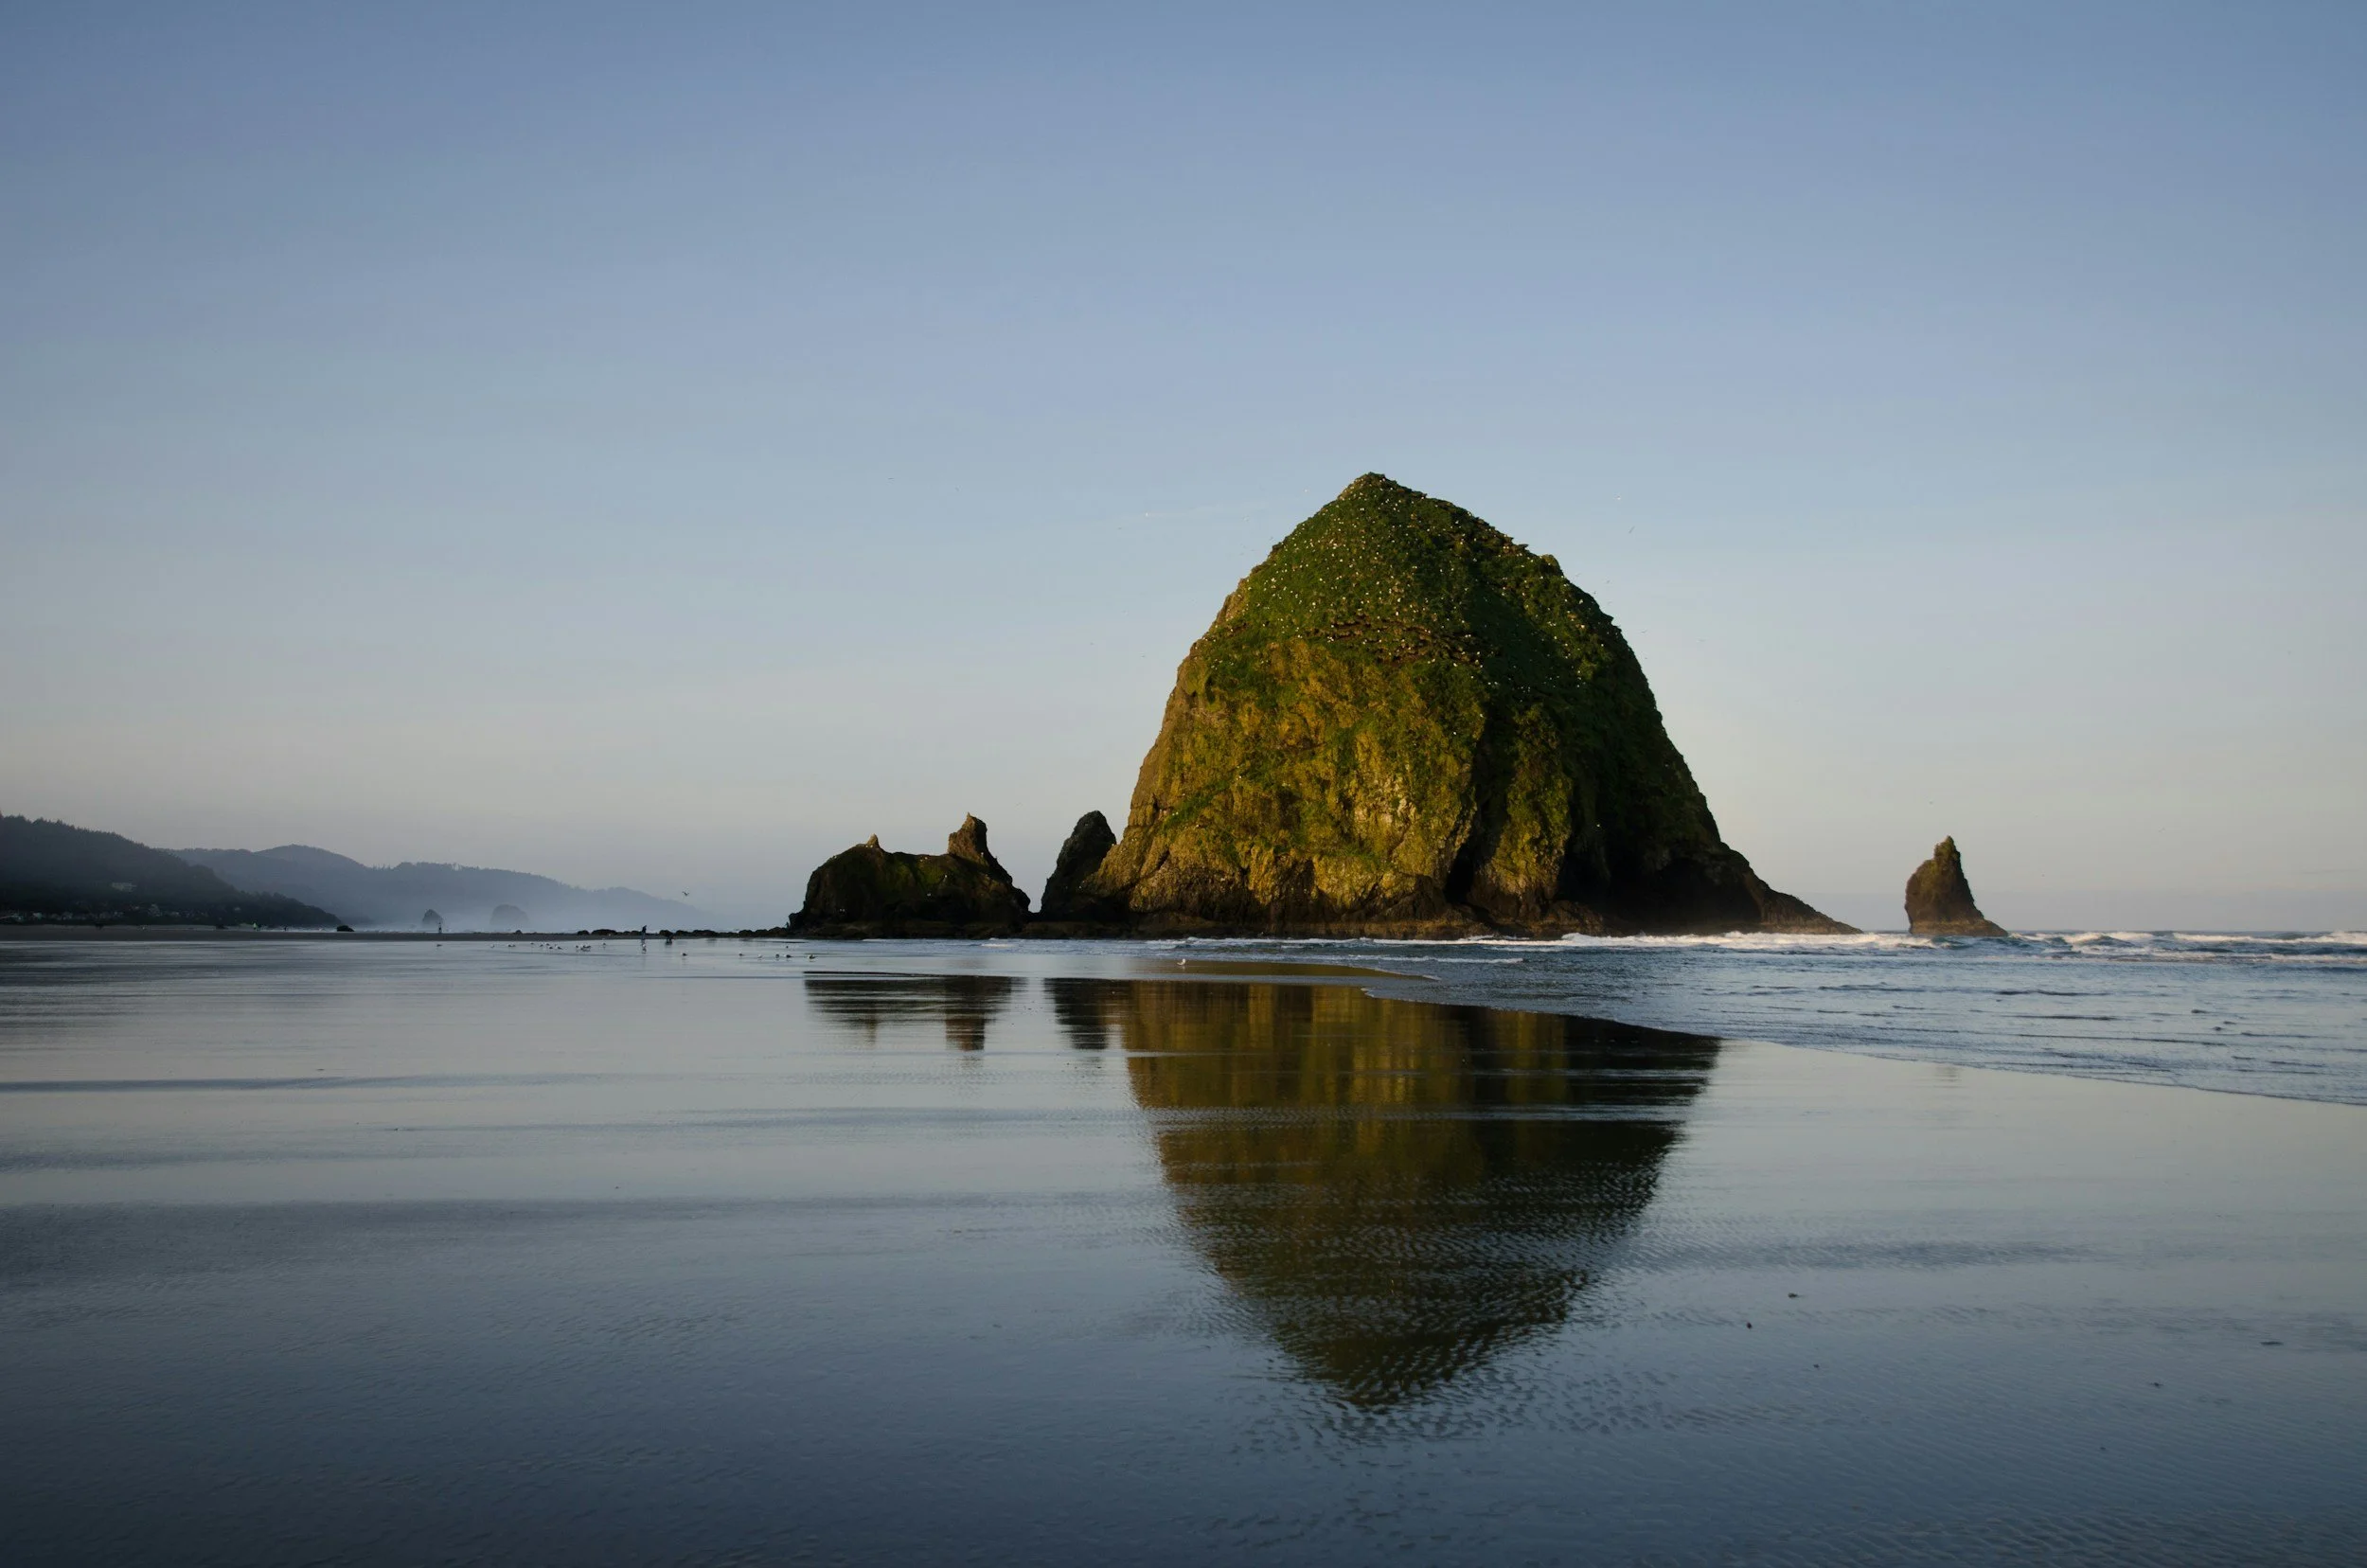
Ruby Beach - A must-stop spot for sunset, Ruby Beach is known for its photogenic sea stacks, reddish sand, and easy access from Highway 101. It’s a short, well-maintained trail down to the beach where the forces of the ocean and lots of driftwood await.
Ruby Beach

Lake Crescent
Other places to consider
Rialto Beach - One of the park’s most dramatic stretches of coastline, with towering sea stacks, crashing surf, and a beach scattered with giant driftwood. If the tide’s low, you can walk the 5 km round trip to Hole-in-the-Wall, a natural arch carved by the ocean. We did go here and found it to be beautiful, however Ruby beach was just as, if not more impressive. So in my opinion, Rialto beach is skippable if you are short on time as it requires a out and back drive, whereas you will pass Ruby beach on the drive south
Hoh Rainforest: One of the park’s most iconic spots, home to moss-draped trees and lush greenery. Personally I would skip this if you are short on time or in peak season, unless you go early, the traffic and crowds can make the 90-minute round trip less worthwhile. While it was beautiful it didn’t leave us gawping and was very crowded
Cape flattery : The northwesternmost point of the continental US, with rugged cliffs, offshore islands, and a short boardwalk trail out to a dramatic viewpoint over the Pacific. We skipped this as it required an out and back drive.
Sol Duc falls and Hot springs : A classic stop for a short hike to one of the park’s prettiest waterfalls, along with the option to soak in developed hot spring pools nearby.

Hoh

Rialato
Where to stay in Olympic National Park
If you’re camping inside the park, these four campgrounds work best for covering the highlights above:
Heart O’ the Hills Campground — Closest to Hurricane Hill / Ridge. First-come, first-served.
Log Cabin Resort RV & Campground — Right on Lake Crescent, with lake views and more amenities.
Mora Campground — Best for Rialto Beach, only a couple of miles away.
Kalaloch Campground — Great for Ruby Beach, perched on a bluff overlooking the Pacific.
For a short 2-night stay, you’ll likely want to mix a night near Hurricane Ridge / Lake Crescent with a night on the coast (Mora or Kalaloch), so you cut down on driving and maximise time at the highlights.
Approximate drive times
Roadsurfer Seattle to Port Angeles: 2:40 / 90 miles by ferry or 3:15 / 180 miles by road
Port Angeles to Hurricane ridge – 0:40 / 21 miles
Port Angeles to Rialto Beach –1:30 / 70 miles
Rialto beach to Hoh rainforest - 1:15 /45 miles
Hoh rainforest to Ruby Beach – 00:45 / 32 miles
What we did
We arrived in Port Angeles in the early evening. After a long haul flight, going back across 8 time zones alongside nearly 3 hours driving, we decided to watch the sunset and have a low key evening, staying at the heart of the hills campground.
We scheduled two fulls days so we had to prioritise. On our first full day, we hiked Hurricane Hill for sunrise, then spent the afternoon at Lake Crescent, before tackling the steep climb up to Mount Storm King for sunset. We then stayed at Log Cabin Resort campground.
On day two we skipped Sol Duc Falls, as the water levels were low and we knew we’d be seeing bigger waterfalls later in the trip. We visited Rialto Beach, then stopped in Forks as my wife loves twilight, walked through the Hoh Rainforest, and finished the day at Ruby Beach. While the Hoh Rainforest was beautiful, I didn’t find it as impressive as expected.
Not knowing where we were going to stay, I made the mistake of then driving 4 hours into Oregon to Cannon beach, missing sunset and arriving very late. We then had to sleep in a non-dispersed area just off the highway as the campsites were closed. If you are going to do this, I‘d recommend getting to cannon beach for sunset and pre booking a campsite.

hurricane hill
Lake Crescent
Day 3: Northern Oregon Coast
This day takes you south along Oregon’s northern coastline, where rugged headlands meet wide sandy beaches and iconic sea stacks. Expect a mix of famous stops and quieter gems.
Things to see and do
Cannon beach – Arguably Oregon’s most famous beach and a filming location for the Goonies. Check out Haystack Rock, and grab a coffee and pastry from Sea level (it was the best coffee I had all trip)
Ecola State Park Overlook, where forested cliffs drop into the ocean and you get sweeping ocean views. It’s a short detour but offers some of Oregon’s classic coastal vistas.
Tunnel beach - A hidden, rugged cove with dramatic rock formations, which can only be accessed by walking through tunnel in the cliffs. Also consider visiting Cape Meares Lighthouse which is nearby
Cape Lookout - Part of the Three Capes Scenic Route, this headland juts two miles into the Pacific. A forested cliff-top trail offers panoramic ocean views, with the chance to spot migrating whales in season.
Cape Kiwanda - Here you’ll find rolling dunes, golden sandstone cliffs, and great ocean views. If you’re up for it, climb the giant dune for panoramic vistas. Cape Kiwanda is also a great spot for sunset.


Where to Stay
You’ve got two great options for your overnight stop, depending on whether you want to stay coastal or head inland for the next day of waterfall adventures.
Cape Kiwanda RV Resort & Campground — Located right in Pacific City, just steps from the beach and Cape Kiwanda’s dunes. Offers tent sites, RV hookups, and amenities like showers, laundry, and even an on-site pub.
Silver Falls State Park Campground — Set inland among the forest, this campground is inside Oregon’s largest state park. It has tent sites, RV sites with hookups, cabins, flush toilets, and showers. Ideal if you’d like to be well-positioned for exploring the famous Trail of Ten Falls the following morning.
Approximate drive times
Ruby Beach → Cannon Beach: 4:30 / 220 miles
Cannon Beach → Tunnel Beach: 0:20 / 12 miles
Tunnel Beach → Cape Kiwanda: 1:30 / 65 miles
Cape Kiwanda → Silver Falls State Park: 2:00 / 85 miles
What we did
After a shocker of a night’s sleep, we woke to find Cannon Beach completely engulfed in thick coastal fog , classic Pacific Northwest. Thankfully, the morning was redeemed with the best coffee we had all trip at Sea Level Bakery + Coffee, a cosy little spot that we can’t recommend enough.
We then continued our drive south along the coast, stopping at all the highlights mentioned above. Even in the mist, the Oregon coastline delivered some moody magic and was beautiful to see.
For lunch, we ate at Beach Wok, a casual Asian-fusion spot just outside Cape Kiwanda. The food was delicious and portions were huge, so I would definitely recommend it here
From there, we made our way inland to set up for the night at Silver Falls State Park
Hay stack rock Photo by Thomas Bishop on Unsplash
Day 4: Silver Falls State Park
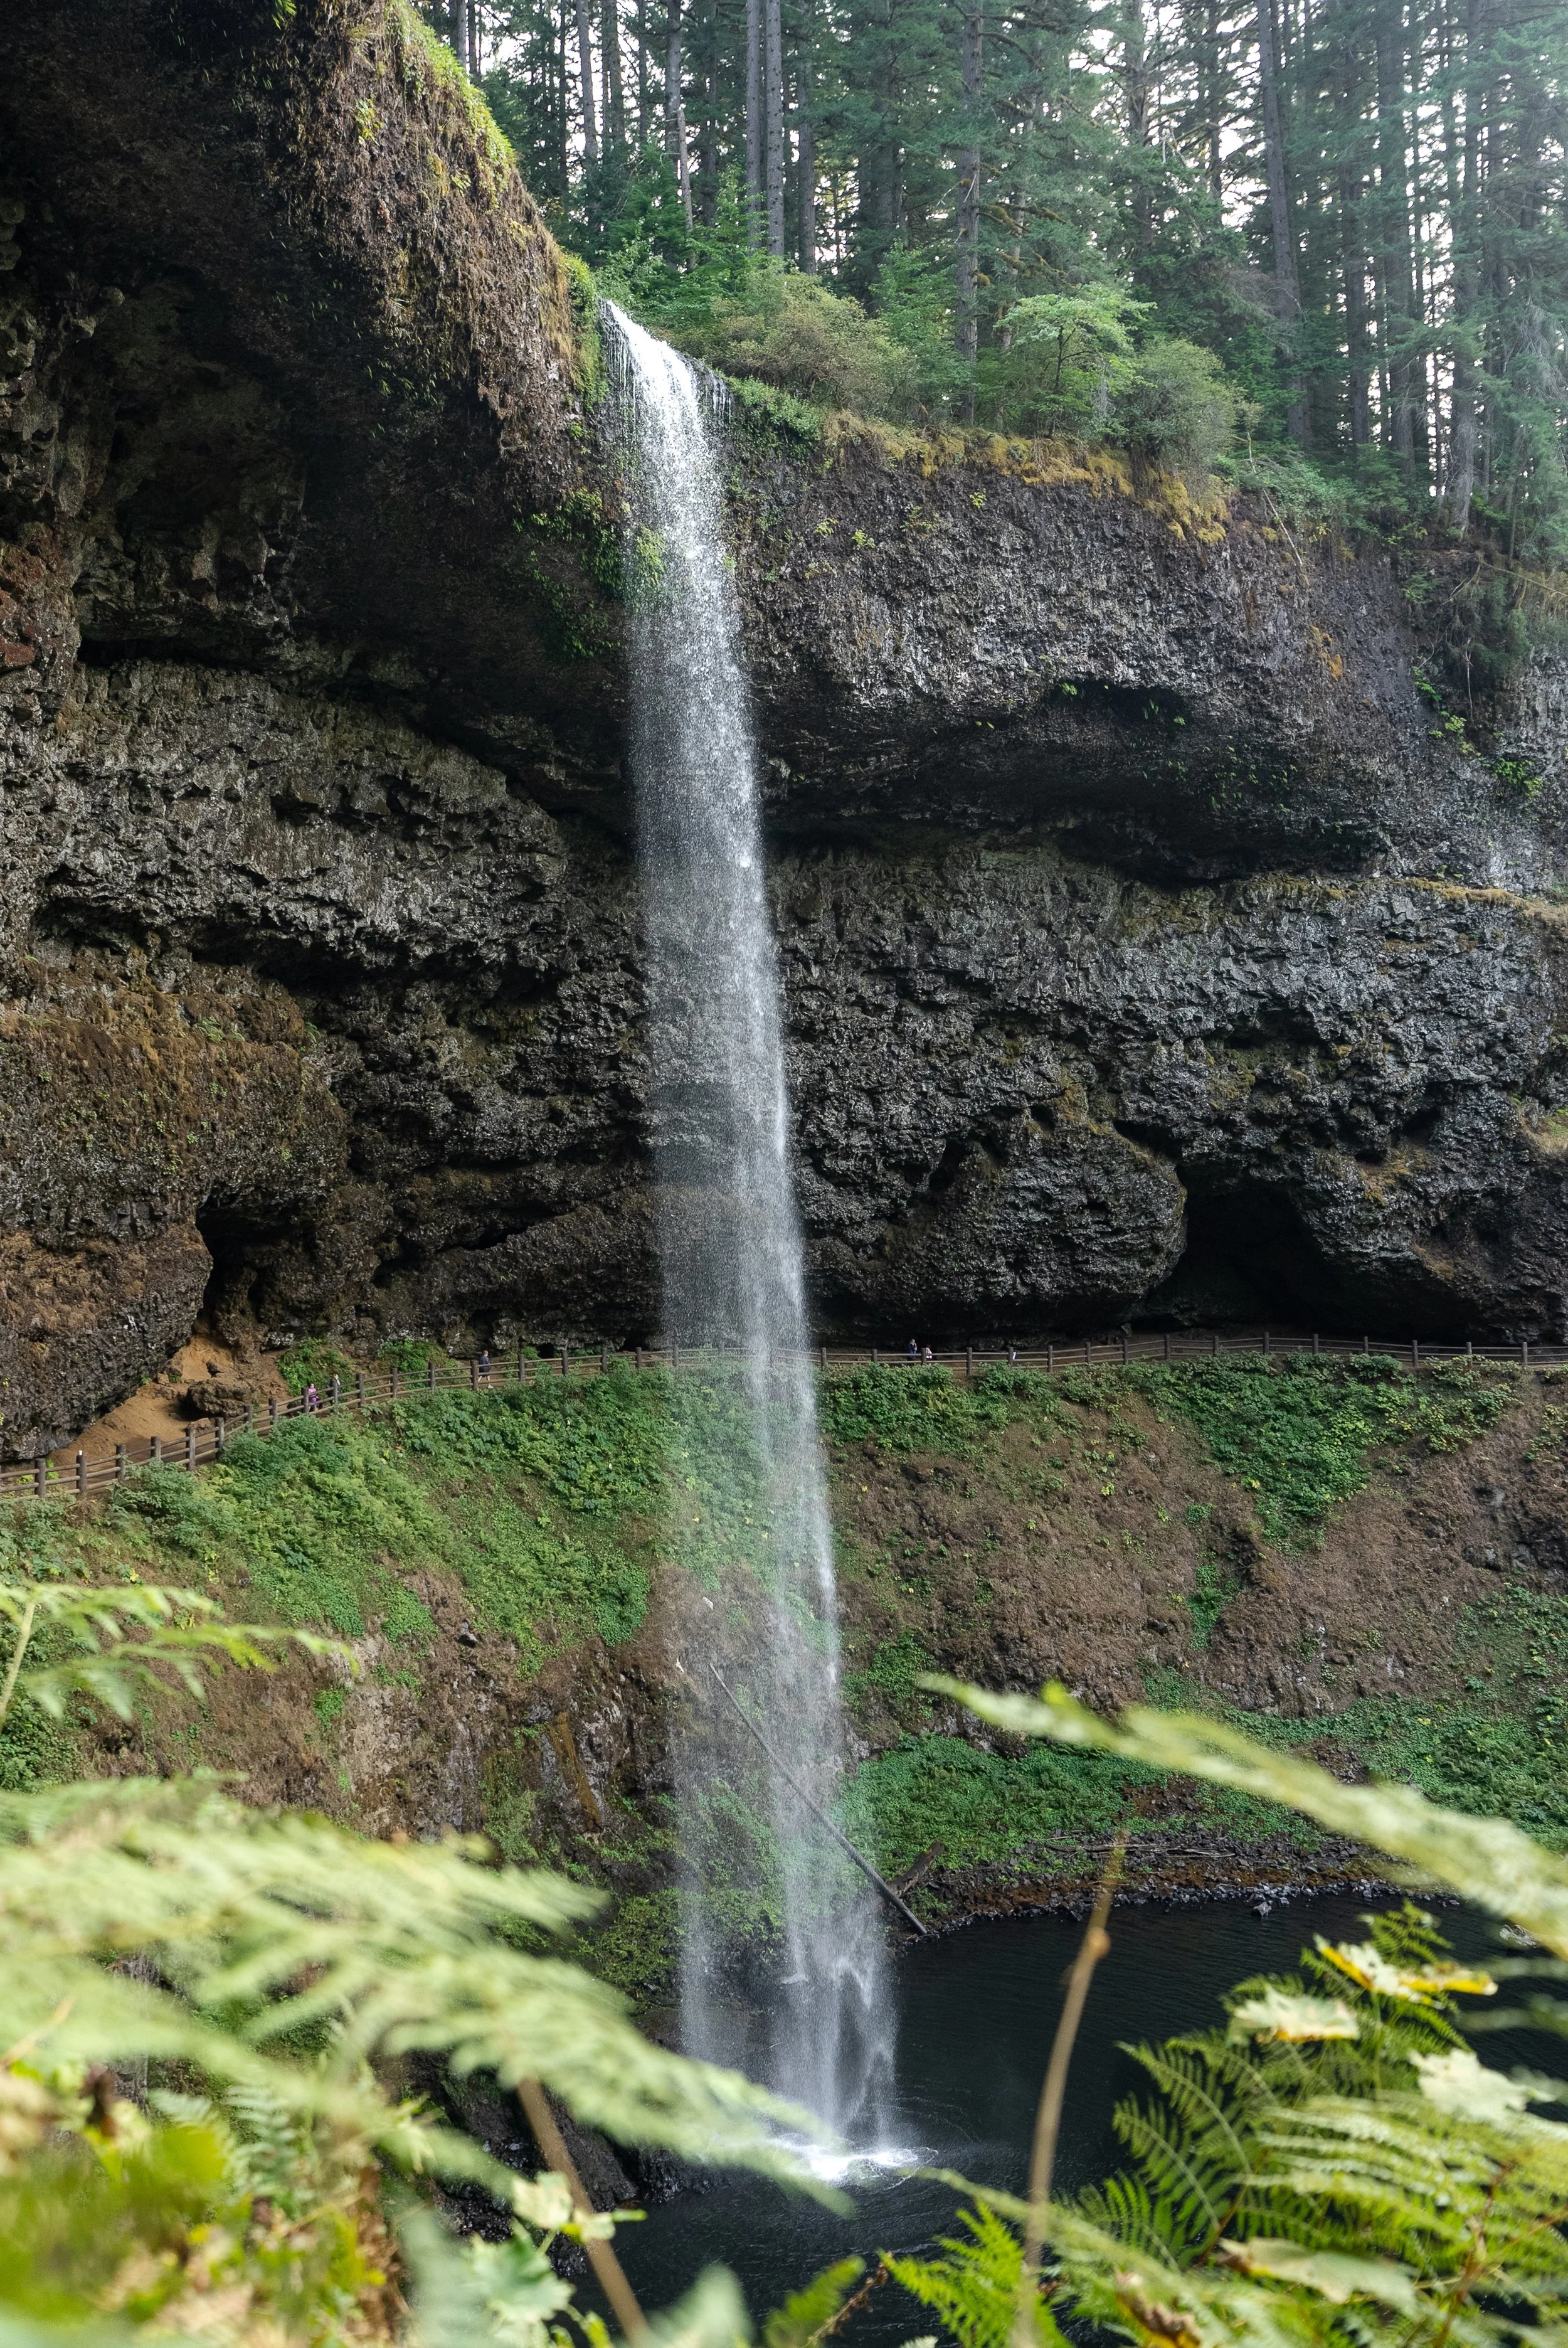
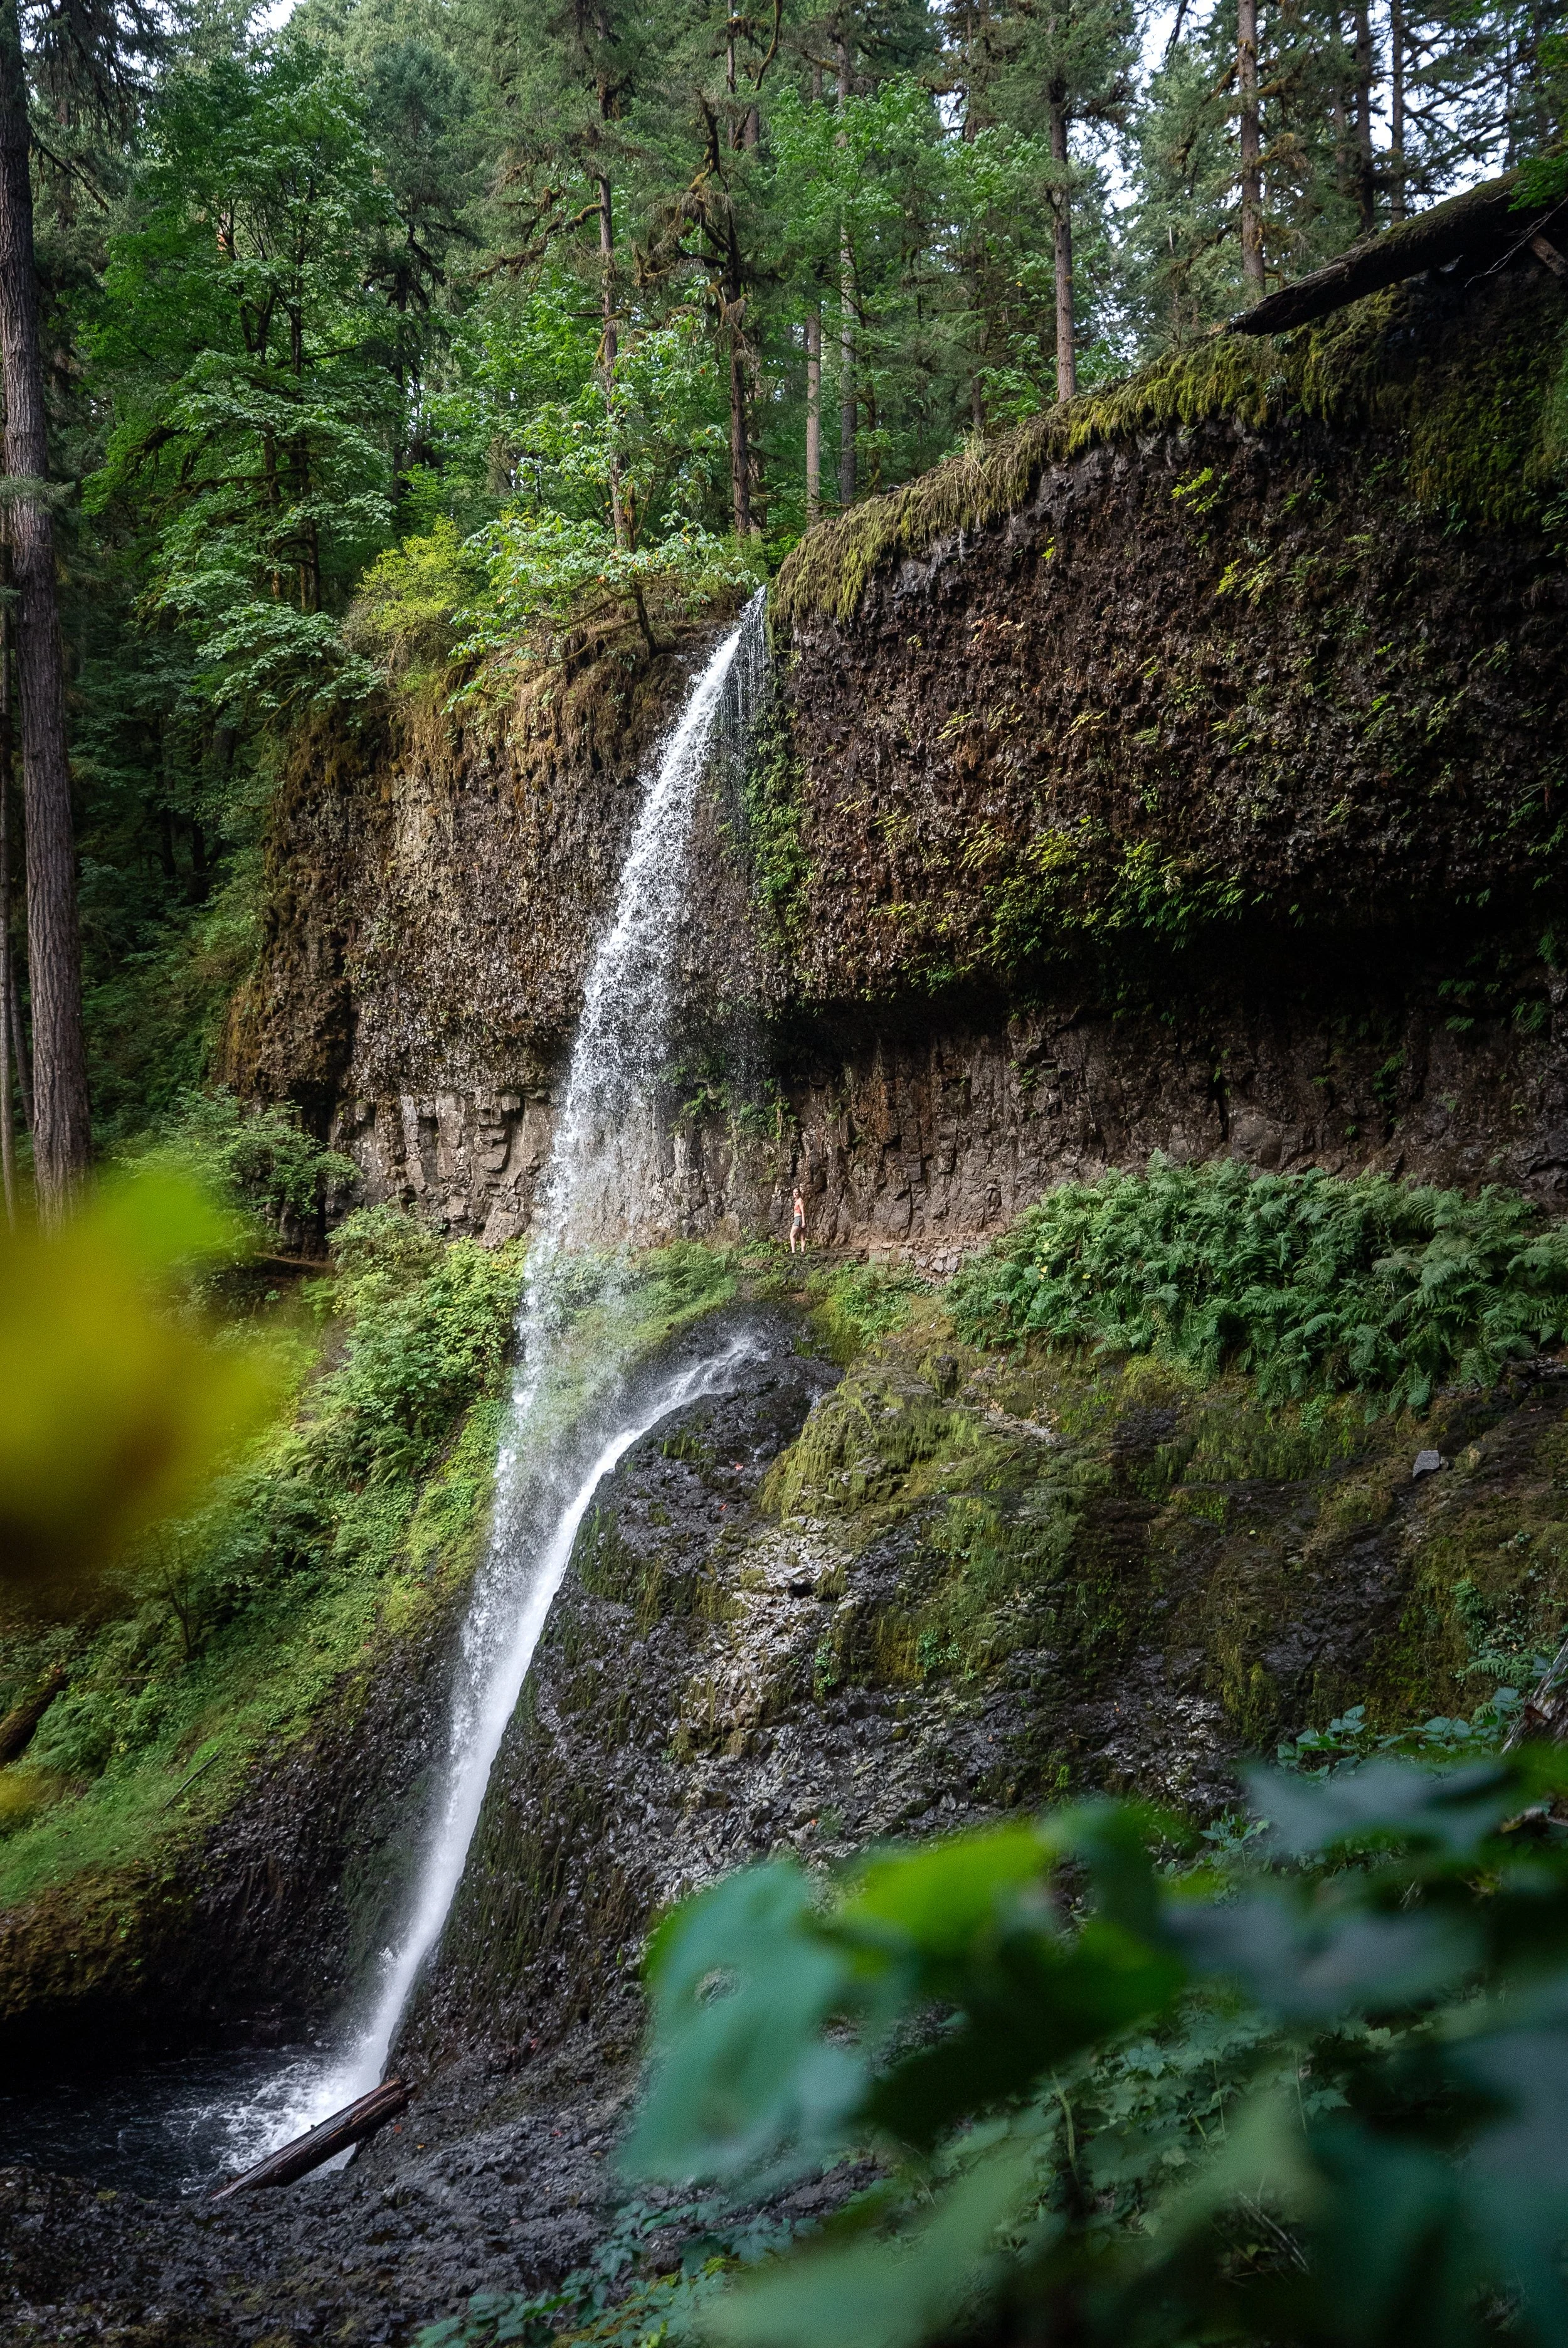
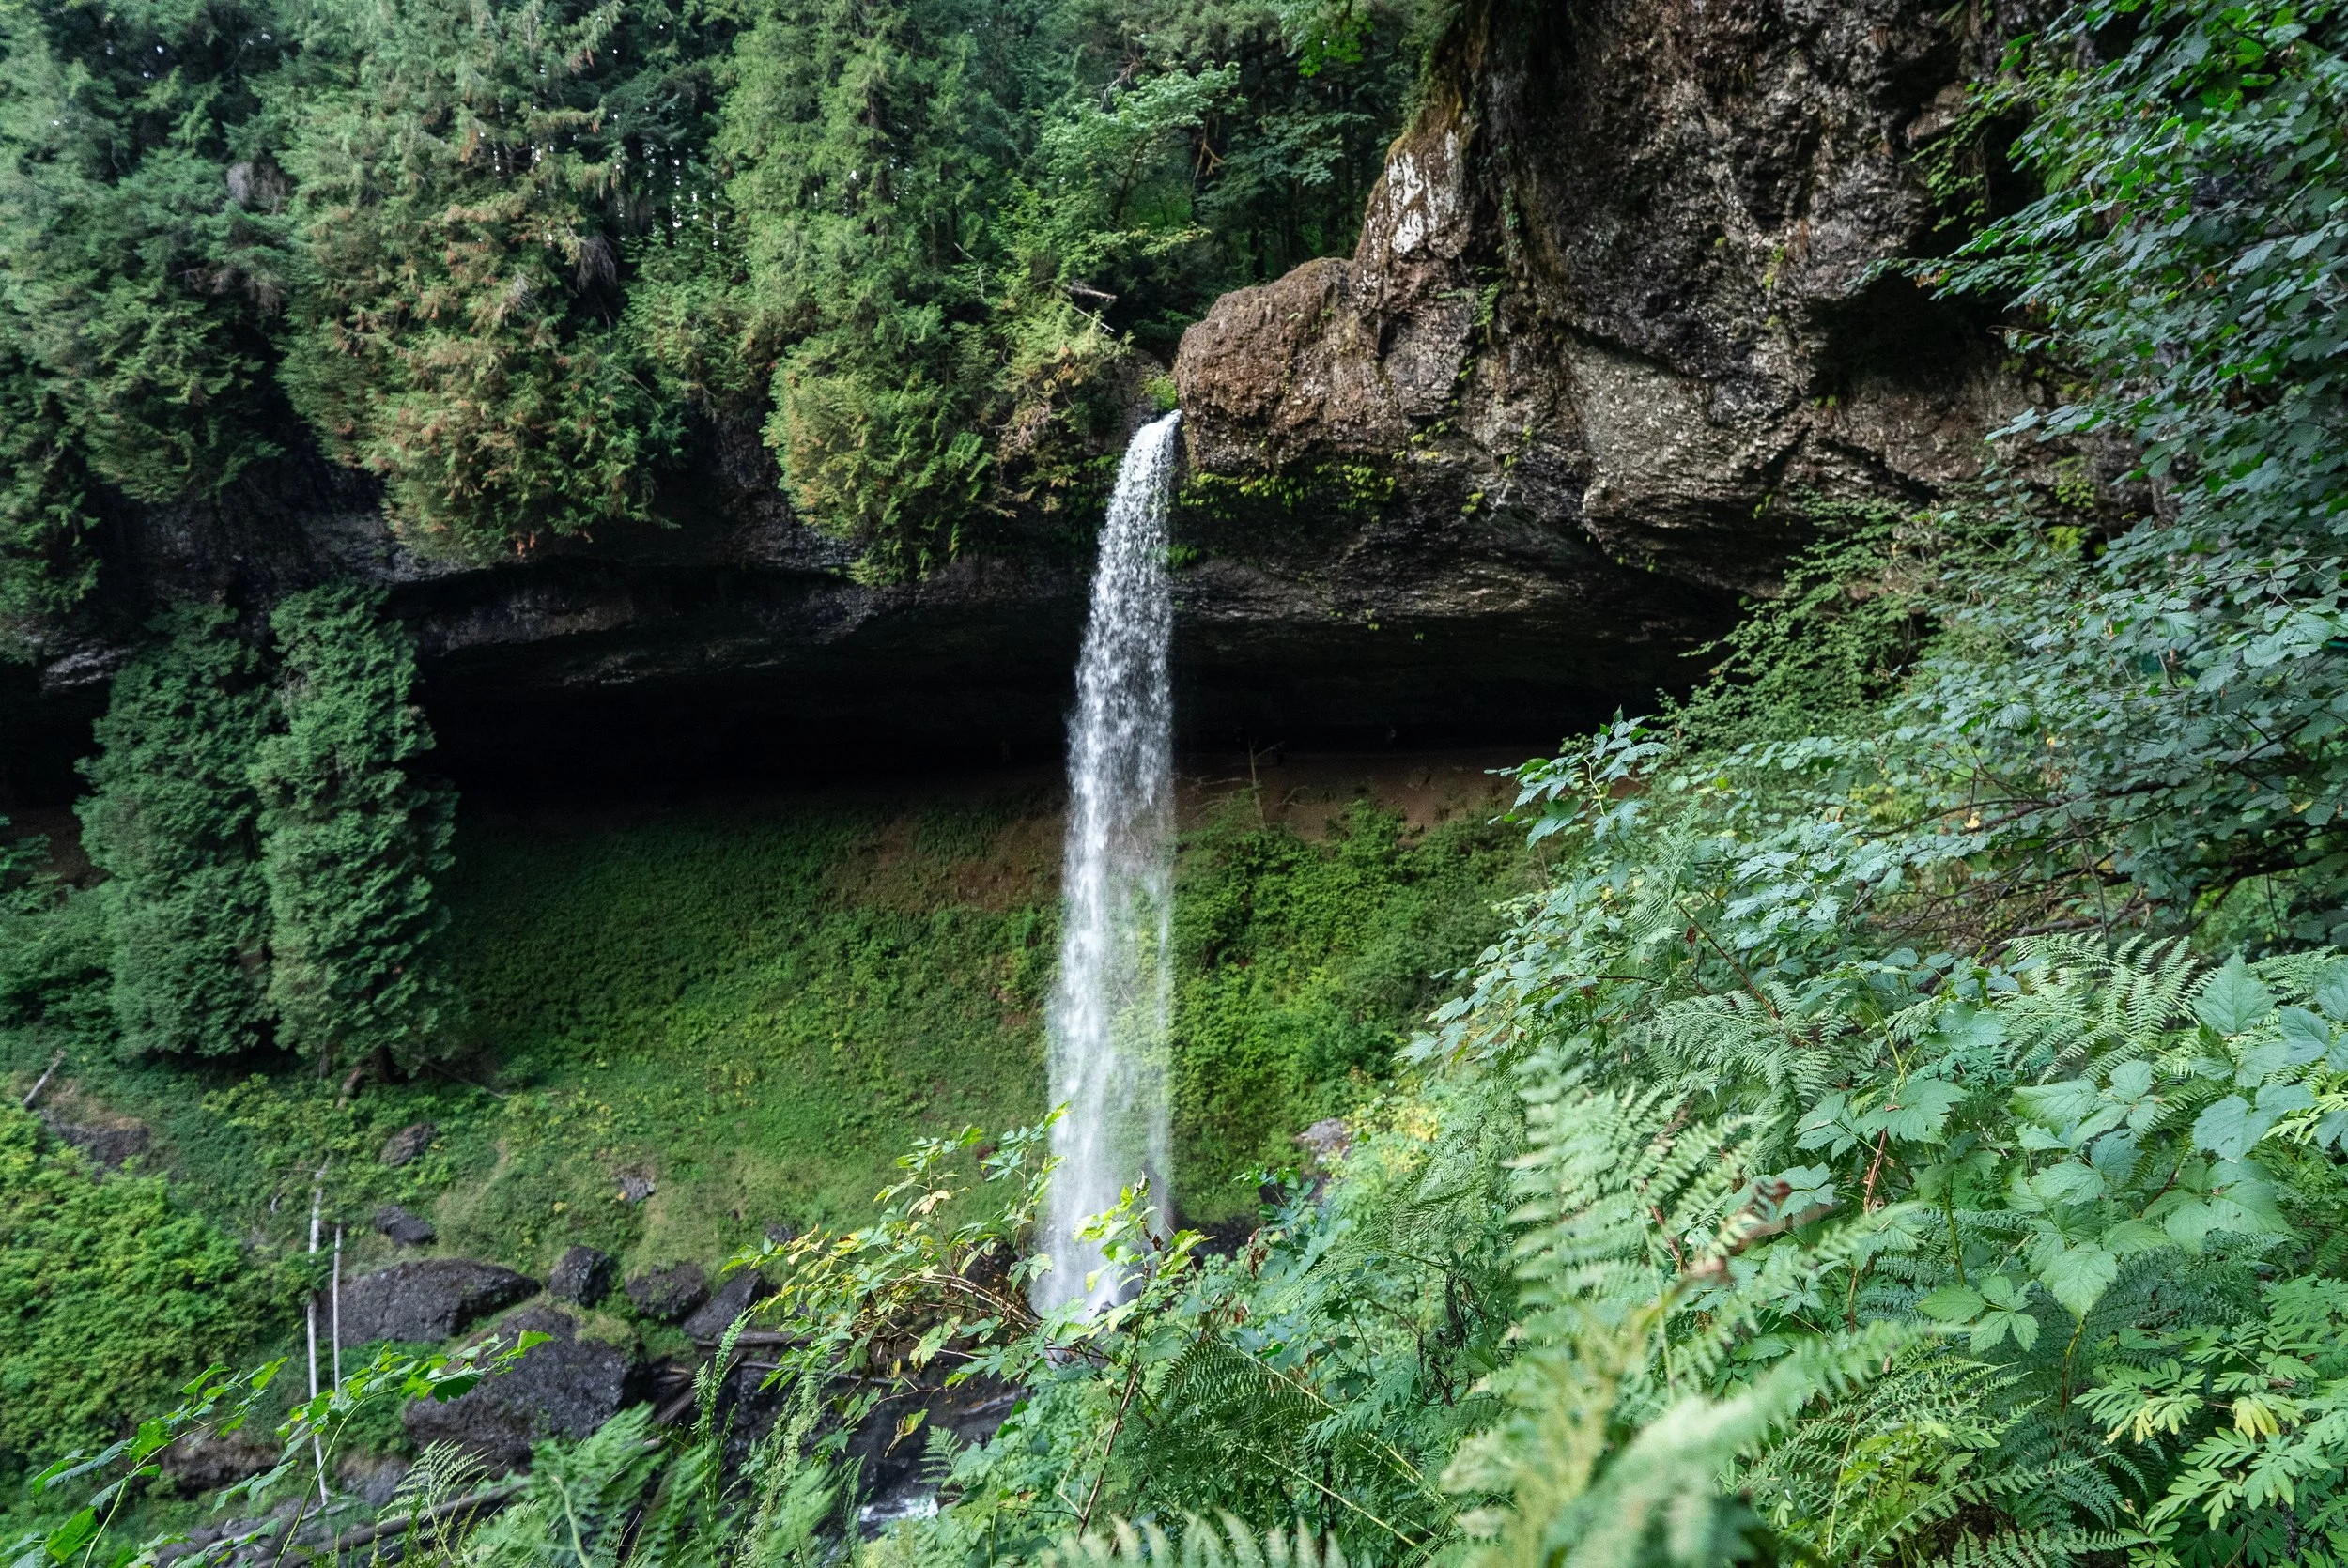
Nicknamed the crown jewel of Oregon’s state parks, Silver Falls is the perfect inland contrast after the previous day of coastal exploring. This lush forested park is home ito the famous Trail of Ten Falls, where you can see a series of waterfalls plunging through basalt canyons, several of which you can actually walk behind.
Must see and do
Trail of Ten Falls - The park’s signature hike winds through a lush canyon past 10 waterfalls of varying sizes. I recommend the shorter 8.7 km loop that covers the highlights (South Falls, Lower South Falls, Middle North Falls, and more). From there, drive to the separate North Falls trailhead to see the last two Waterfalls S
Shorter Loop: 8.7km / 270m / 2-3 hours/ Moderate / All Trails
North Falls & Upper North Falls - North Falls (136 ft) is one of the most dramatic in the park, with a huge cavern that allows you to walk behind the cascade. Upper North Falls is a short stroll further along the creek and is much quieter, offering a peaceful forest setting. You can reach both from the North Falls Car Park
South Falls
upper middle falls
North falls
Other places to consider
Abiqua Falls - Arguably one of the most impressive waterfalls in Oregon. Located outside the park, this 92 ft cascade drops into a turquoise pool surrounded by striking basalt columns. Getting there involves a rugged forest trail with some tricky footing, but the payoff is huge. Unfortunately, we skipped this hike we wanted to push onto Mount hood. Hike info: 6.5 km / 300 m / 3 hours / Moderate.
Where to stay
Silver Falls State Park Campground — If you wanted to take things easy
Trillium Lake Campground: This popular campground sits right on the lake with postcard views of Mount Hood reflected in the water. Facilities include tent and RV sites, toilets, and picnic areas. It also sets you up perfectly for exploring Mount Hood and the Columbia River Gorge the next morning.
Approximate drive times
Silver Falls → Abiqua Falls: 0h 45m / 24 miles
Abiqua Falls → Trillium Lake: 2h 00m / 85 miles
Trillium Lake by Atanas Malamov on Unsplash
Day 5: Mount Hood & Columbia River Gorge
Today blends alpine beauty with Oregon’s most iconic waterfall corridor. If you get lucky with the weather, you’ll start your hopefully see Mount Hood reflected in a still alpine lake, tackle a rewarding waterfall hike, then spend the afternoon weaving through the Columbia River Gorge. This corridor is home to some of the most photogenic and accessible waterfalls in the Pacific Northwest.
Mount Hood
Trillium Lake - One of Oregon’s most photographed spots. If the lake is calm, you’ll get that iconic mirror-like reflection of Mount Hood. There’s a flat trail around the lake, and it’s a great place jump in for a cold swim. Unfortunely we had a mist covered morning, so we didn’t end up stopping here as there we zero views.
Tamanawas Falls: A rewarding 3.5-mile out and back trip hike leads to this 110 ft waterfall tumbling over a basalt cliff into a mossy amphitheatre. This was one of, if not my favourite waterfalls of the trip as you have the ability to walk behind the falls. It’s not difficult and should take 45-60 minutes to reach
Hike Details: 5.5km / 172m elevation gain / Moderate / 1.5 - 3 hours / All Trails Route


Columbia River Gorge
Elowah Falls - A 213 ft waterfall that is tucked away in a rocky canyon. It can be reached via a 2.5km out and back hike with 125m of elevation gain which should take less than an hour.
Multnomah Falls - The crown jewel of the Gorge and Oregon’s tallest waterfall at 620 ft. A paved trail leads to Benson Bridge for the iconic view between the upper and lower tiers. It’s the busiest stop of the day, but worth it. To avoid the $15 parking fees, park at Wahkeena Falls and walk the trail back to the falls
Wahkeena Falls - The least impressive in this list but worth a visit. This is a fan-shaped, tiered waterfall with a short, steep trail to its base. if you had more time tyou can link this waterfall up with a loop of Multnomah Falls
Ponytail Falls and Horsetail Falls - A short but trail leads you right behind the curtain of this 75 ft waterfall. This was one of the quieter waterfalls in the gorge and is definitely worth visiting
Bridal Veil Falls - A quick hike (1 km) brings you to this two-tiered cascade framed by lush greenery. It’s small but charming.
Latourell Falls - this 249 ft waterfall drops in a single dramatic plunge in front of striking column of basalt. You can walk to the base of the falls in less than 5 minutes or you can hike a short loop trail (2.4 km) to get views from both the base and above the falls.
You can visit all of these waterfalls in a single afternoon, as most of them are with 5-20 minutes drive of each other. But if you prefer to take it slower, pair Tamanawas Falls in the morning with Ponytail Falls, Multnomah, and Latourell in the afternoon.
Multnomah Falls

Elowah

Ponytail

Latourell

Wahkeena
Where to Stay
Columbia River Gorge – There are several scenic campgrounds like Ainsworth State Park, or you could stay at a small lodge along the Gorge. If you want a night of comfort, Portland is just 40 minutes west with hotels and laundry stops.
Push onto Mount Rainier – - If you’re feeling ambitious, make the 3-hour evening drive north to Cougar Rock Campground inside Mount Rainier National Park. This sets you up perfectly for an early start at Paradise the following morning. I would recommend reserving a spot in summer
Approximate drive times
Trillium Lake → Tamanawas Falls: 0h 30m / 17 miles
Tamanawas Falls → Latourell Falls: 1h 15m / 63 miles
Latourell Falls → Cougar Rock Campground (Mount Rainier): 3h 00m / 170 miles
What we did
After a wet and lazy morning at Silver Falls State Park, we made the drive towards Mount Hood. Unfortunately, the mountain was completely hidden under thick mist, so we decided to skip Trillium Lake and go straight to Tamanawas Falls. This turned out to be my favourite waterfall of the entire trip. It’s a beautiful and atmospheric spot, and being able to walk behind the falls really made it special.
After the hike, we had a quick lunch and set off into the Columbia River Gorge. With only about 3.5 hours of daylight left, we were a little pressed for time so didn’t linger long at each stop. We managed to tick off Elowah, Ponytail, Multnomah, and Wahkeena Falls with short visits, which I think is all you need unless you’re doing a longer hike. my favourite of the lot was Ponytail but Multomah is epic. We skipped Bridal Veil Falls in favour of watching the sunset from the nearby car park trail, then made a quick final stop at Latourell Falls. We then had an In and Out Burger before residing at a Walmart Car park!

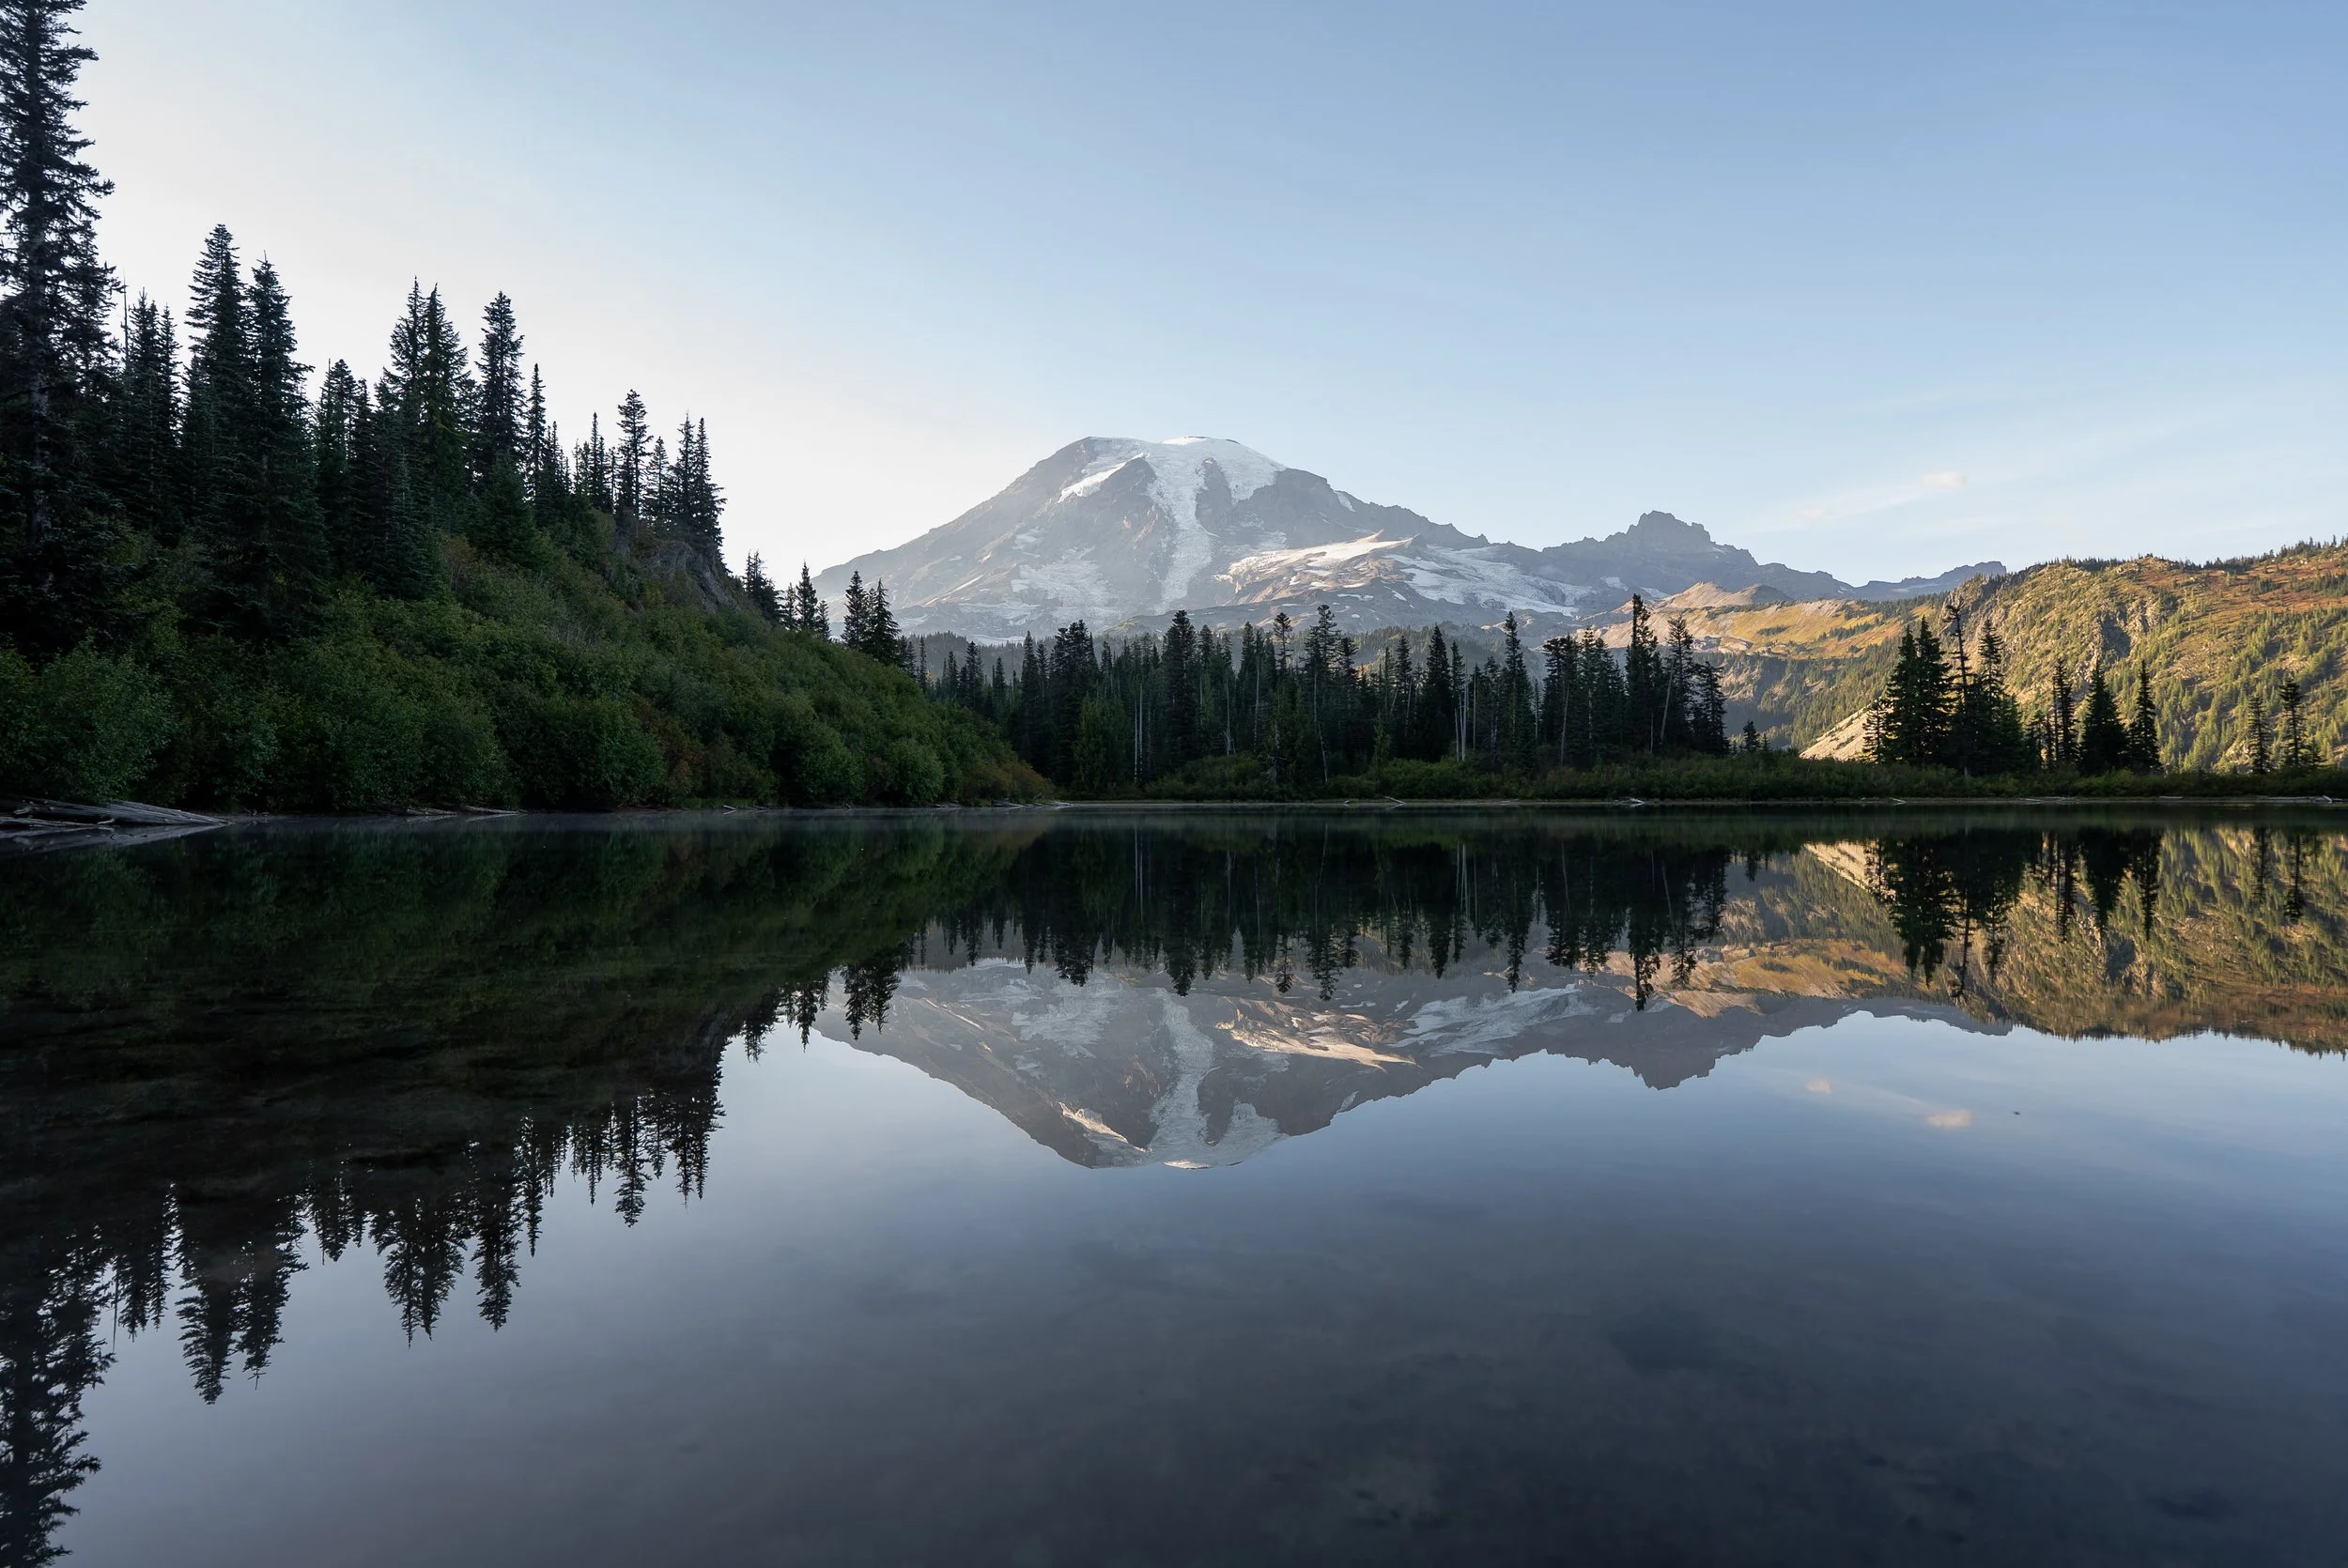
Day 7 and 8: Mount Rainier NP
Split your time between the Paradise and Sunrise regions of Mount Rainier National Park. Each offers unique views of Washington’s tallest mountain, Mount Rainier (4,392 m / 14,411 ft), alongside a wide variety of trails, waterfalls, and alpine lakes.
Paradise has more to see and do, so plan to spend a full day here. That said, it’s worth experiencing both areas. Staying one night near Paradise and one near Sunrise gives you the chance to catch sunrise and sunset at each location.
A timed entry reservation is required for both Paradise and Sunrise between 7 am and 5 pm on summer days and weekends. So make sure you book this in advance
Paradise must see and do
Christine Falls: A picturesque waterfall framed by a stone bridge which you will drive over. The viewpoint is located 20m off the side of the road
Narada Falls: A powerful 58 m waterfall also located on the side of the road. The lower viewpoint is best and is located a short 5 minute walk from the roadside.
Skyline Loop & Myrtle Falls - The park’s most popular trail, offering classic views of Mount Rainier, wildflower meadows in summer, and a chance to spot marmots. Myrtle Falls is just 0.8 km from the visitor center, so it’s easily accessible if you didn’t want to do the full hike.
Trail: 9.5 km / 500 m / 3-4 hours / Moderate / All Trails
Skyline loop

Christine Falls


Myrtle Falls by Intricate Explorer
Bench and Snow lake: A short, easy trail leading to two beautiful alpine lakes with views of Mount Rainier in the background. Bench lake is closer and has the better views. Hike details: 3.5 km / 140 m / 1.5 hours / Easy / All Trails
Reflection Lakes: Located right next to the road, this is one of the park’s most iconic photography spots, offering postcard-perfect reflections of Mount Rainier on a calm day. Ideal for sunrise and sunset
Bench lake

Snow lake

Reflection la
Pinnacle peak or Plummer Peak: Two peaks which offer incredible views over Mount Rainier, the Tatoosh Range and south towards Mount Adams. Pinnacle peak has the better views as its higher, but requires a technical and difficult scramble to reach the summit. Plummer peak would be the better choice for those who aren’t familiar with technical hiking. I did Pinnacle peak and it was one of my favourite hikes of the entire trip
Hike details: 6 km / 550 m / 2–4 hours / Moderate / All Trails

Sunrise must see and do
Sunrise Point Lookout : A scenic roadside viewpoint offering panoramic views of Mount Rainier and the Cascade Range. Coincidently it’s a great choice for sunrise
Mount Fremont Lookout: One of the park’s most famous fire lookouts, with sweeping views of Mount Rainier, Emmons Glacier, and surrounding valleys. A great choice for sunset, he trail is very steady and not technical at all. The lookout won’t be open so pack some layers as it does get chilly.
Hike details: 9.5 km / 338 m / 3 hours / Moderate / All Trails


Where to stay
Paradise – Cougar Rock Campground - Located just outside the Paradise area, Cougar Rock offers forested campsites with easy access to the park’s main hiking trails. Reservations are highly recommended in summer, but there are a limited number of first-come, first-served spots as well.
Sunrise – White River Campground - Tucked into a scenic forested valley, White River Campground is the closest option to the Sunrise area. It’s only available on a first-come, first-served basis, so aim to arrive early, especially on weekends.
What We Did
On our first day exploring the Paradise area, we stopped at Christine Falls and Narada Falls before hiking the Skyline Trail in the early afternoon. For sunset, I hiked up to Pinnacle Peak, while my wife explored the shorter Snow and Bench Lakes trail. We camped overnight at Cougar Rock Campground.
The next morning, we caught sunrise at Reflection Lakes before making the long drive around to the Sunrise area (we had a 3-hour detour, which was pretty brutal). That evening, we hiked to Fremont Lookout for sunset, then stayed at White River Campground. The following morning, we watched the sunrise from Sunrise Point before starting the long drive toward Colchuck Lake.
We got accommodation at both locations by heading there first thing in the morning before exploring the surrounding areas.

Day 9: Colchuck Lake
After waking up in Sunrise, we hit the road for a long but rewarding day. The drive to Colchuck Lake takes about 4 hours and leads you into one of Washington’s most iconic hiking destinations, the Enchantments. To make the most of it, aim to leave just after sunrise. Along the way, make a quick stop at Little Tipsoo Lake, an alpine gem with perfect views of Mount Rainier on calm mornings.
Things to do
Little Tipsoo Lake - Just a short detour from the road as you leave the Sunrise area. The upper little lake is the easiest to reach and offers arguably the best reflection views of Mount Rainier, especially at sunrise.
Leavenworth: A bizarre yet impressive Bavarian-style town surrounded by alpine peaks. Worth stopping at for a bite to eat and coffee before beginning the drive north

Little Tipsoo lake
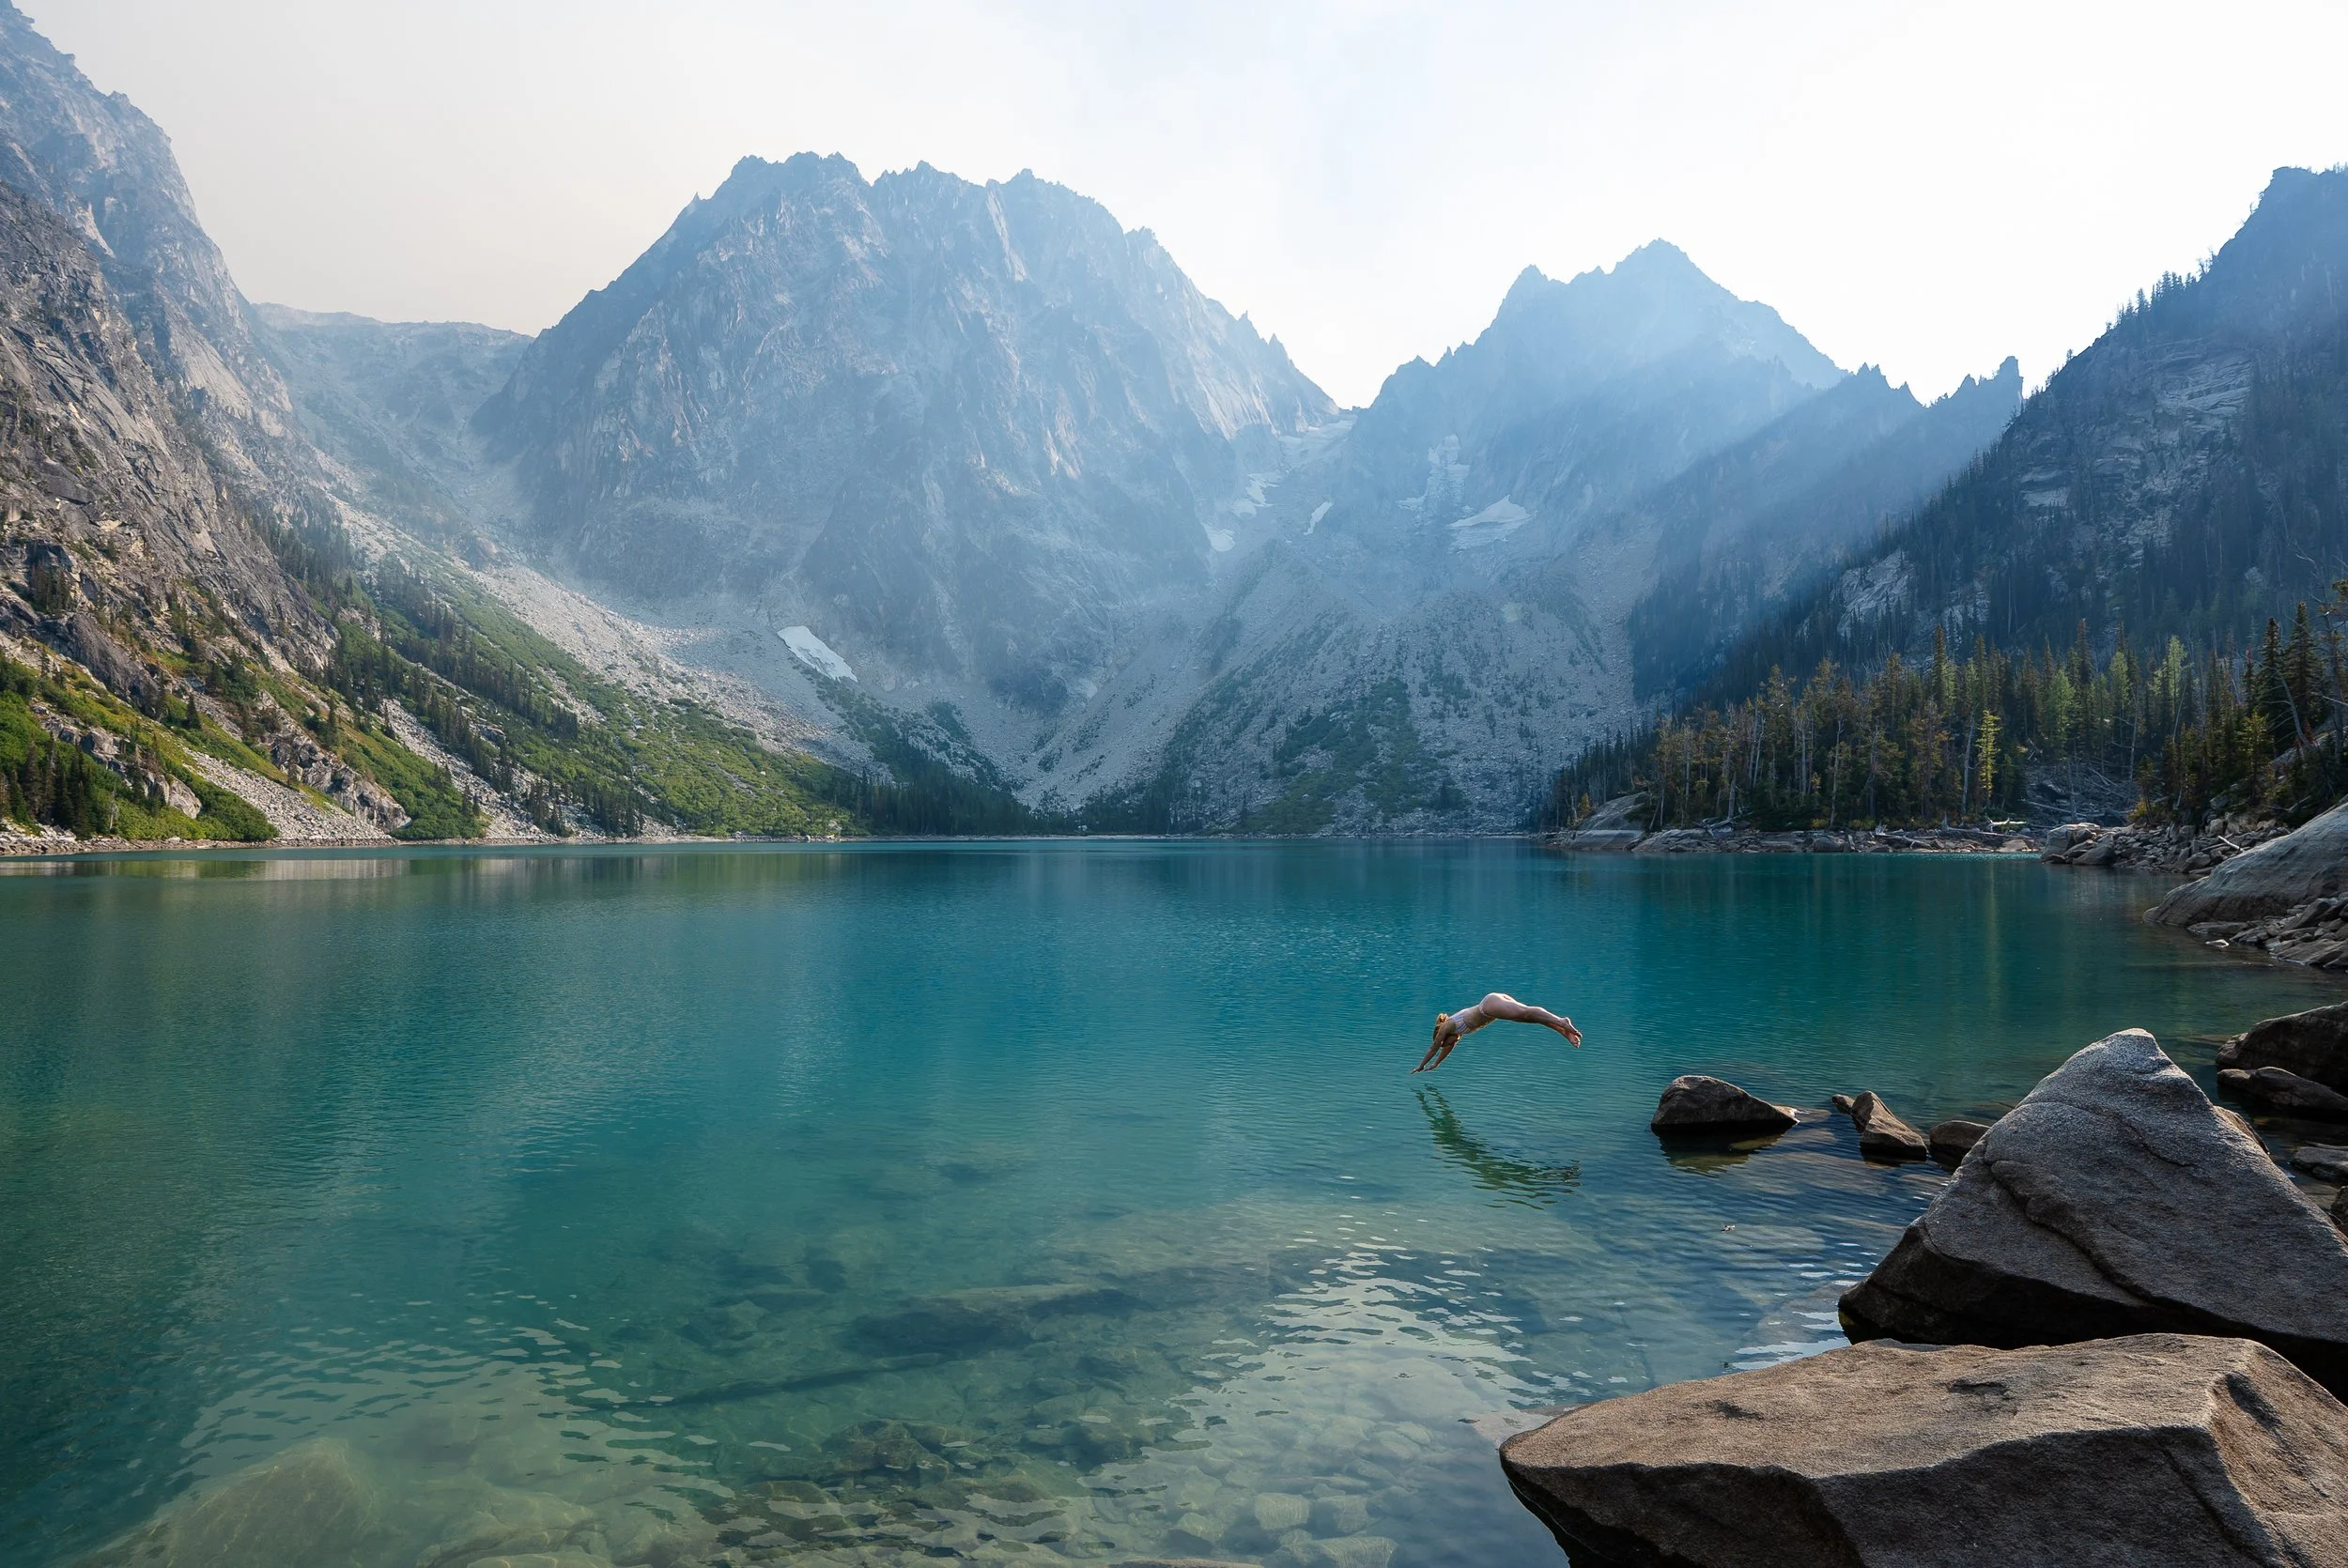
Colchuck Lake Hike - A moderate but relentless climb through pine forest and rocky switchbacks to one of the state’s most beautiful alpine lakes. Expect a steady uphill the entire way, but the final view is worth every step. Pack some swimmers as the lake is too inviting no to swim in. The road to the Stuart Lake Trailhead is steep and unpaved, but typically manageable for low-clearance vehicles, just take it slow. If you're in a rental, be sure to check your insurance terms regarding unpaved roads.
Hike details : 14 km / 720 m elevation gain / 4–7 hours / Moderate–Hard


Where to stay
After eight nights of van life, we treated ourselves to a stay at the Sleeping Lady Mountain Resort in Leavenworth. It had comfortable rooms, beautiful surroundings, a pizzeria and was just a short drive from the Colchuck Lake trailhead. Bonus: we did laundry the next morning, which was much-needed halfway through our adventure.
Other options nearby include:
Eightmile Campground – Located along Icicle Creek Road, this forested campsite is closer to the trailhead but operates seasonally and is first-come, first-served.
Lodging in Leavenworth – A Bavarian-style mountain town packed with charm, breweries, restaurants, and a variety of hotels and cabins. It’s a fun place to unwind with proper meals and amenities after the hike.
Approximate drive times
Sunrise → Little Tipsoo Lake: 20–25 minutes / 10 miles
Little Tipsoo Lake → Stuart Lake Trailhead: 3 hours 30 minutes / 140 miles
My thoughts
This was one of the most memorable days of the trip, yet it wasn’t actually in our original itinerary as I initially didn’t think the detour was worth it. Thankfully I was gladly convinced otherwise. While it was a push with the driving and hiking combined, the payoff was more than worth it. We set off at 2pm and were back down at 7pm
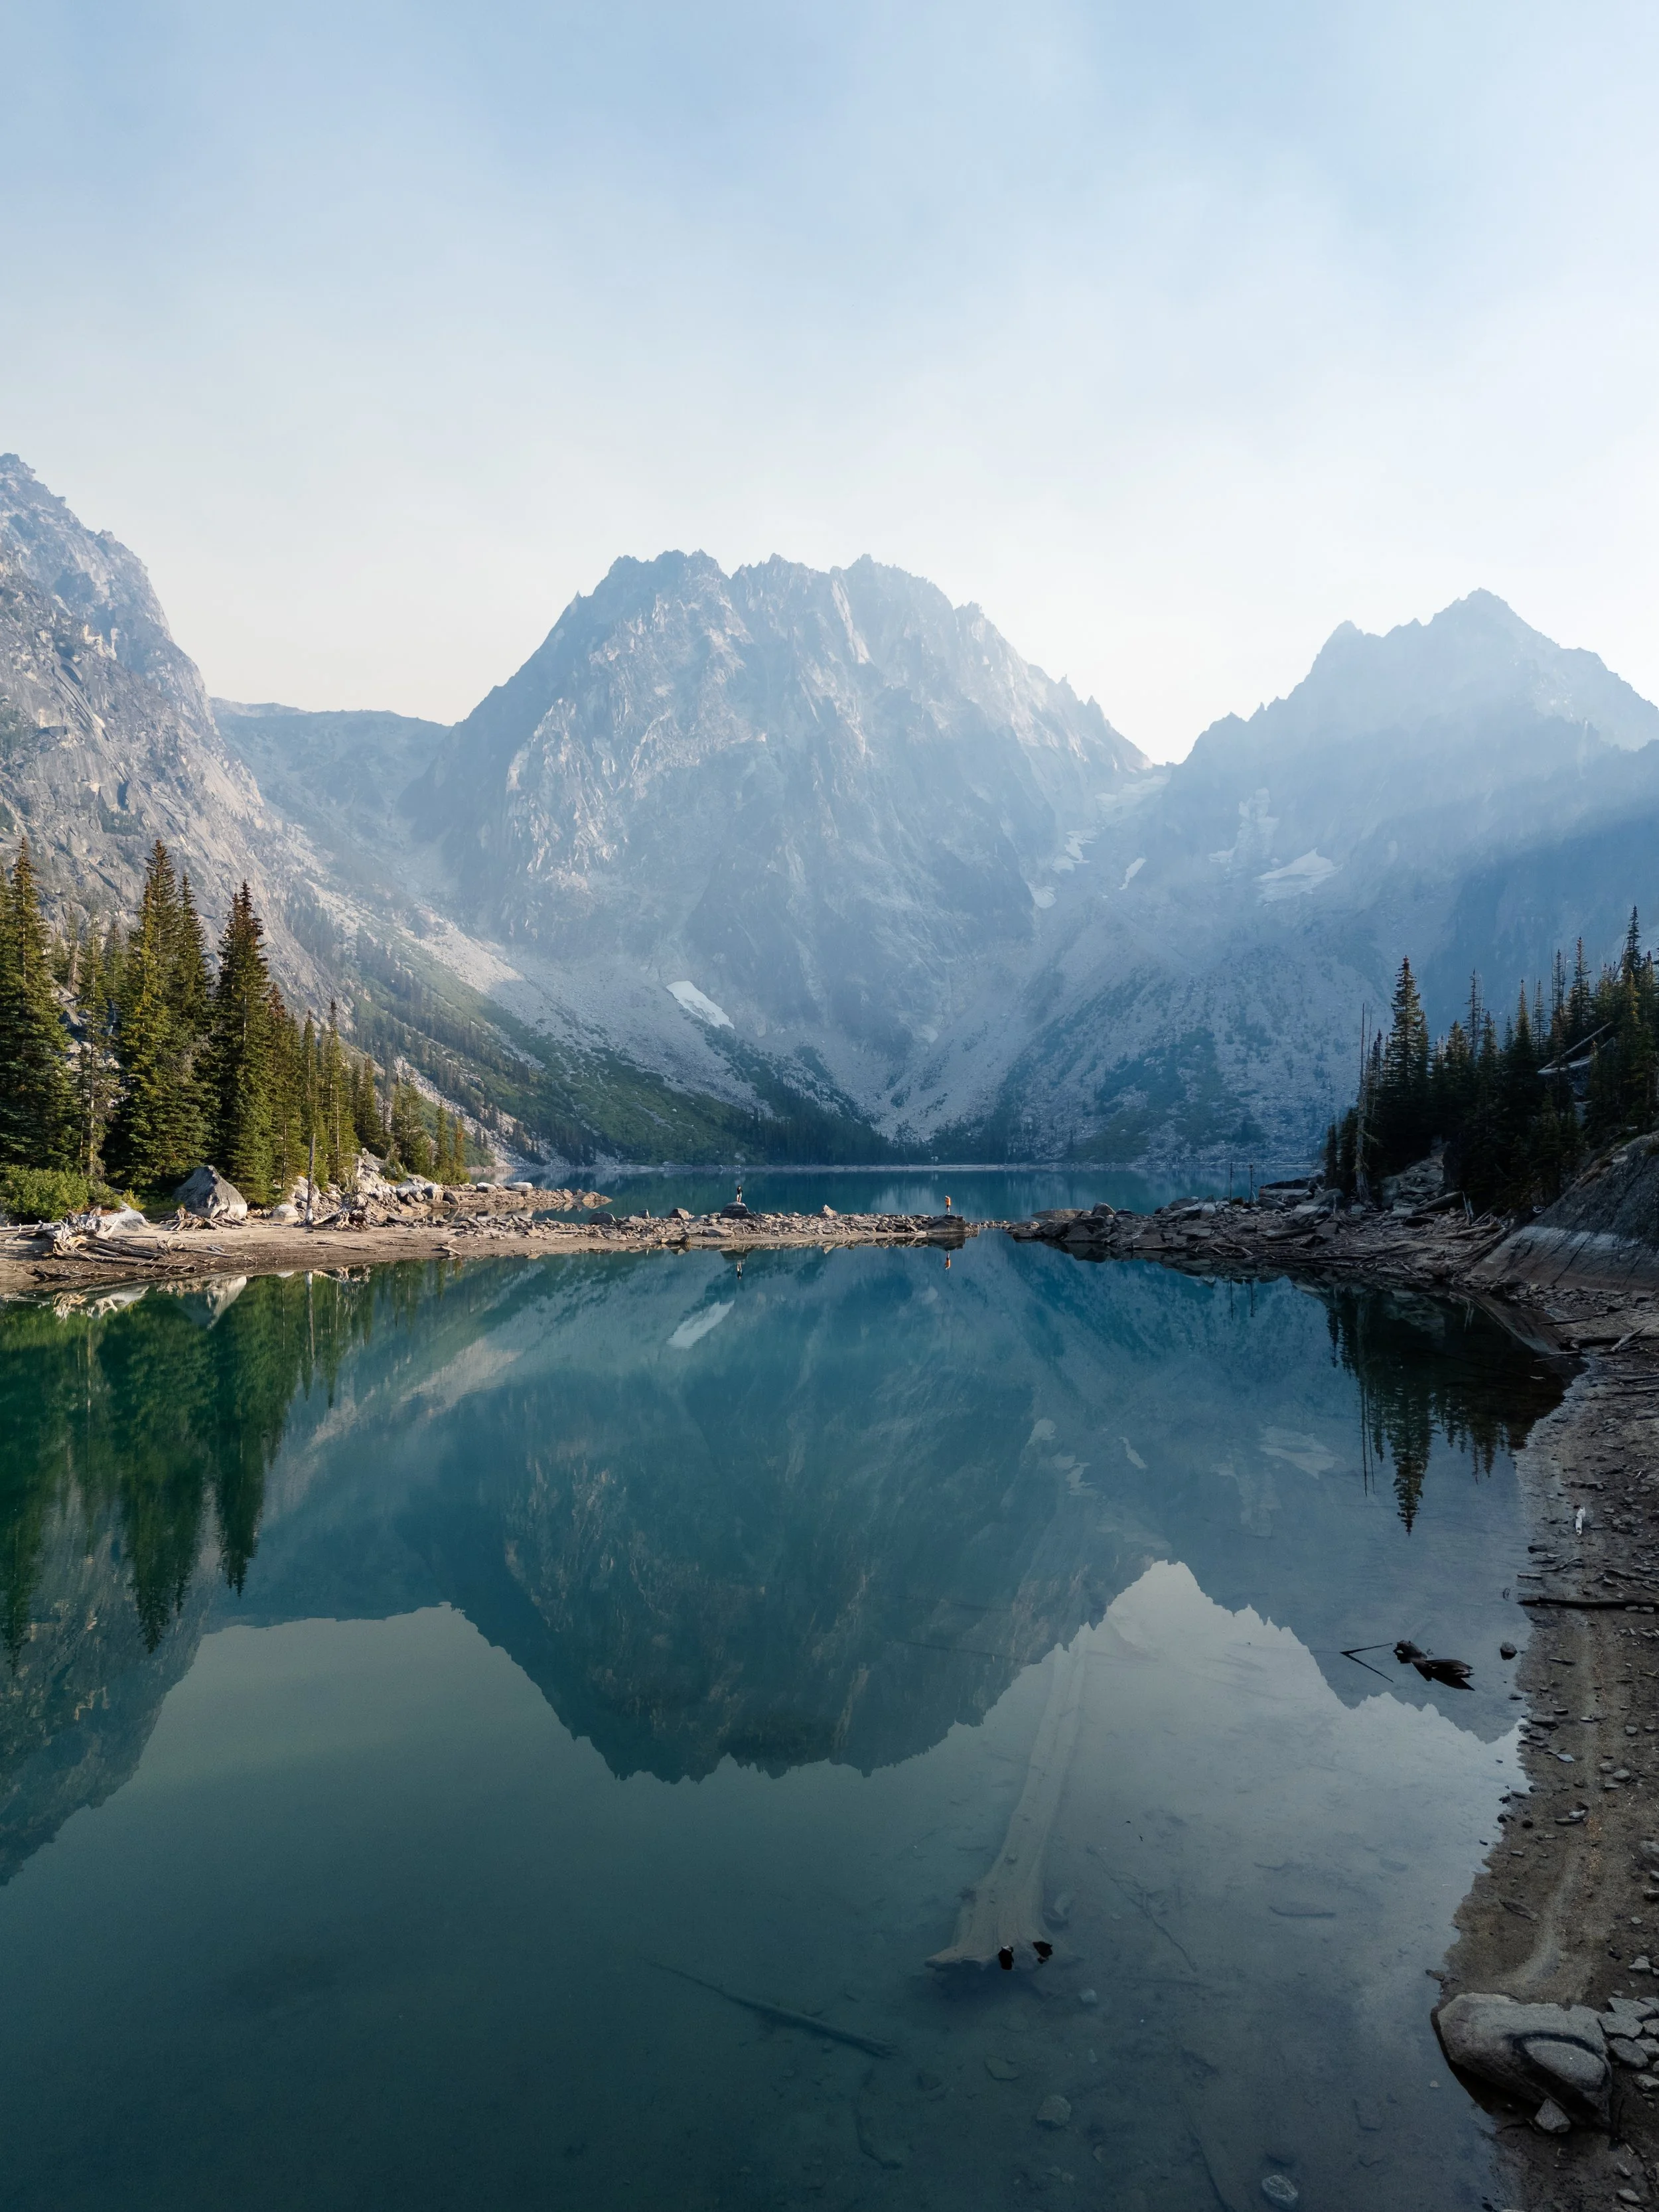
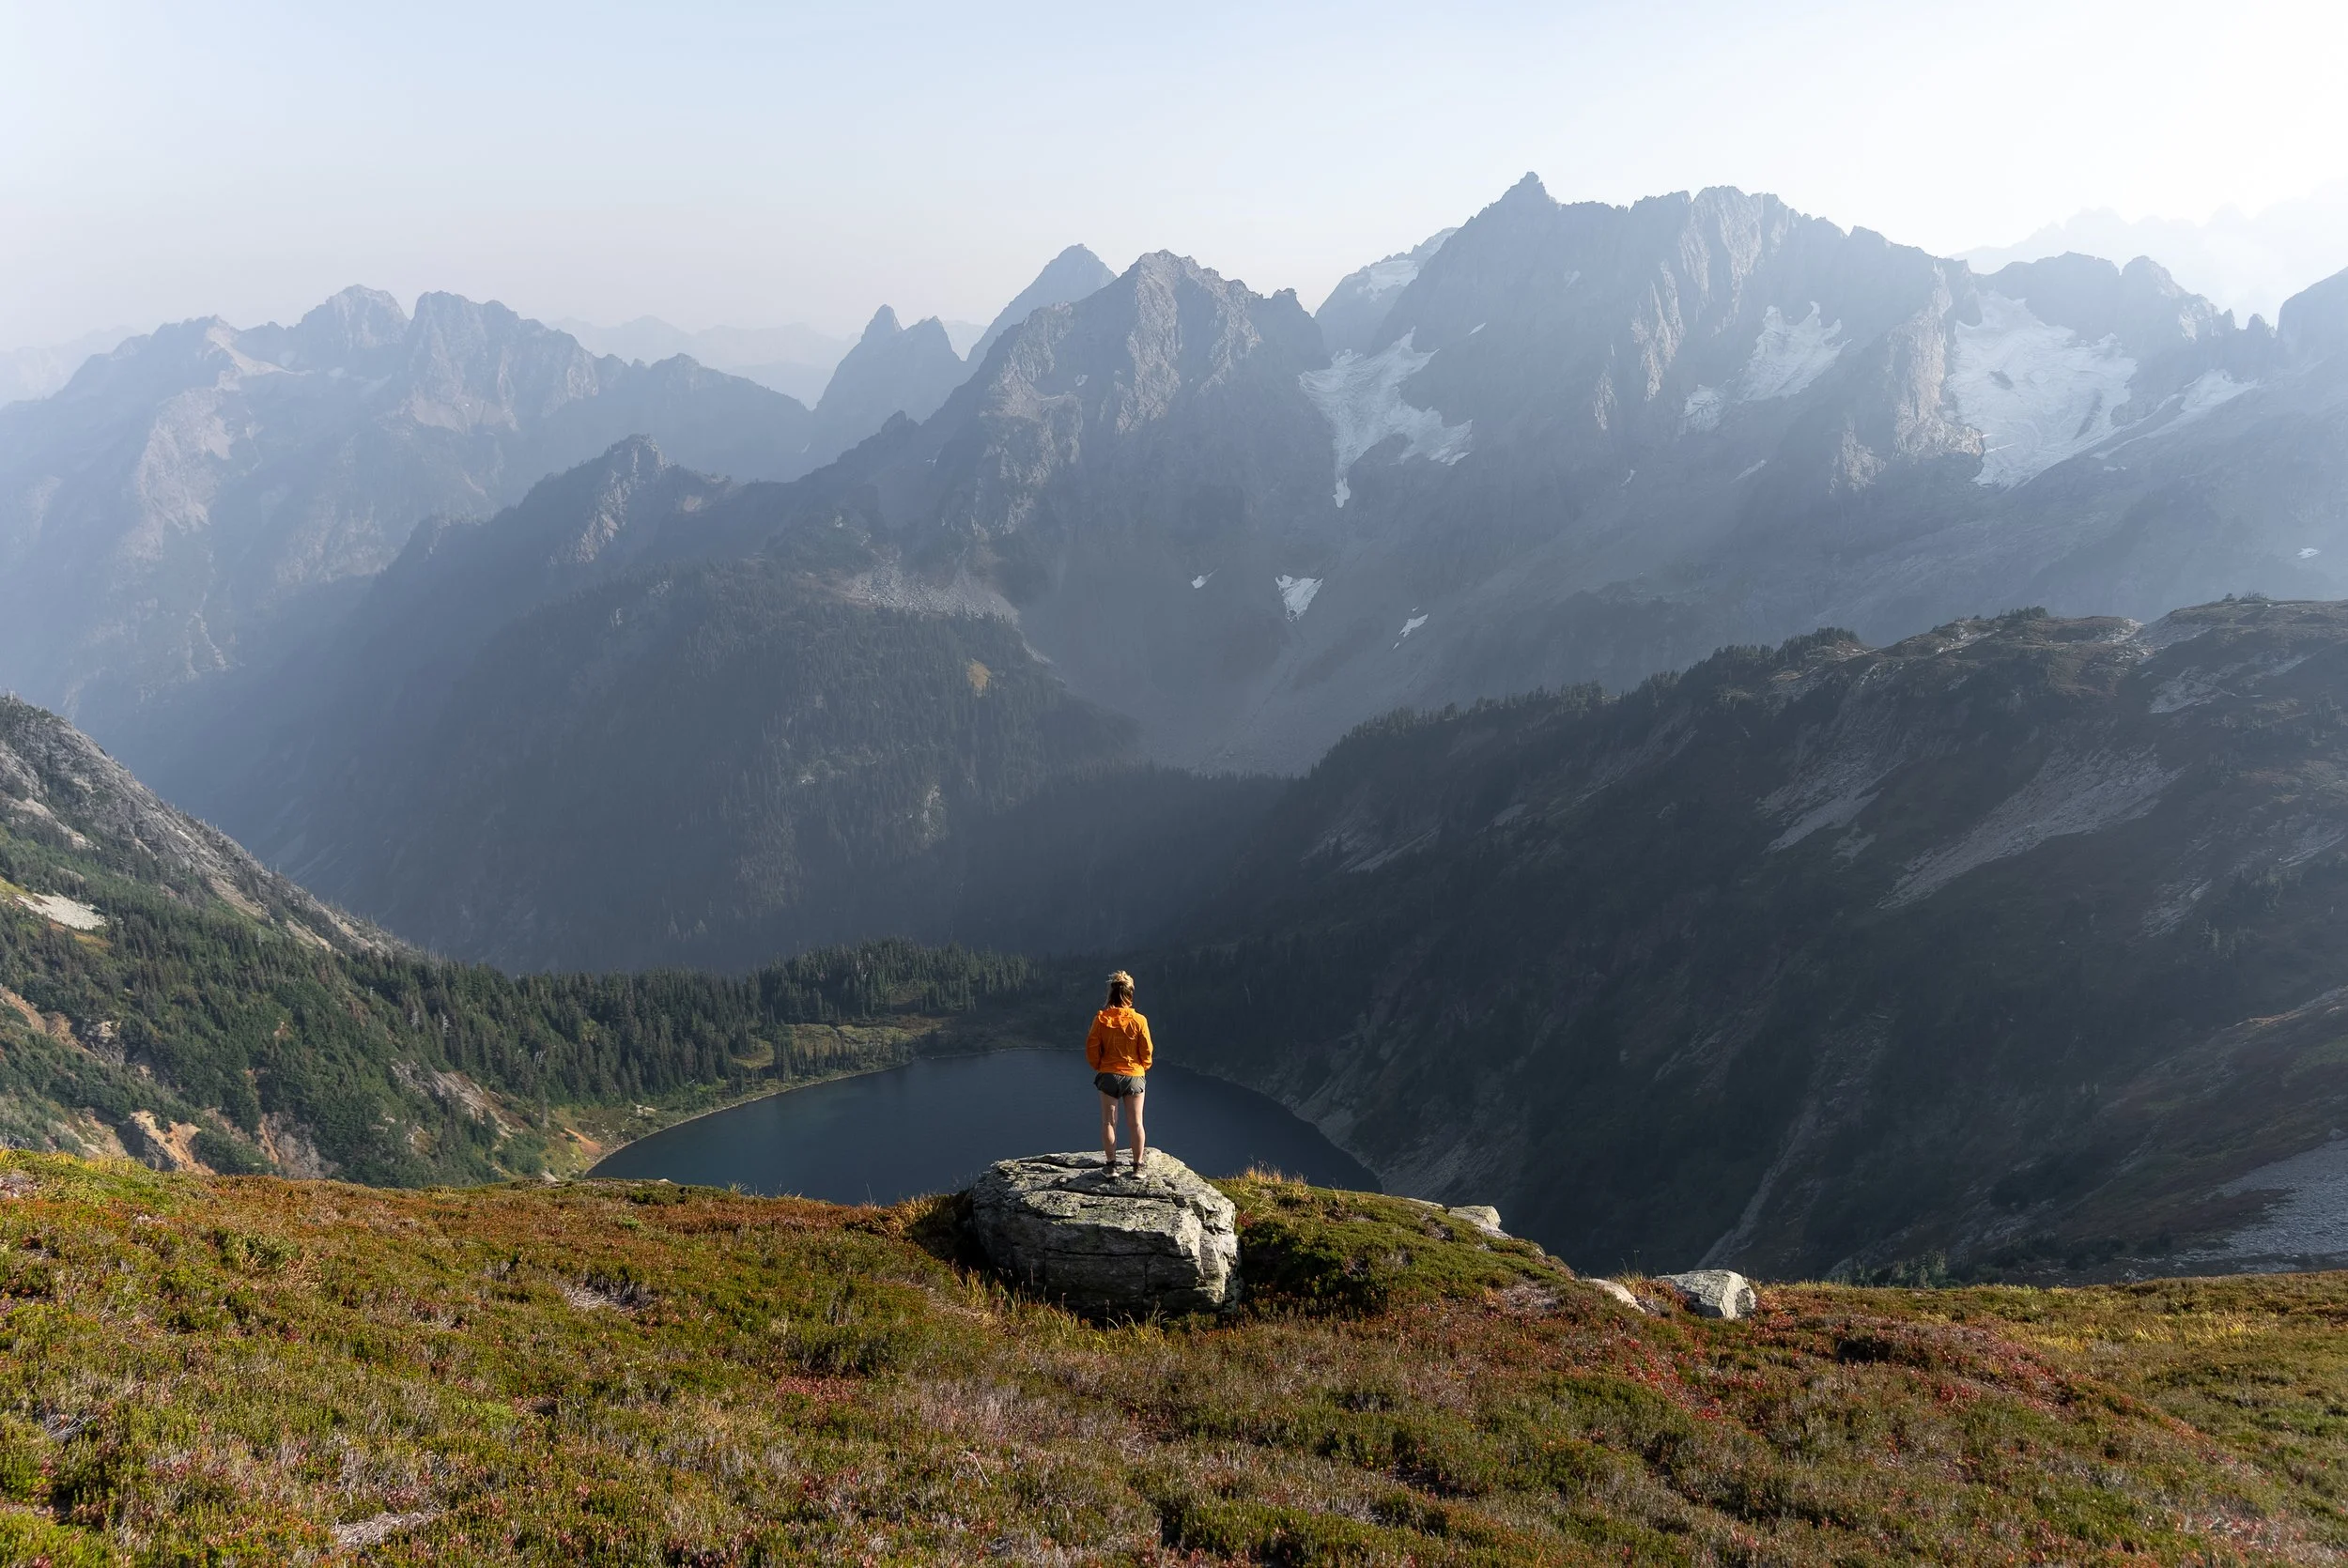
While the full Enchantments thru-hike is a bucket-list challenge at over 28 km with 1,200 m of elevation gain (and typically requires an overnight permit), the out-and-back hike to Colchuck Lake offers more than enough magic for a single day. With turquoise water cradled between jagged peaks like Dragontail and Colchuck, it's one of the most jaw-dropping alpine lakes in the U.S

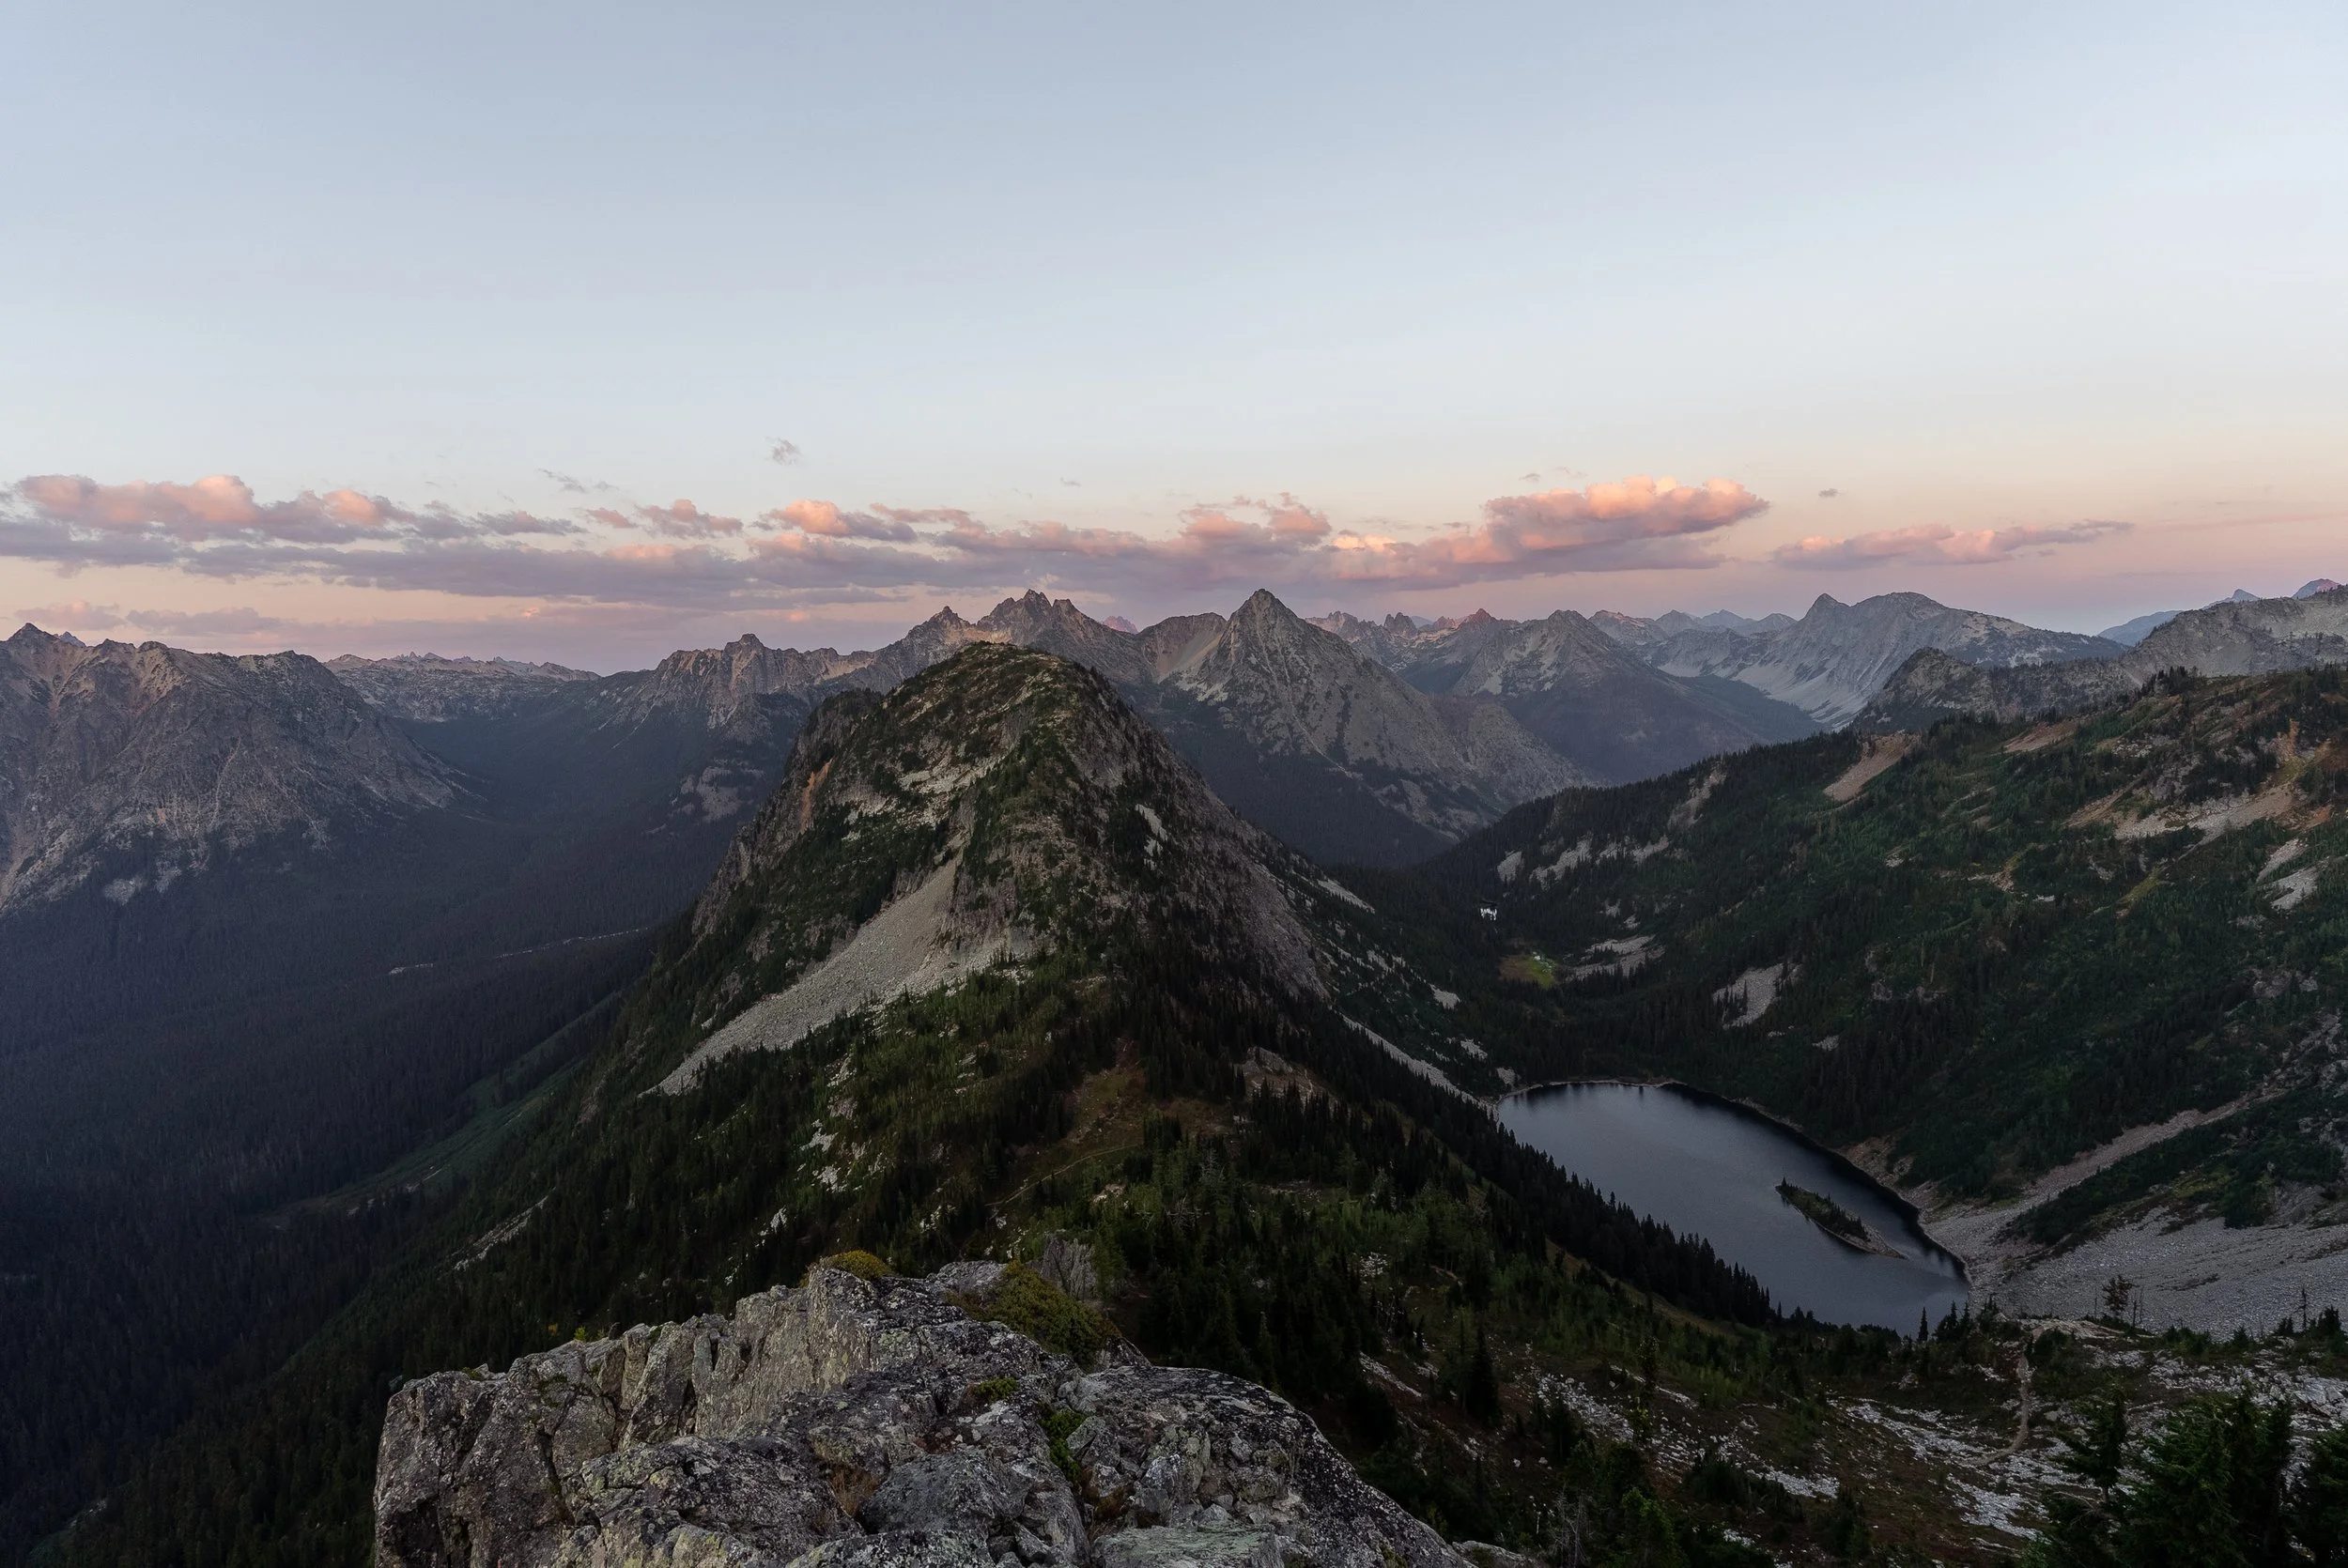
Days 10 & 11: North Cascades
The North Cascades is one of the most rugged and spectacular parts of Washington, with jagged peaks, turquoise lakes, and some of the state’s best hiking. With two days here you’ll have time to explore alpine trails, scenic overlooks, and glacial lakes along Highway 20.
Stock up on supplies in Wenatchee (there’s a Fred Meyer here), as this will be the last large supermarket you’ll pass for the next four days. There are no major grocery stores in the North Cascades or around Mount Baker, only small general stores.
Things to see do
Winthrop: A quaint Wild West–themed town with wooden boardwalks, saloons, and shops. Well worth stopping at for a well-earned break
Washington Pass Overlook: A must-stop viewpoint with a short paved trail leading to sweeping views of Liberty Bell Mountain and the winding highway below.
Diablo lake: Framed by mountains and famous for its surreal turquoise colour created by glacial silt.


Maple Pass Loop: One of Washington’s best alpine hikes, offering endless panoramic views of peaks and lakes. Although best done counterclockwise for a gentler climb, I’d recommend doing it clockwise if hiking it for sunset as the descent in the dark is much easier.
Hike Details: 11.5 km / 610 m / 4–6 hours / Moderate / WTA Route
Sahale Arm & Cascade Pass - Perhaps the ultimate hike in the North Cascades and the most difficult on this blog. It climbs to Cascade Pass before continuing along Sahale Arm, a wide ridge which offers jaw-dropping views of glaciers, jagged peaks, and alpine meadows: The Cascade Pass Trailhead is only accessible via the 14 mile Cascade River forest road. It’s technically suitable for low-clearance vehicles, but the first 7 miles is very beat up washboard road and requires slow, careful driving. The 14 mile road took us an hour to drive
Hike Details: 18 km / 1,000 m / 5–9 hours / Hard - Very hard / WTA

Other hikes to consider
Blue lake hike: A shorter hike which takes you up to a turquoise alpine lake framed by Liberty Bell Mountain and granite spires. Hike details: 7 km / 300 m / 2–3 hours / Easy / WTA
Park Butte Lookout: A classic fire lookout hike with stunning views of Mount Baker and nearby glaciers. This does involve river crossings which get worse in the afternoon after snow melt. Hike details: 12 km / 650 m / 4–6 hours / Moderate / All Trails Route
Where to stay
Winthrop / Mazama area: Great for the first night if you’re coming from Leavenworth. Close to Maple Pass and Blue Lake. Options include Klipchuck Campground and Silverline Resort (RV and tent sites).
Colonial Creek Campground: The most popular campground in the park, right on the shores of Diablo Lake. Tent and RV sites, surrounded by forest, with trail access nearby.
Thunder Point / Gorge Lake Campgrounds: Smaller options near Diablo Lake, good if Colonial Creek is full.
Skagit River RV & Campground: Conveniently located along Highway 20 by the Skagit River. A practical base if you plan to tackle the Sahale Arm / Cascade Pass hike
Approximate Drive times
Leavenworth → Winthrop: 2h 30m / 125 miles
Winthrop → Maple Pass Trailhead: 0h 45m / 35 miles
Maple Pass → Diablo Lake: 1h 00m / 50 miles
Diablo Lake → Cascade Pass / Sahale Arm Trailhead: 2h 00m / 50 miles
What we did
After driving from Leavenworth to Maple Pass via Winthrop, I hiked the Maple Pass Loop for sunset (my wife relaxed in the van) before we camped at Colonial Creek Campground on the shores of Diablo Lake.
The next morning, we stopped at the Diablo Lake Overlook before heading up the rough forest road to the Cascade Pass Trailhead to hike up to Sahale Arm. Despite being the toughest hike of the trip, it ended up being one of the most rewarding, my wife loved it, and we were even lucky enough to spot a bear along the way.
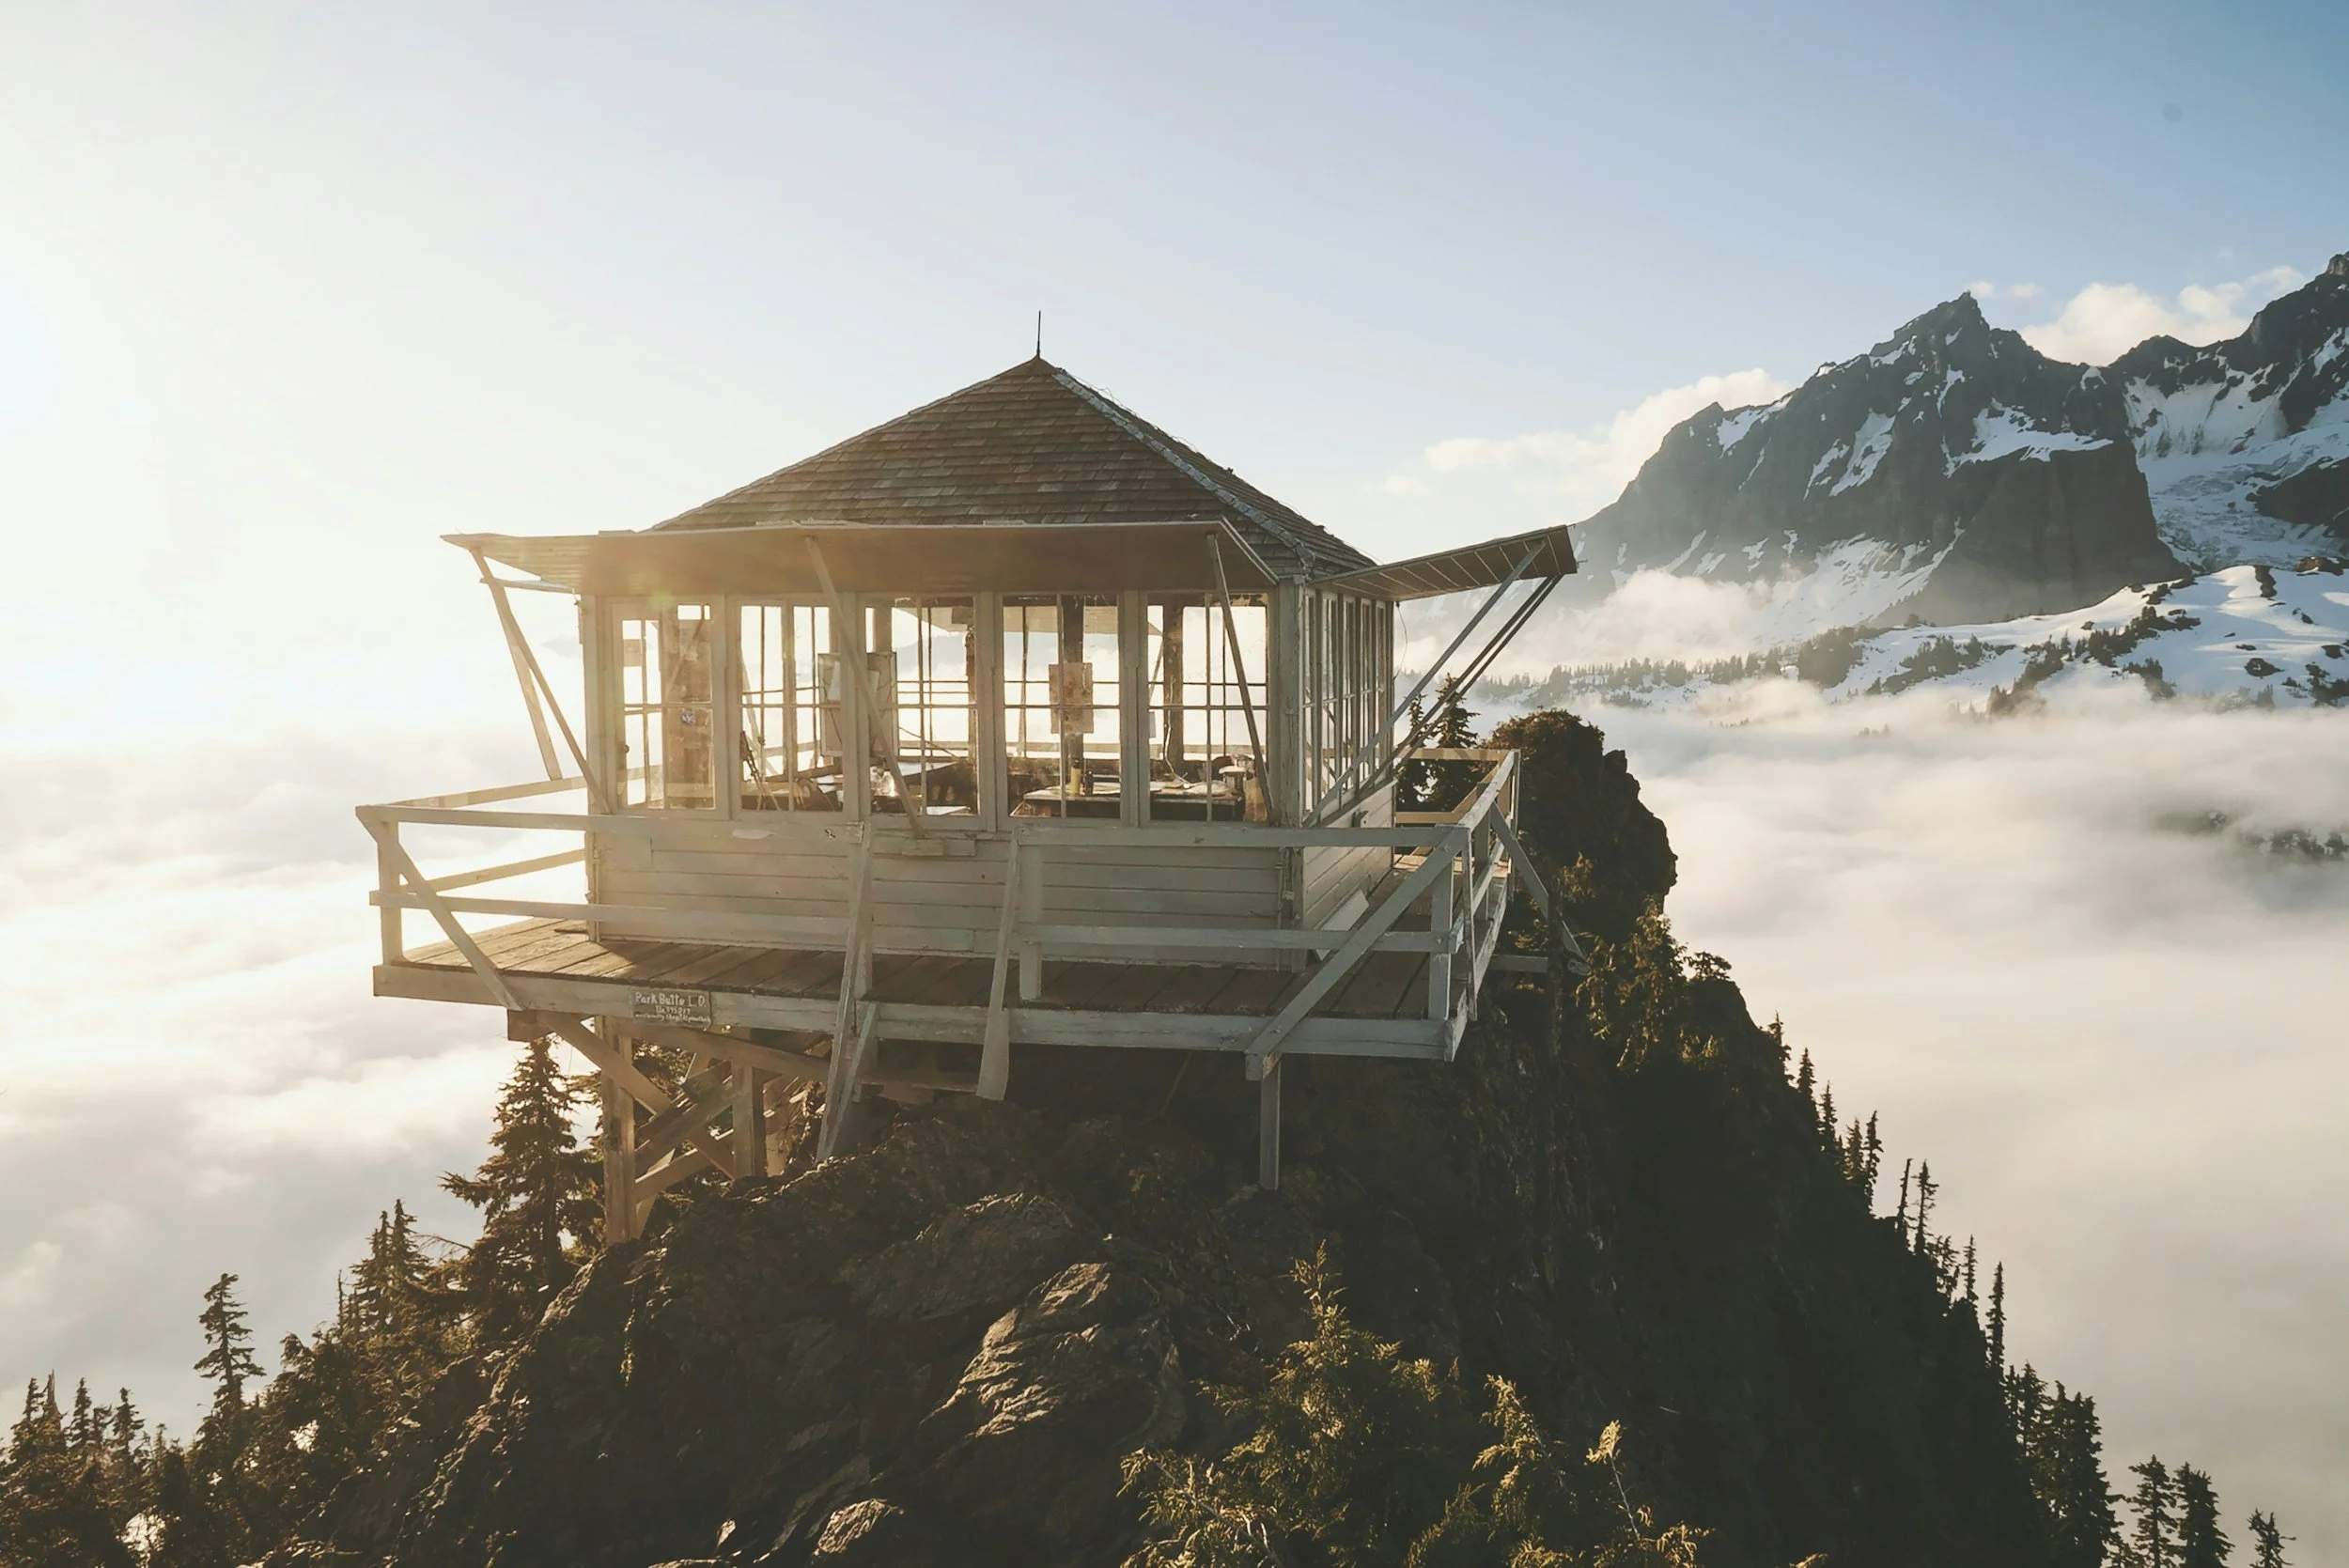
Park Butte lookout by Kurt Von
Days 11 & 12: Mount Baker
The Mount Baker area is one of Washington’s most spectacular alpine playgrounds. Artist Point, at the end of the Mount Baker Highway, offers panoramic views of Mount Baker and Mount Shuksan and serves as the trailhead for several incredible hikes. With two days, you can explore a mix of short scenic stops and longer alpine hikes.
Must see and do
Nooksack falls - A roadside stop to see this 88 ft waterfall cascading through a rocky gorge.
Artists point - A dramatic viewpoint at the end of the Mount Baker Highway, surrounded by alpine ridges and glaciers. It’s also the starting point for several hikes, including Ptarmigan Ridge and Chain Lakes Loop.
Picture lake - A small lake with one of Washington’s most photographed views: Mount Shuksan reflected in the still waters. The accessible boardwalk makes this an easy stop.
Ptarmigan Ridge – A breathtaking ridge hike that winds through high alpine terrain with nonstop views of Mount Baker, Mount Shuksan, and the Coleman Glacier. While it’s a longer outing, the trail is relatively gradual and far less demanding than some of the other North Cascades hikes. Expect wildflower meadows, rocky outcrops, and the possibility of spotting mountain goats. You can turn around at any point, making this a flexible choice depending on time and energy. Trail details: Up to 15.3 km return / 460 m elevation / 4–6 hours / Moderate / AllTrails
Chain lakes loop - A classic Mount Baker loop trail that links a series of alpine lakes via scenic ridgelines and flower-filled meadows. The route starts and ends near Artist Point, offering some of the best views in the area. Expect some climbs, but nothing too intense. Trail details: 10.1 km loop / 550 m elevation / 3–4 hours / Moderate/ AllTrails


Other hikes to consider
Yellow Aster Butte – A demanding but rewarding alpine hike that climbs through meadows and switchbacks to deliver panoramic views of the North Cascades. In late summer and early fall, the area is scattered with tarns and vibrant wildflowers or golden larches. The trailhead is located at the end of Forest Road 3065, which is unpaved but manageable with care. Trail: 12 km return / 760 m elevation / 4–5 hours / Hard / AllTrails Route
Winchester Mountain Lookout – A short but steep trail leads to one of Washington’s most scenic overnight lookouts. The 360-degree views from the top are unreal, especially at sunrise or sunset. The road to the Winchester trailhead is in rough shape and only suitable for high-clearance 4x4s. We had to park at the Yellow Aster Butte trailhead and luckily hitched a ride up to the top (hiking it adds another 6-7k miles round trip). Hike details: 5.1 km return / 420 m elevation / 2–3 hours / Moderate–Hard / AllTrails Route
Where to stay
Silver Fir Campground – Forested sites along the North Fork Nooksack River, about 40 minutes from Artist Point. First-come, first-served, no hookups.
Douglas Fir Campground – A rustic campground near Glacier, WA, offering shaded forest sites with river access. A good base for exploring the Mount Baker Highway.
Luxury Getaways in Glacier – If you’d like a break from camping, Glacier has cabins and vacation rentals with full amenities. Staying here keeps you close to the trailheads while offering more comfort. We stayed at Twin Lakes and it was ideal.
Practical tips
Parking fills up fast at Artist Point and nearby trailheads, especially on weekends. Arrive early to secure a spot.
Cell service is notoriously poor once you leave Glacier, so download maps and trail info ahead of time. if you need wifi, you can get it outside the Luxury Getaways reception in glacier
Groceries are very limited so consider calling by Bellingham on route to pick up supplies
Approximate drive time: Marblemount → Artist Point: 2h 30m / 110 miles
What we did
On our first day, I created a custom hike combining parts of both the Ptarmigan Ridge and Chain Lakes Loop trails. Since the two hikes share the same trailhead and overlap for the first couple of kilometres, we followed the shared section before branching off toward Ptarmigan Ridge, then backtracked and explored the Chain Lakes area. We didn’t hike all the way to the saddle overlooking the lakes, but the Y-shaped out-and-back route we created gave us the best views from both hikes without needing to cover their full distances. We even squeezed in a cold but refreshing swim in one of the Chain Lakes.
That evening, we stayed at Artist Point for sunset, before heading down to check into our apartment in Glacier for the night. For food, I cannot recommend Gunner’s BBQ in Glacier enough. it was easily one of the best American-style barbecue spots we’ve ever tried.
The following day was slower-paced. After a relaxed morning, we made our way up toward Winchester Mountain Lookout for sunset. Be warned: the final section of the road up to Twin Lakes is in a horrendous condition and is only suitable for high-clearance 4x4s. We parked at the Yellow Aster Butte trailhead and were lucky enough to hitch a ride with another hiker up to the lookout trailhead. We stayed up top for sunset, and by some stroke of luck, managed to hitch another lift down just as the light faded.

Sunset from artists point

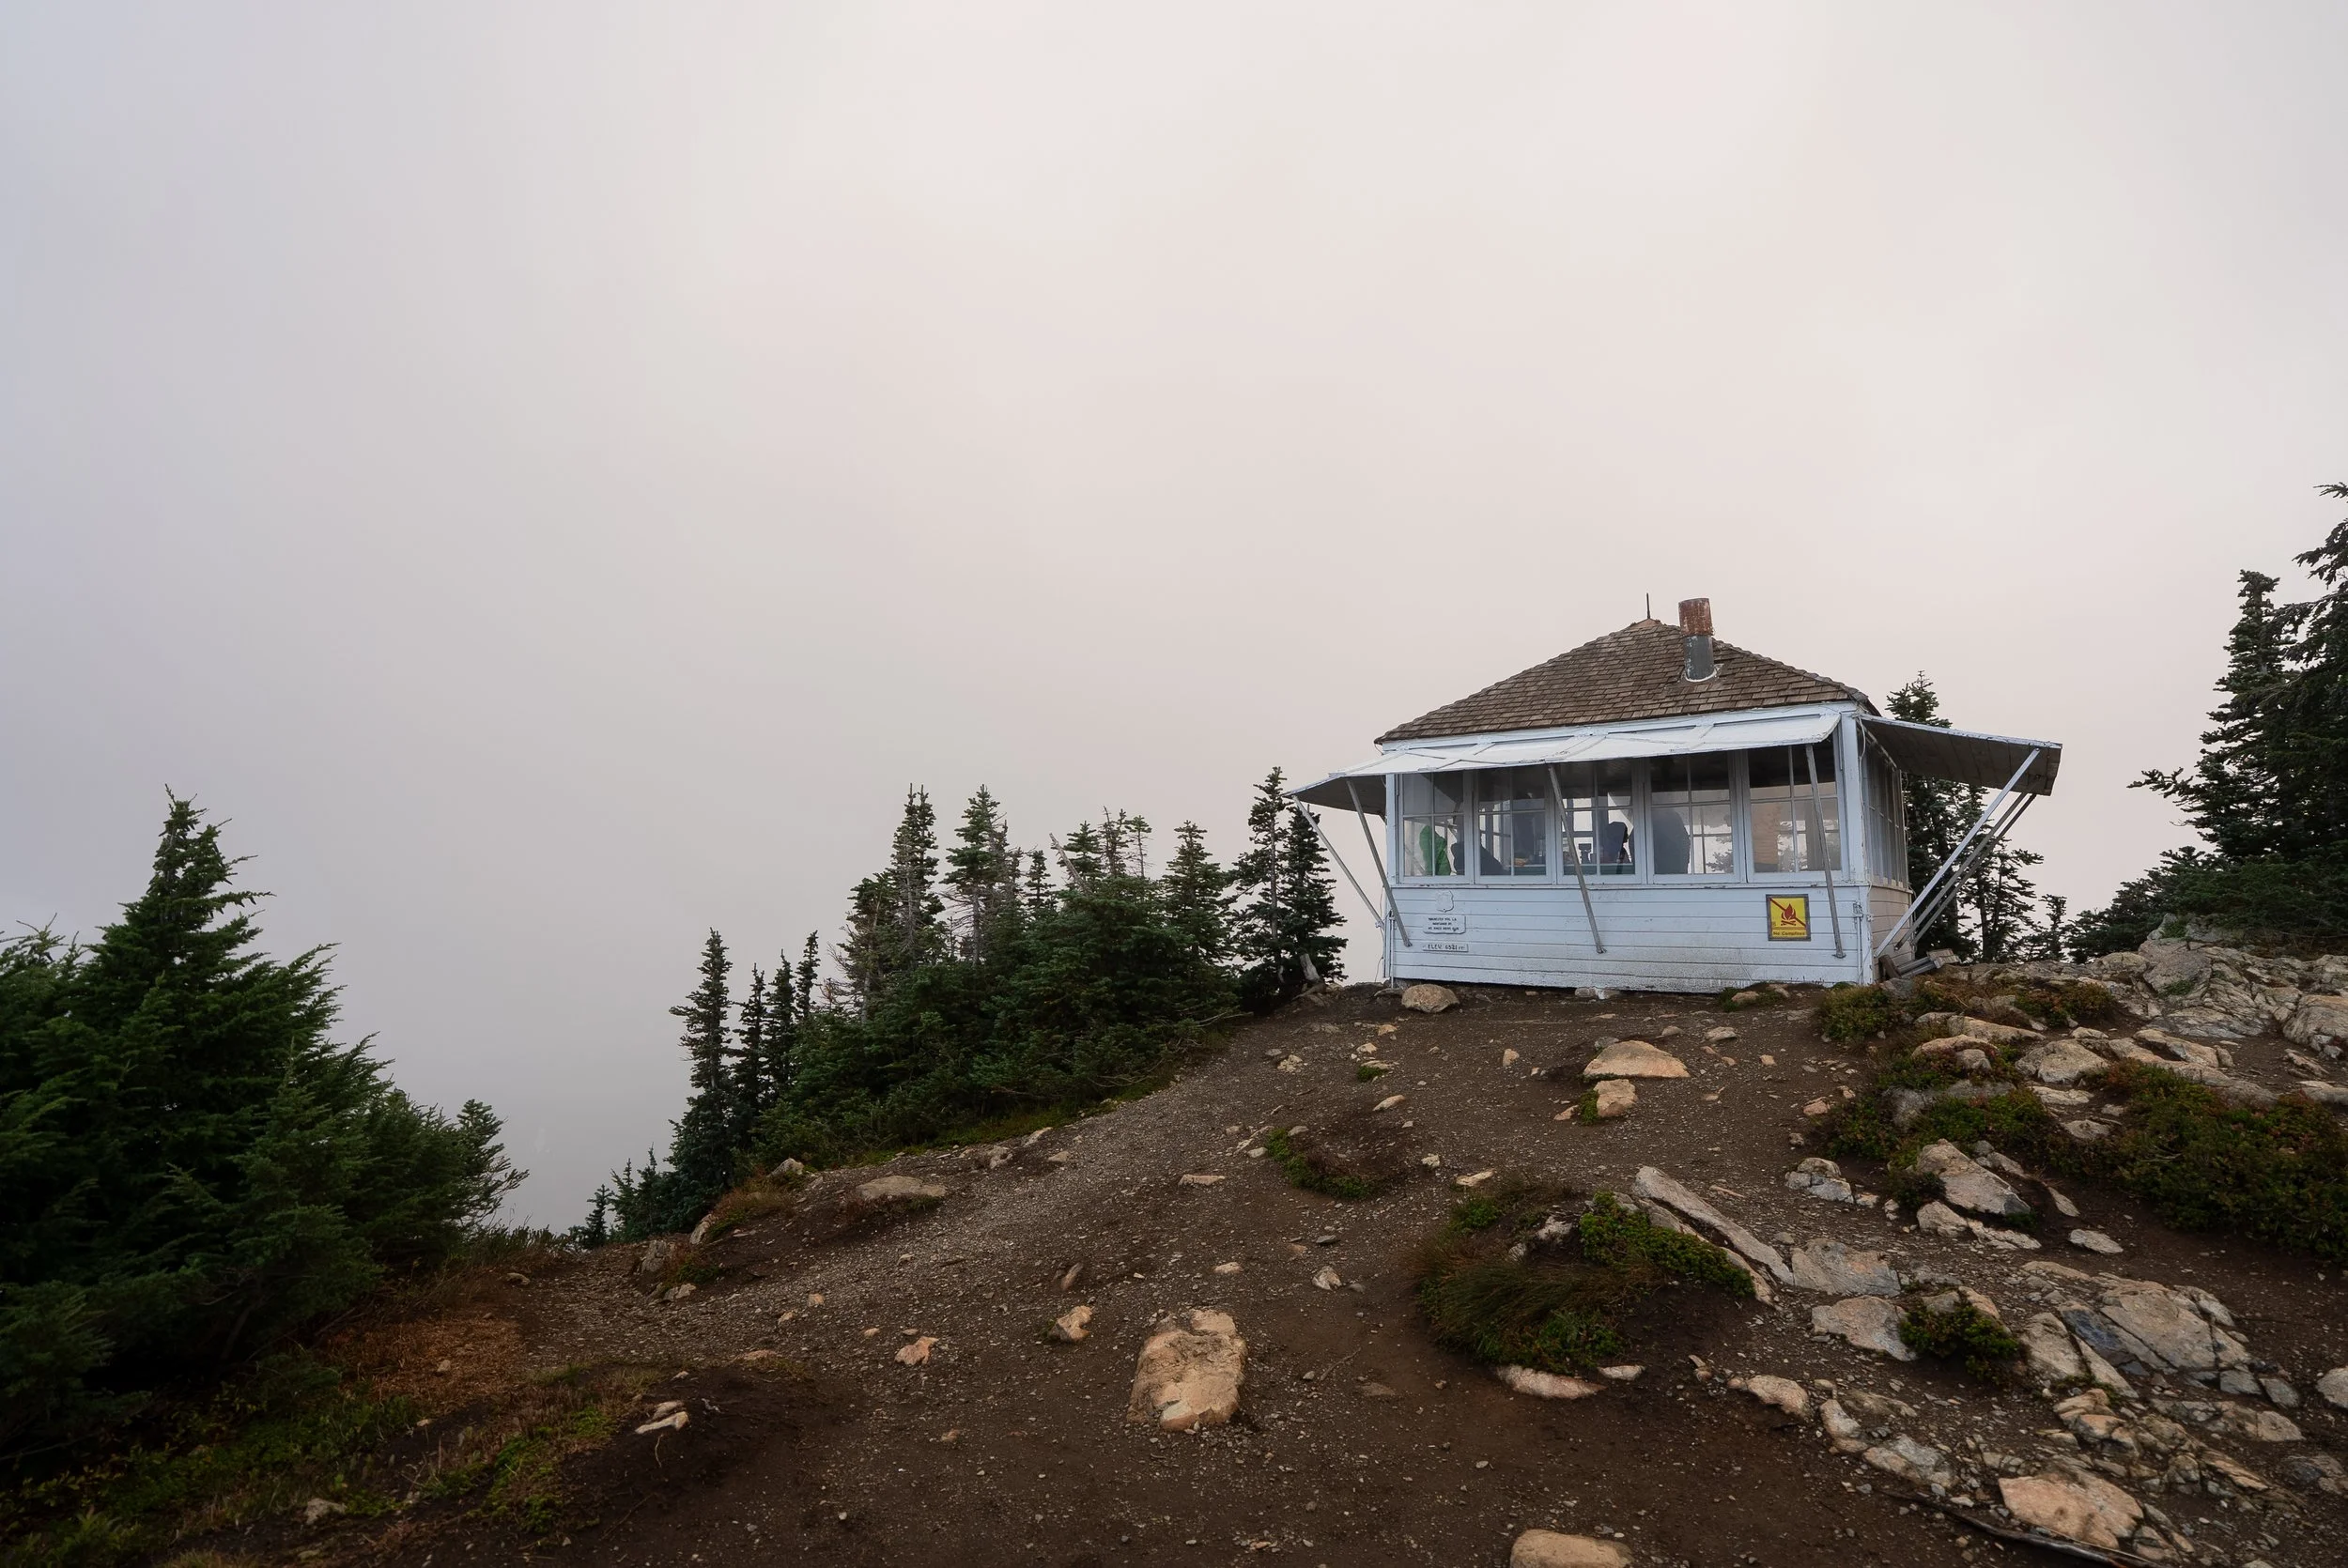
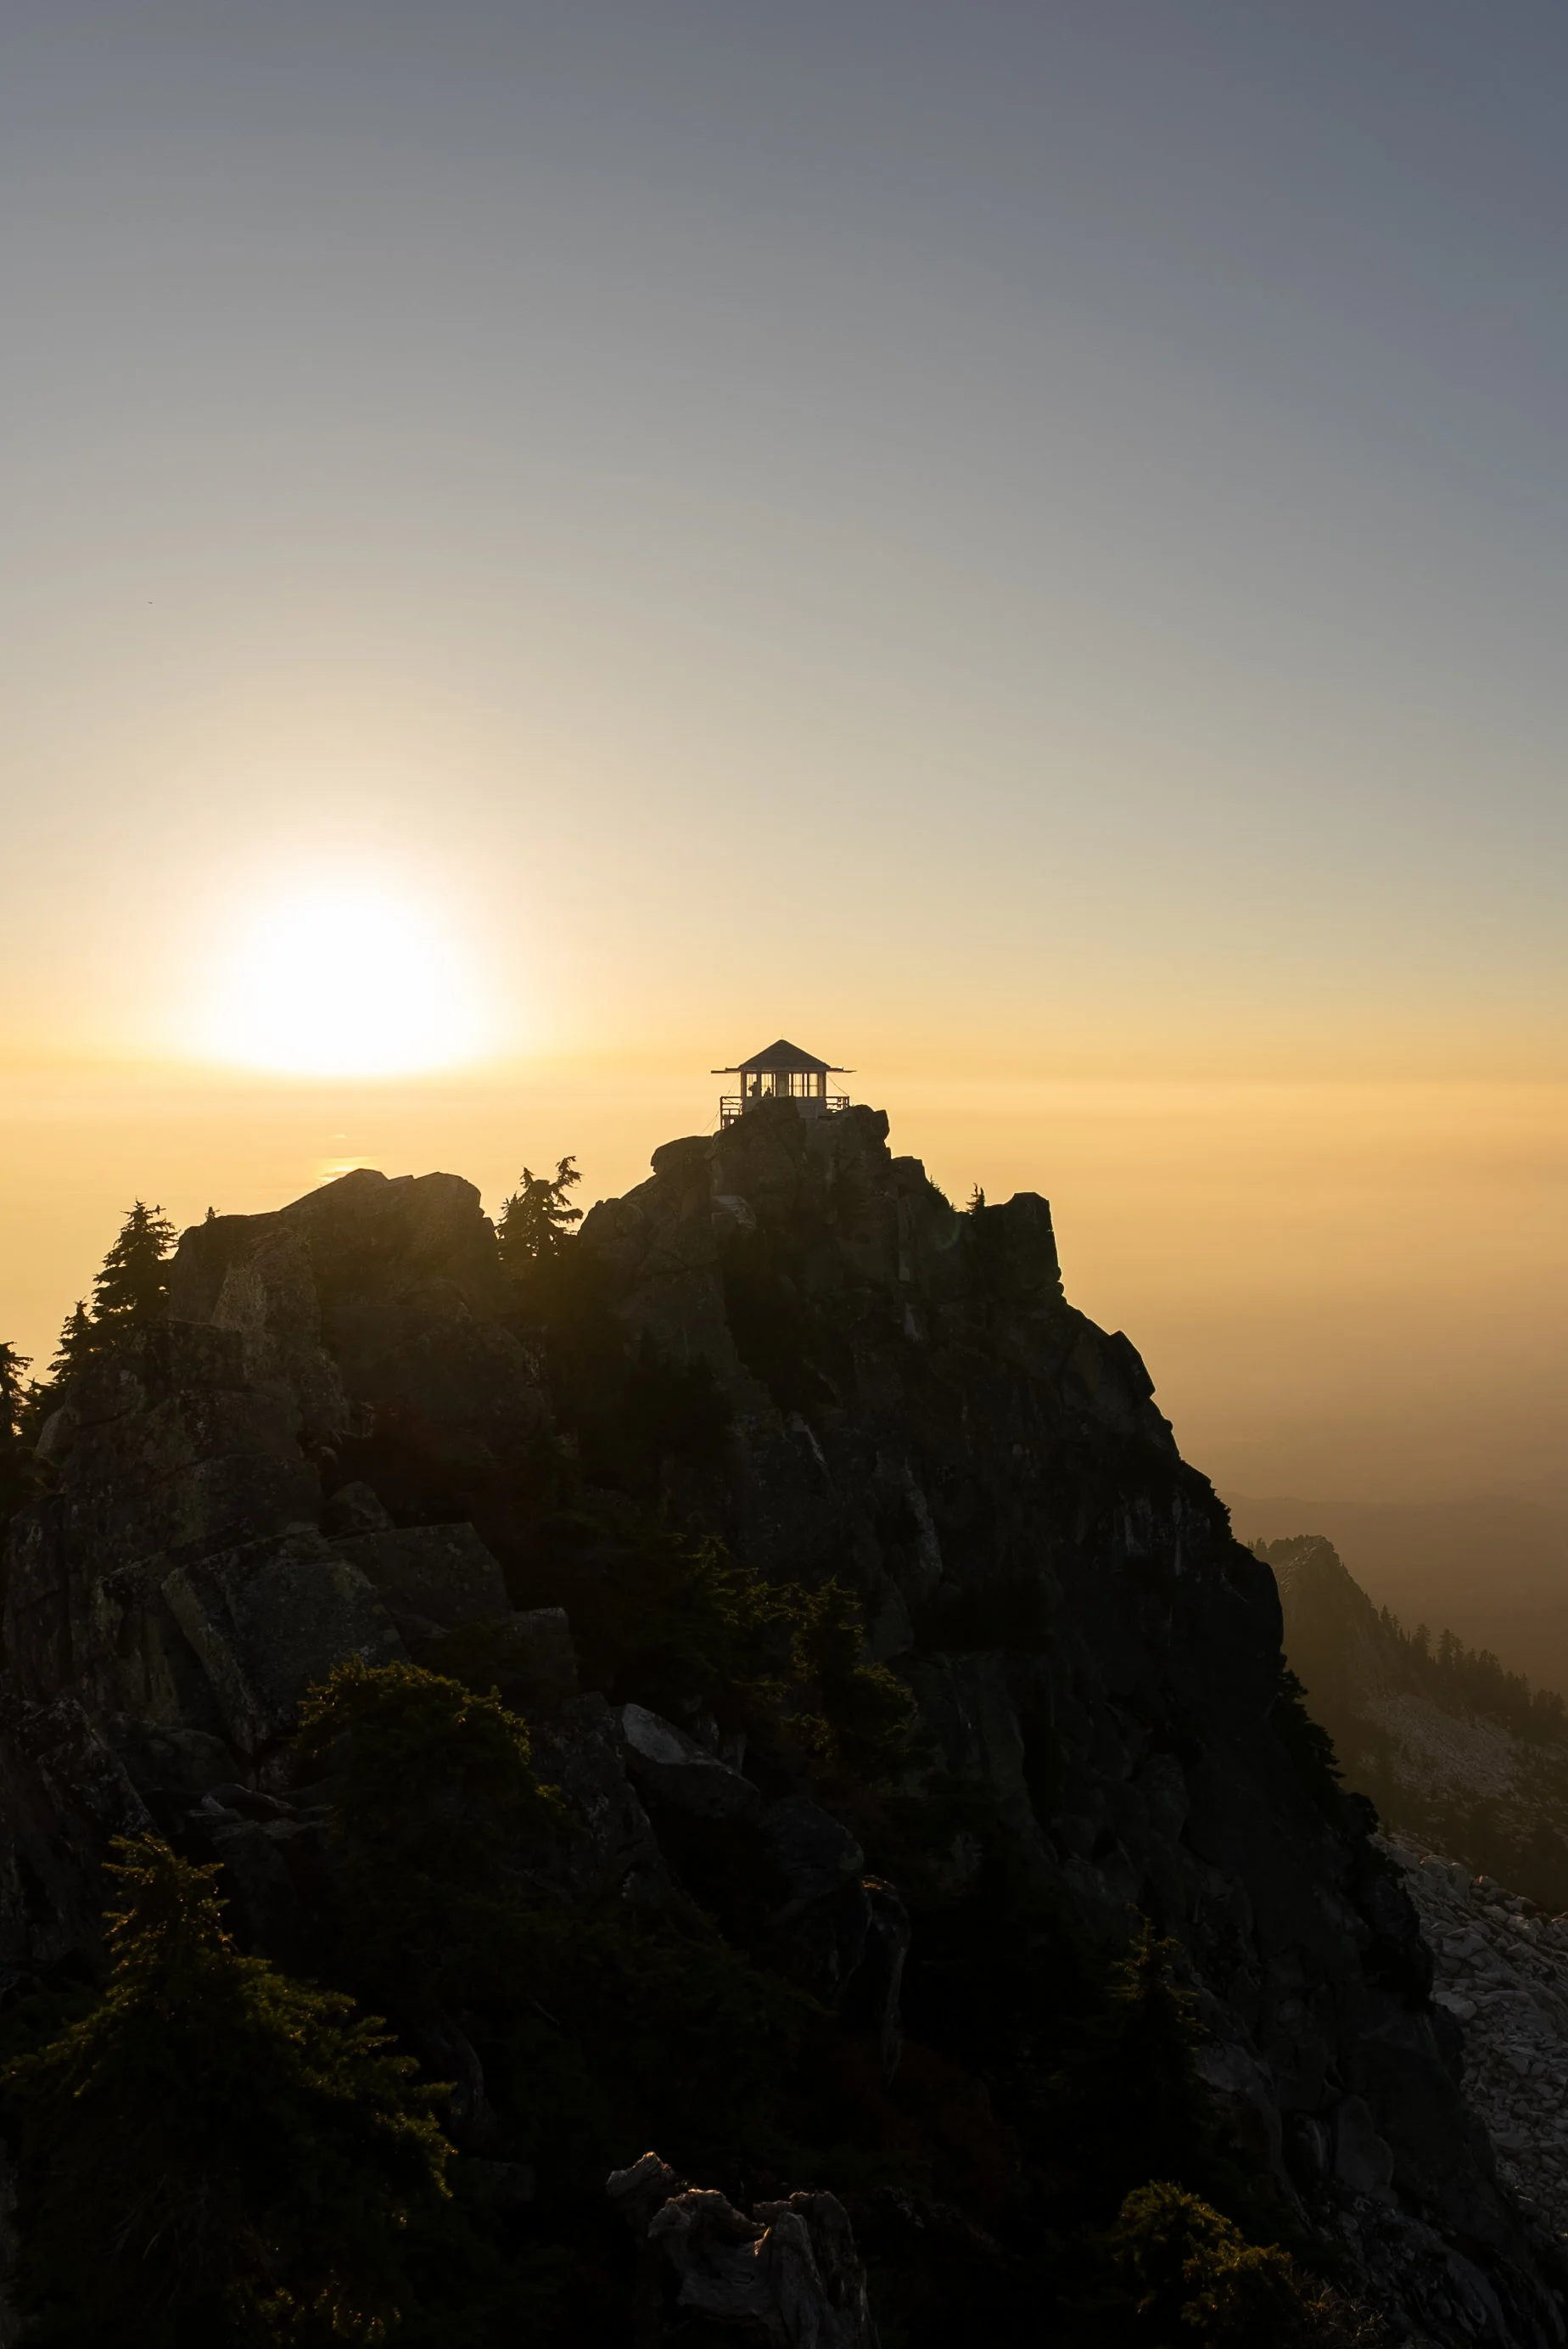
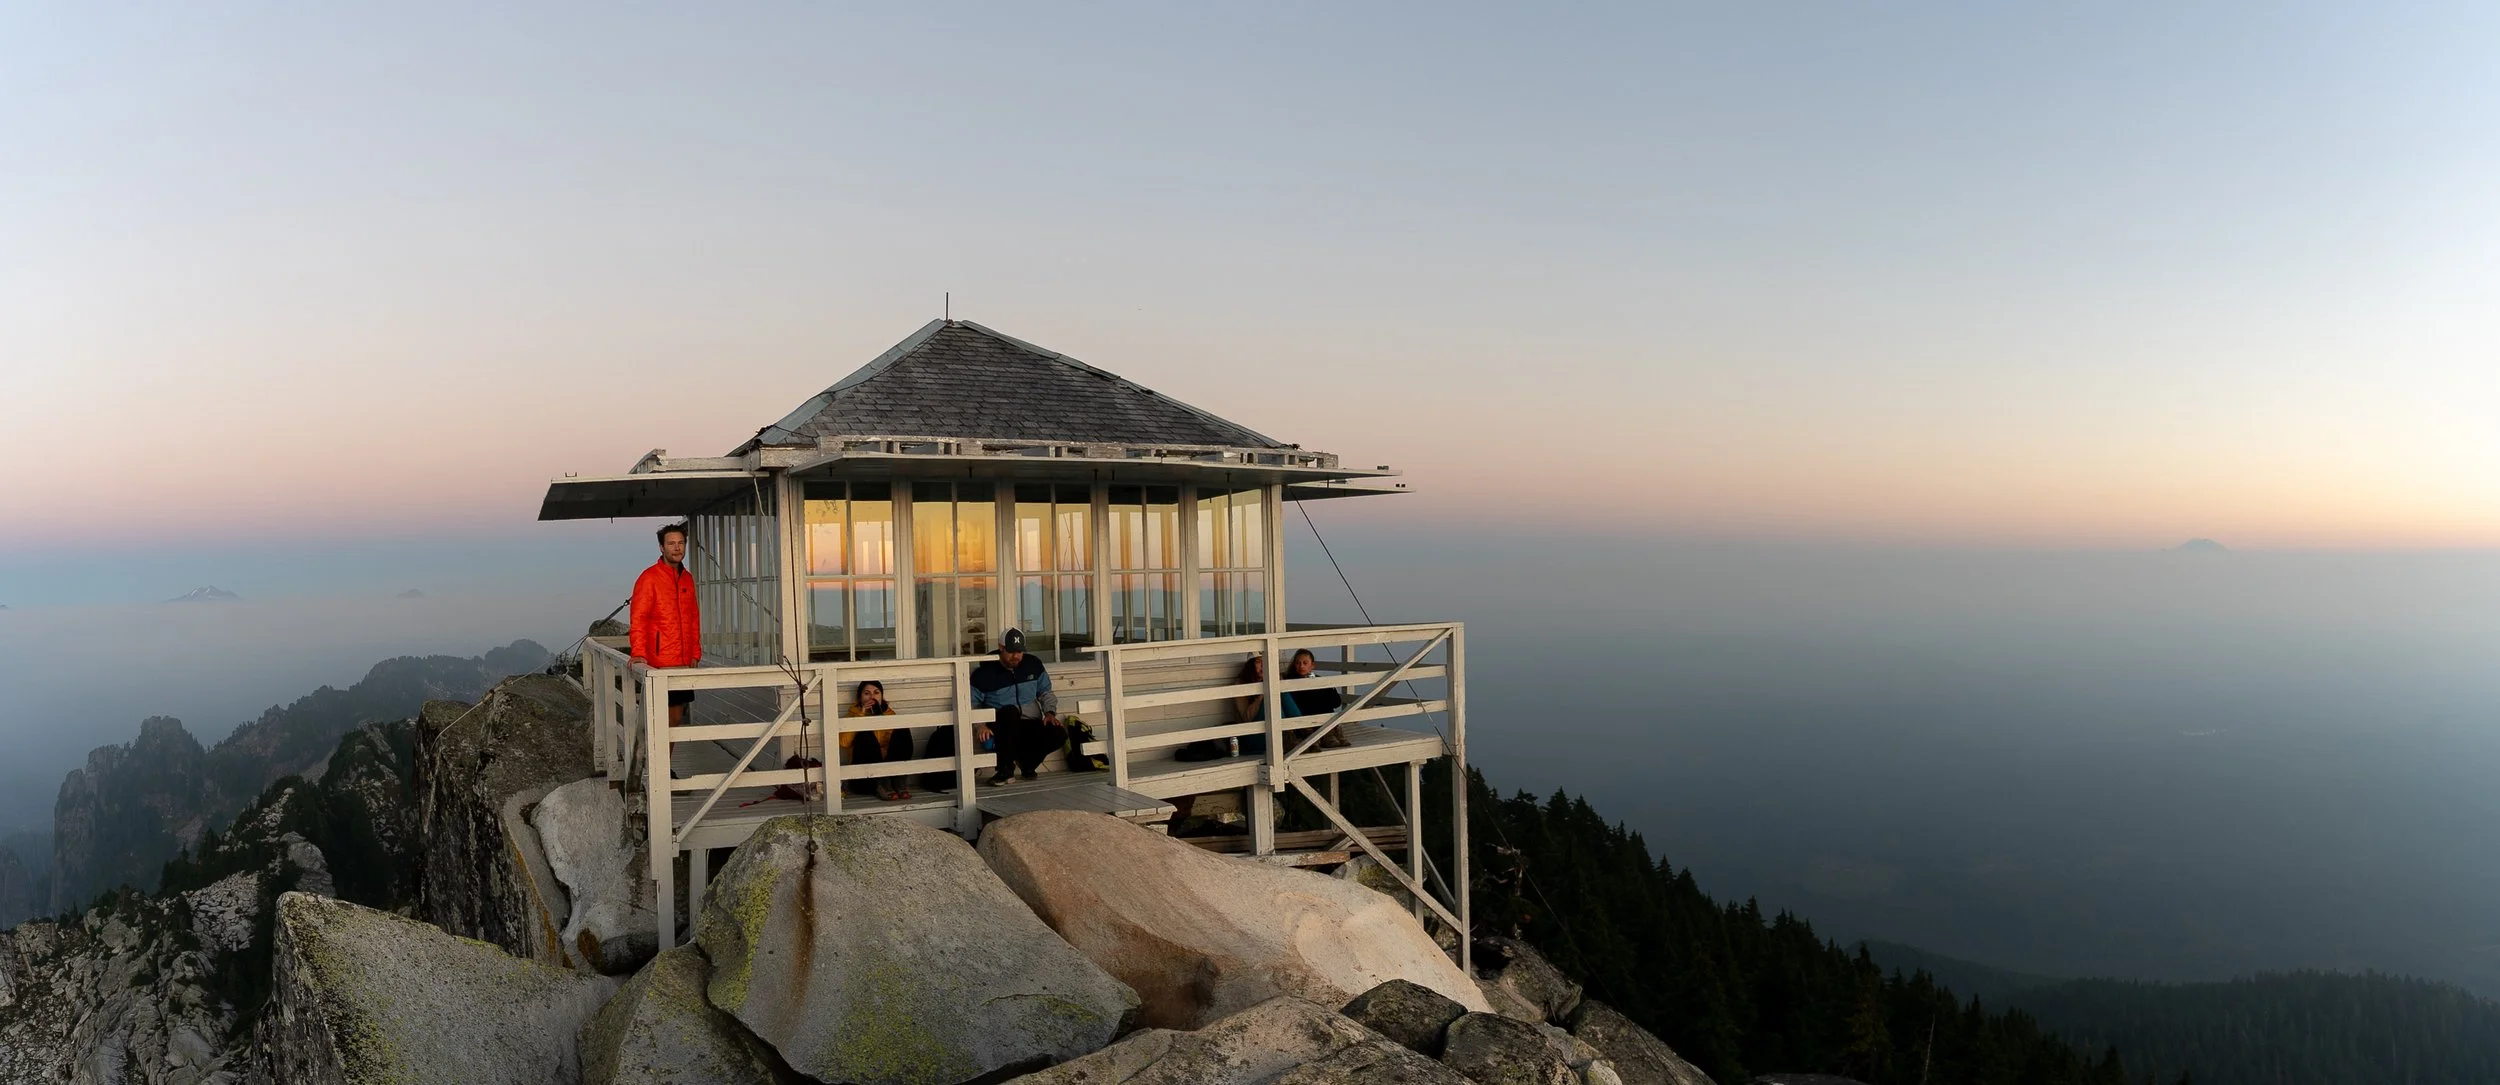
Day 13: Mount Pilchuck state Park
Mount Pilchuck sttae park makes for a perfect final stop before returning to Seattle. This area sits on the western slopes of the Cascades and offers a blend of alpine lookouts, lush forests, and waterfalls , a condensed snapshot of everything that makes Washington special.
Must see and to do
Mount Pilchuck Lookout — One of Washington’s most iconic fire lookouts, perched on top of a granite peak with 360° views stretching from Mount Rainier to the Olympic Mountains and Puget Sound. The final section involves light scrambling, but the panoramic summit rewards the effort — it’s particularly beautiful at sunset or during late-afternoon golden light. Hike details: 8.5 km / 700 m / 3–4 hours / Moderate / WTA Route

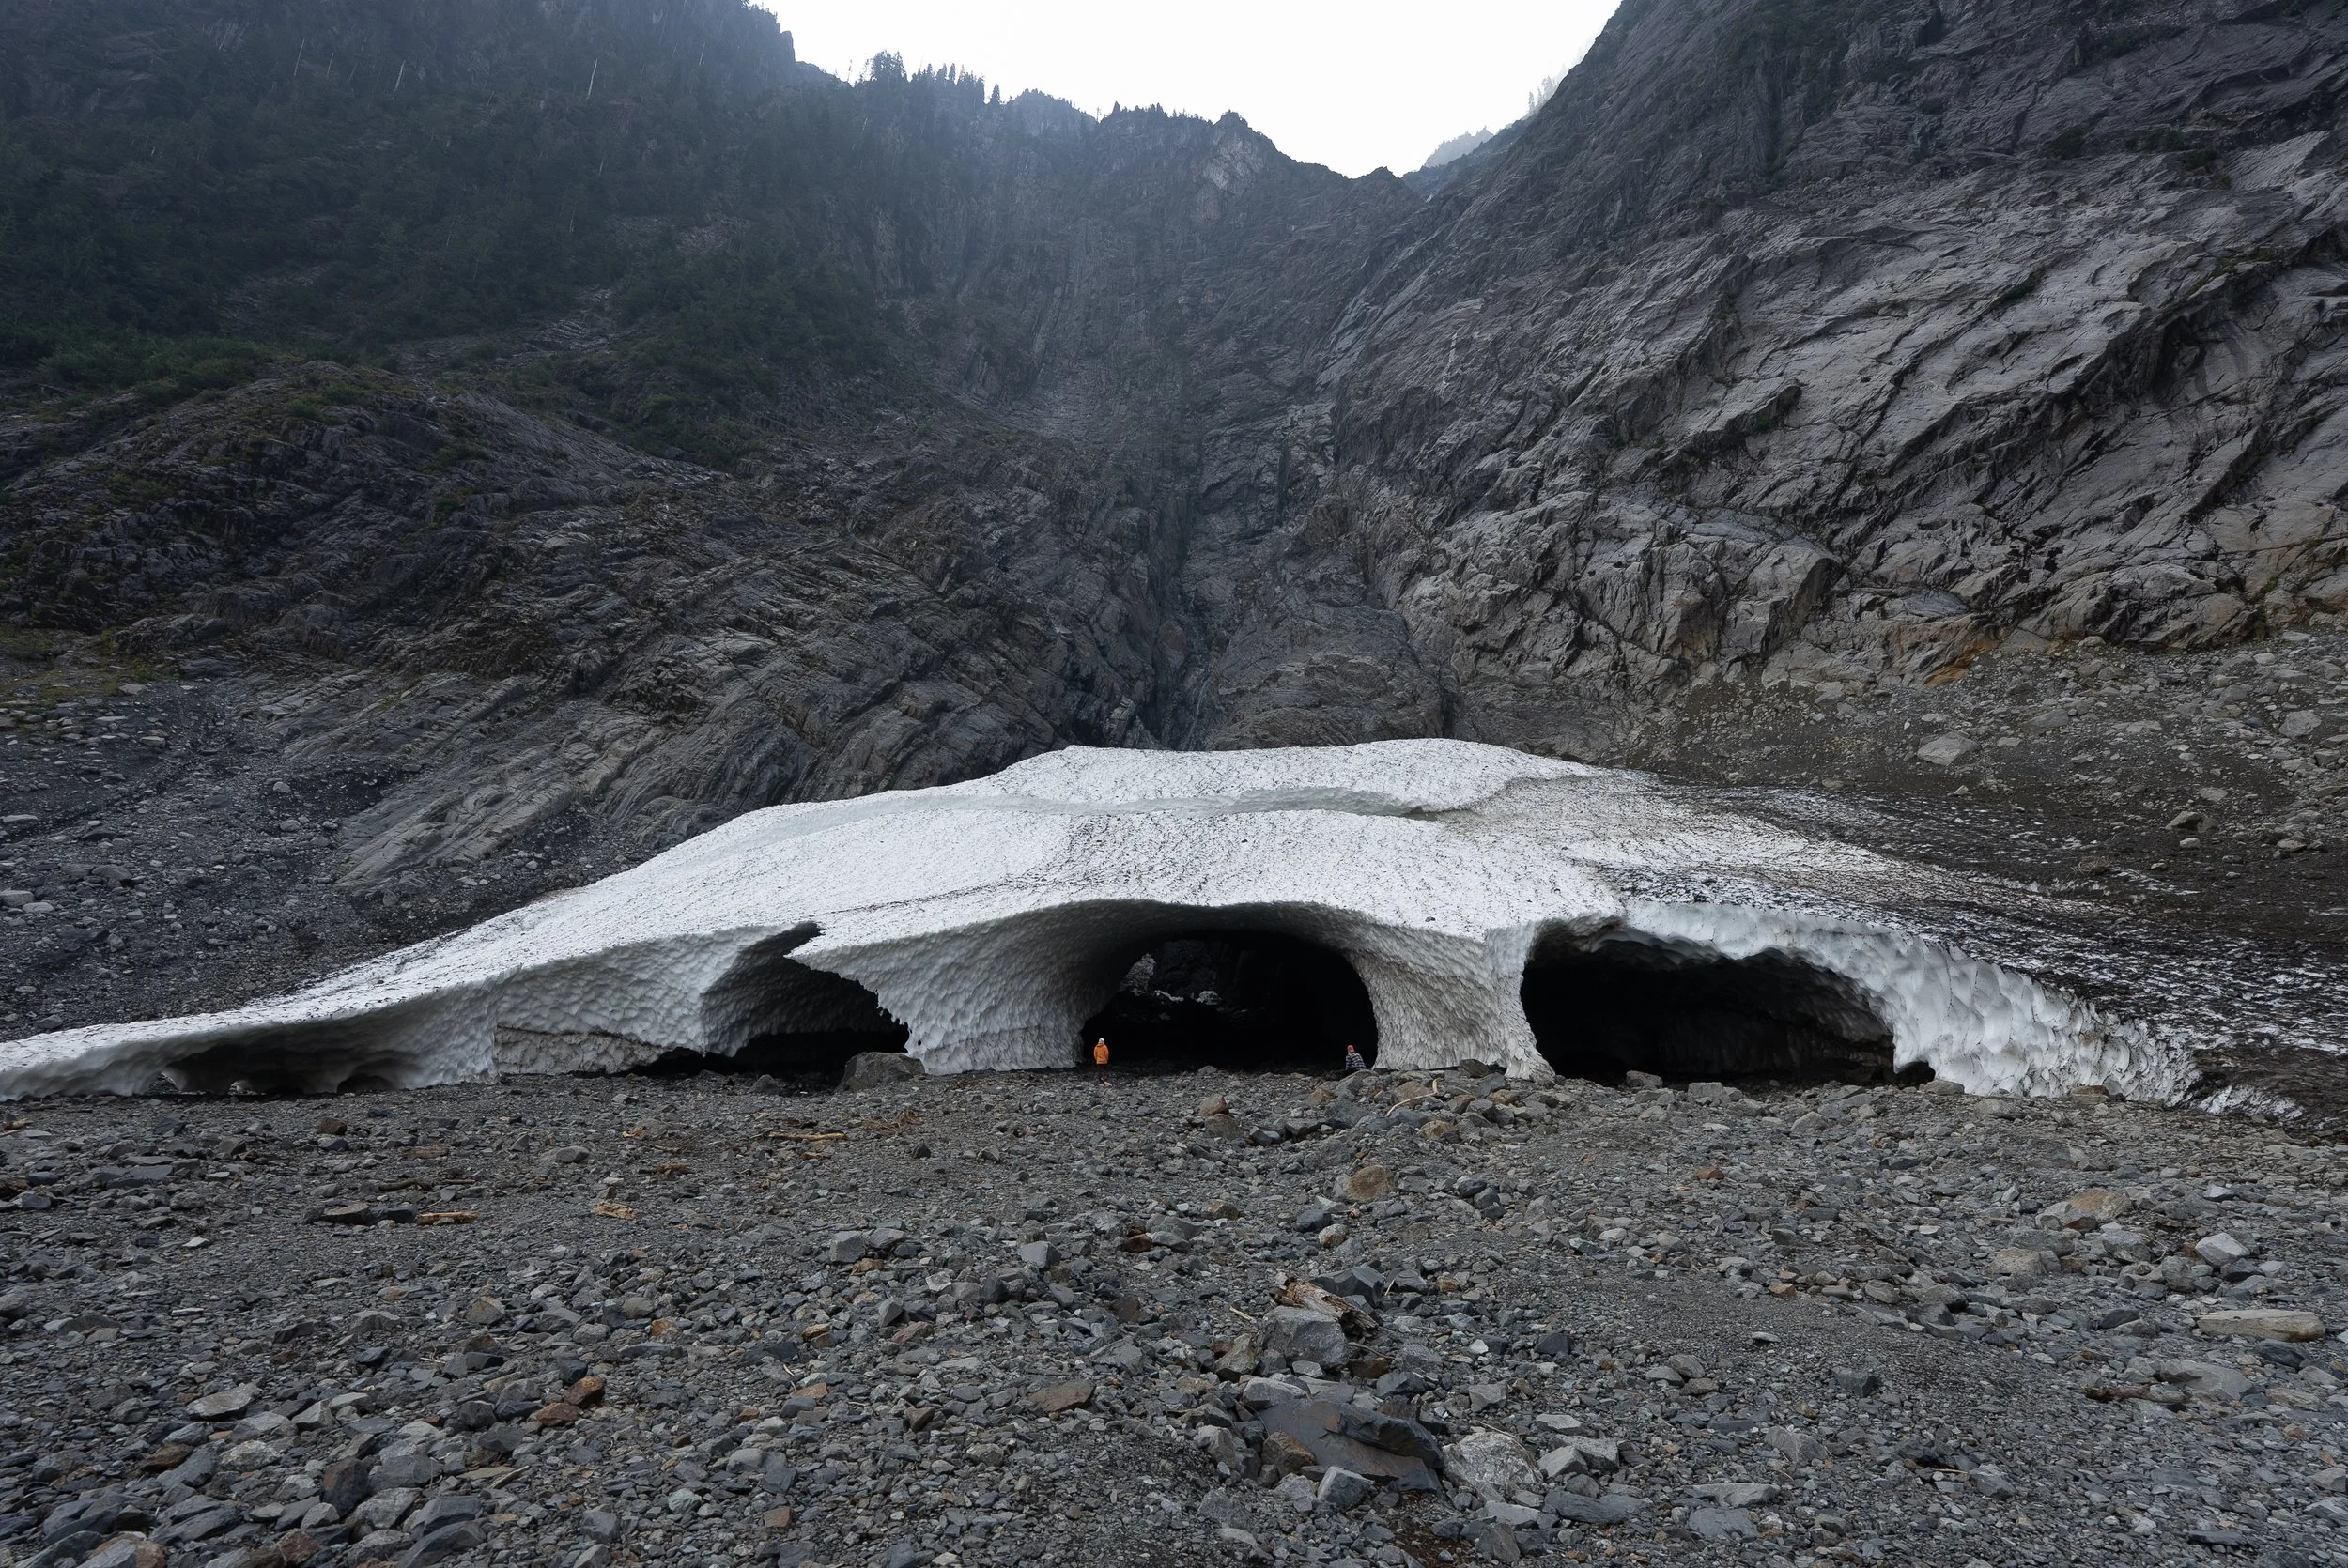
Big Four Ice Caves — A short, flat forest trail leads to the base of Big Four Mountain, where snowfields and waterfalls carve out shimmering ice caves each summer. It’s an easy and rewarding stop with great photo opportunities and interpretive signs explaining the formation process. 3.2 km return / Easy


Where to stay
Verlot Campground – A well-maintained, forested National Forest Service site located along the Mountain Loop Highway, with access to the Stillaguamish River. First-come, first-served.
Turlo Campground – Located close to Verlot Ranger Station, this peaceful riverside site is shaded by trees and has basic facilities. First-come, first-served.
Mt Pilchuck Trailhead (iOverlander) – We parked overnight at the Mount Pilchuck Trailhead. It’s listed on iOverlander as an informal overnight spot. We parked right at the back, had no issues, and weren’t distrubed.
Approximate drive times
Artist Point (Mount Baker) → Mount Pilchuck Trailhead: 2h 30m / ~95 miles
Mount Pilchuck Trailhead → Big Four Ice Caves: 0h 45m / ~20 miles
What we did
We made the drive south and arrived at the Big Four Ice Caves around midday. After a short but scenic hike and a relaxed lunch with views of the mountain face, we continued our journey toward Mount Pilchuck for a sunset hike.
My wife opted to stay in the van, so I tackled the trail solo — a power hike up in just 53 minutes, followed by a 30-minute run back down. Unfortunately, wildfire smoke had rolled in by the afternoon, creating a thick haze that limited visibility throughout the hike. That said, the sunset and alpine views at the summit still managed to deliver a memorable experience and made the effort completely worthwhile.
We also spent the night at the trailhead as it was on iOverlander. We parked right at the back, had no issues and were not disturbed.
Day 14: Seattle
After two weeks of mountains, coastlines, and alpine trails, it’s time to wrap up your Pacific Northwest road trip in the Emerald City. Seattle blends vibrant urban culture with outdoor charm , from bustling markets and waterfront views to nearby waterfalls and forest trails. This final day is perfect for winding down, grabbing souvenirs, reflecting on the trip, and possibly catching one last Washington sunset.
Things to see and do in Seattle
Pike Place Market – A Seattle institution and the oldest continuously operating farmers market in the US. Watch the fishmongers toss salmon, browse local crafts, and grab some Mac & Cheese at Beechers
Kerry Park – The classic Seattle photo spot, offering iconic views of the skyline, Mount Rainier, and Elliott Bay. Visit at sunset or blue hour for dreamy shots.
Alki Beach – A scenic waterfront neighborhood with beach walks, skyline views, and a laid-back vibe. Ideal for sunset strolls and spotting paddleboarders and seals


Alki beach
Also worth exploring
Now if you really don’t want to visit Seattle, or haven’t had your outdoor fix then there are plenty of other things to do just outside of the city. Two recommendations would be
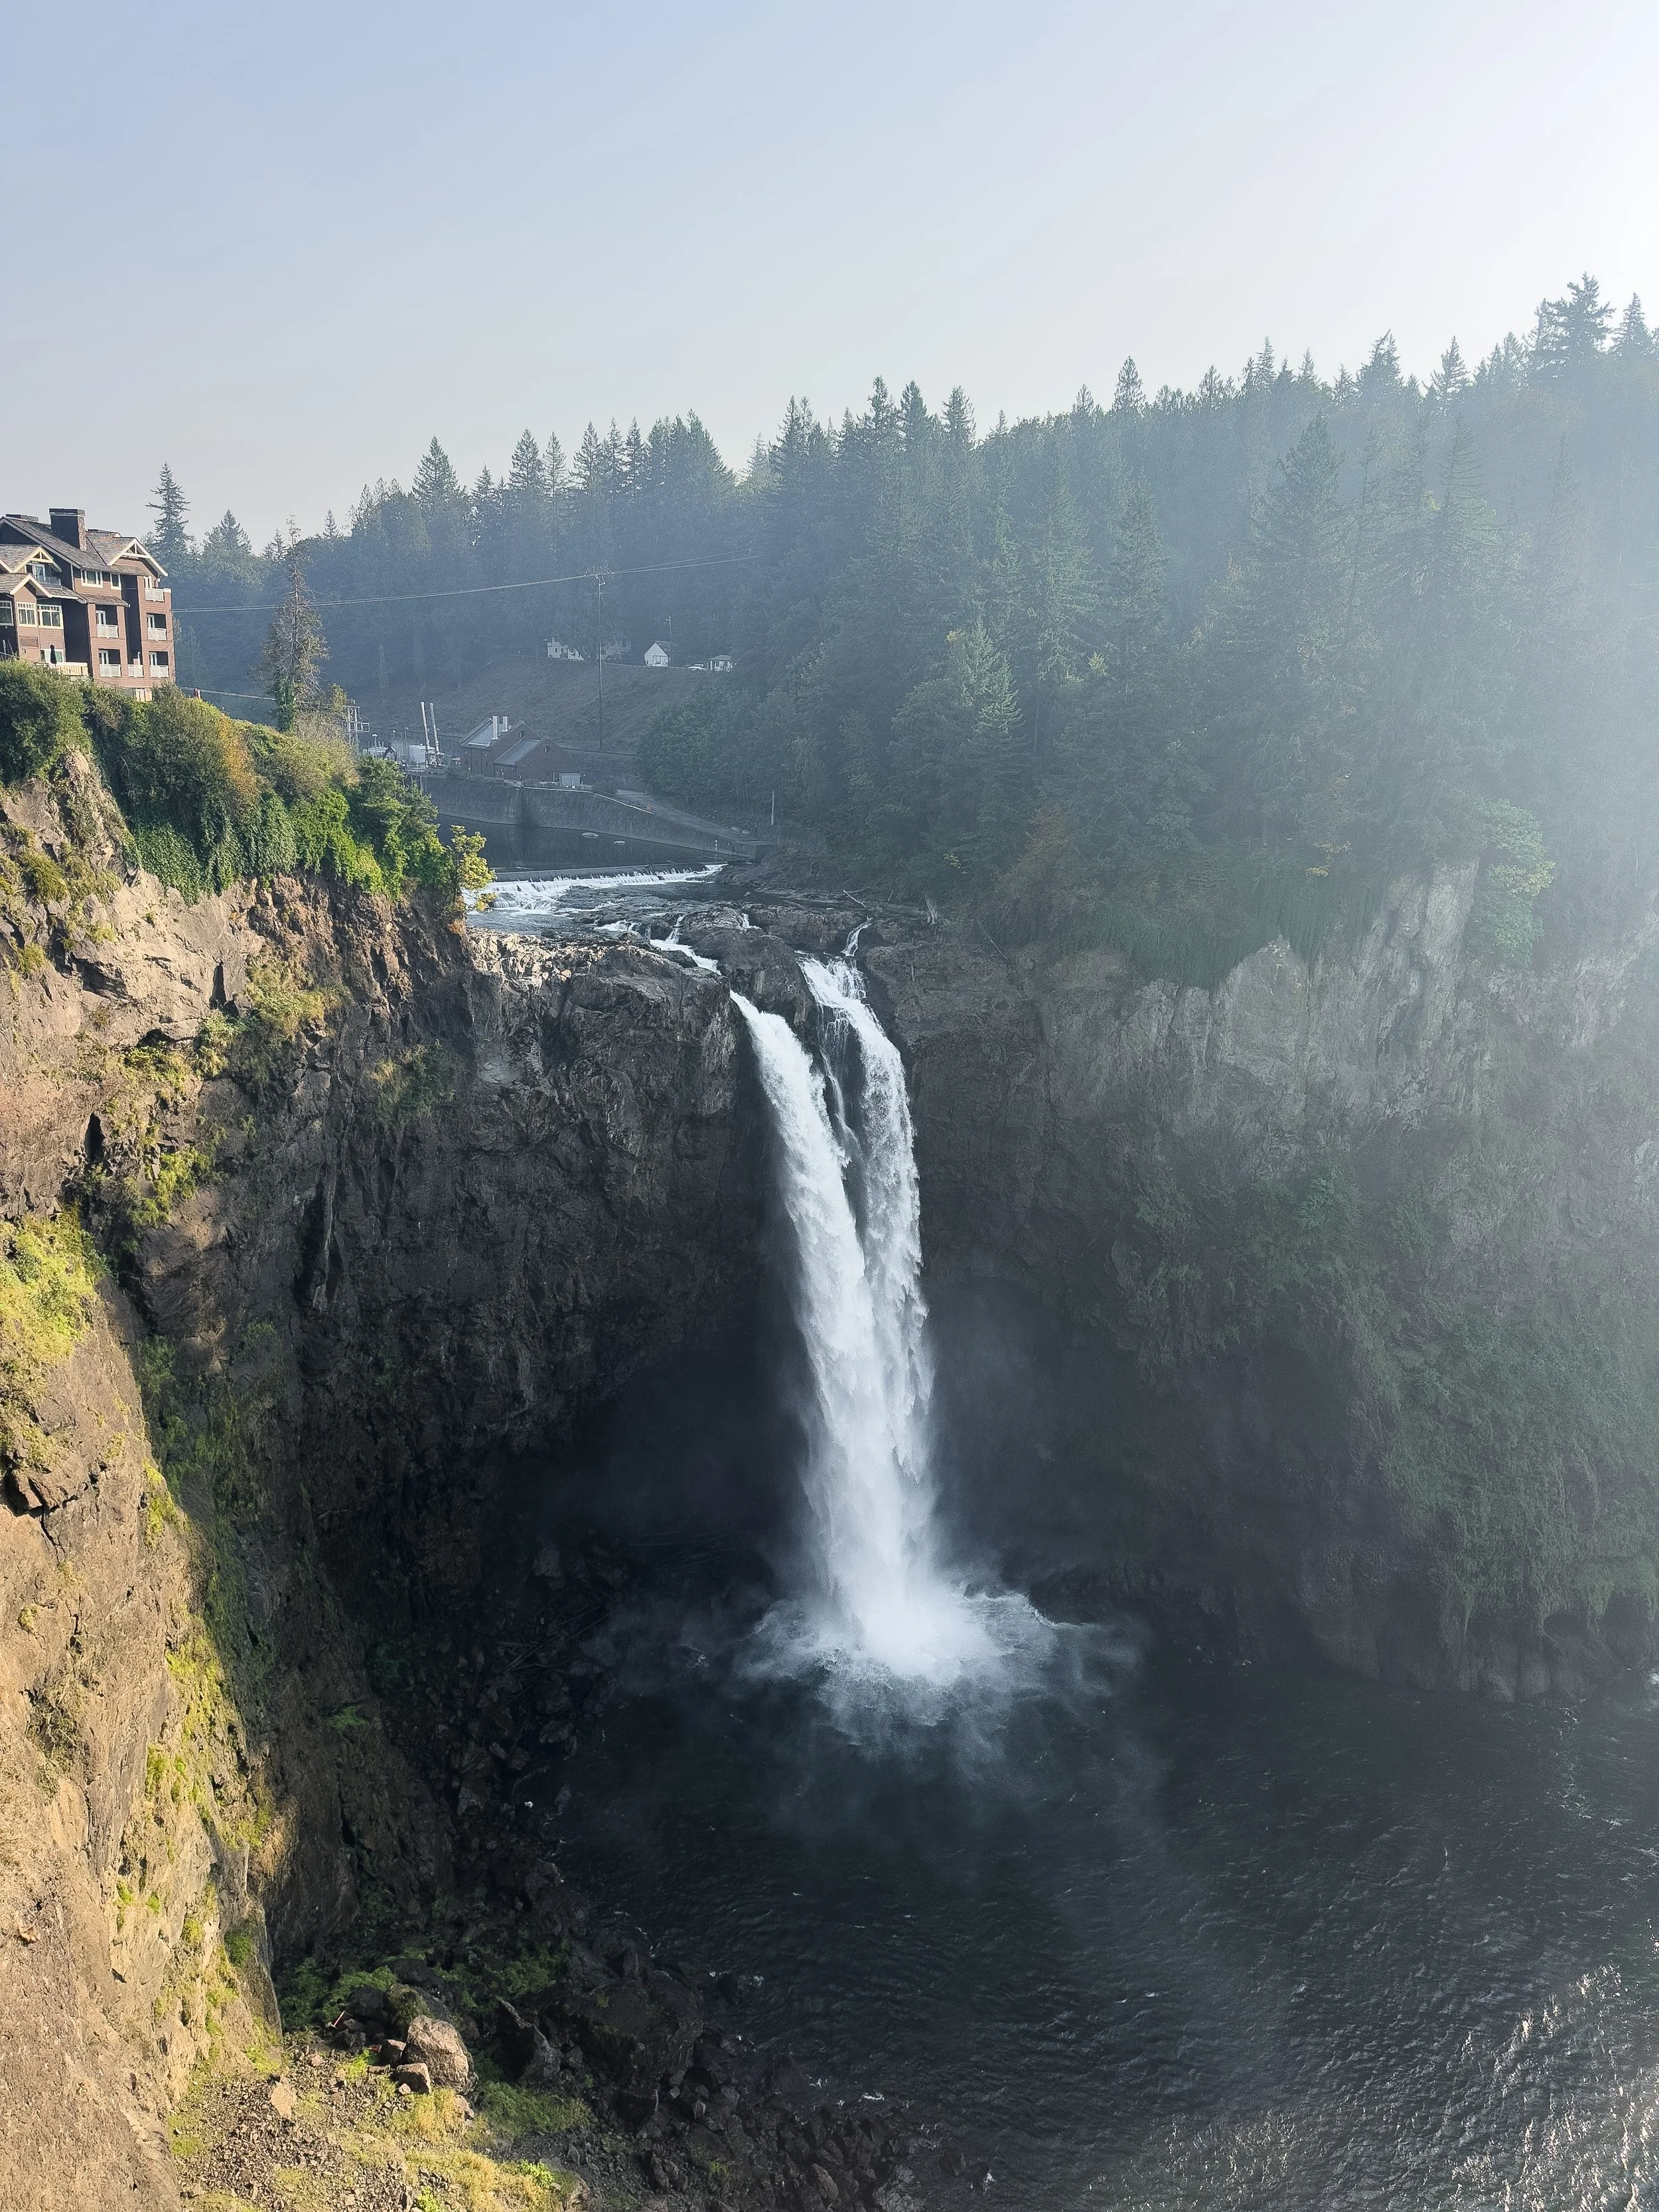
Snoqualmie Falls – One of Washington’s most famous waterfalls, plunging 82 metres into a misty gorge. The upper viewpoint near Salish Lodge is easily accessible, while a paved trail leads down to the lower platform. Visit at sunrise or sunset for dreamy light.
Rattlesnake Lake & Rattlesnake Ledge – A popular local hike just 45 minutes from the city. The short but steep trail to the ledge offers dramatic views of the lake and surrounding hills. Ideal if you want to squeeze in one last hike.
Where to stay
We stayed at the Best Western Seattle Airport Hotel, which worked out perfectly for our final night. It was cheap, comfortable, and included:
Free parking
Complimentary breakfast
Luggage storage
Gym and pool
Free shuttle to Seattle–Tacoma Airport
It’s also located just a few minutes’ walk from the light rail, which made it really easy to explore downtown Seattle without having to deal with city driving or parking.
Our flight at at 8:30pm so we left our luggage at the hotel, dropped off our campervan at Roadsurfer, and took the light rail into the city for a relaxed afternoon. After a late lunch we then hopped back on the train and used the hotel’s shuttle to get to the airport. This saved us the hassle of carrying bags around the city and allowed for a stress-free end to the trip.

How to Make the Route Longer
If you’ve got extra days, you can either slow down (add time in Olympic National Park and the Mount Baker–Snoqualmie National Forest) or extend into Oregon: continue down the Southern Oregon Coast, head inland to Crater Lake National Park, then pass up through Bend, Oregon on the way back toward Silver Falls State Park and the Mount Hood / Columbia River Gorge area.
If you’d like even more coastline, consider adding the San Juan Islands off Washington’s northwestern shore — perfect for a quieter, scenic interlude of beaches, marine life, and small-town charm.
Potential 3-Week Route
Days 1–3: Olympic National Park, WA
Day 4: Northern Oregon Coast, OR
Days 5–6: Northern & Southern Oregon Coast
Day 7: Southern Oregon Coast
Days 8: Crater Lake NP, OR
Day 9: Bend, OR
Day 10: Silver Falls State Park, OR
Day 11: Mount Hood & Columbia River Gorge, OR
Day 12: Columbia River Gorge
Days 13- 14: Mount Rainier National Park, WA
Day 15 : Okanogan–Wenatchee National Forest, WA
Days 16-17: North Cascades, WA
Days 18–19: Mount Baker, WA
Day 20 Mount Baker–Snoqualmie NF, WA
Day 21: Seattle, WA
I had considered going to the below locations and had identified the following places..
Southern Oregon Coast: 1–2 days
Wilder and quieter than the north: home to endless sea stacks, dunes, and headlands its a coastal photographers wet dream.
Things to do
Face Rock State Scenic Viewpoint (Bandon) — Sea stacks and tidepools at low tide.
Heceta Head Lighthouse — Short climb to Oregon’s most photogenic lighthouse.
Samuel H. Boardman Scenic Corridor — Coastal viewpoints and trails (Natural Bridges, Secret Beach).

Photo by Karsten Winegeart
Crater Lake National Park: 1–2 days
A deep-blue volcanic caldera rimmed by viewpoints and short summit hikes. Rim Drive usually opens mid-summer. As of …. They are closing access to the lake shore, so you can no longer enter the water. this is because …
Things to do
Toketee Falls — Short, scenic waterfall walk framed by basalt columns.
Watchman Peak — Moderate trail to a fire lookout with sunset views.
Garfield Peak 3.5 miles / 5.6 km — Classic rim hike from Rim Village.
Cleetwood Cove Trail — The only trail to the lake shore; access for swimming/boat tours.
Bend: 1–2 days
Sunny high desert city known for craft beer, coffee, and easy access to canyons, lava flows, and mountain trails.
Things to see & do
Smith Rock State Park — Hike Misery Ridge for spire and canyon views.
Tumalo Falls — 97-foot waterfall just outside town.
Newberry National Volcanic Monument — Lava Butte lookout, Lava River Cave, Paulina Lake hot springs.

Smith Rock by Jeff Finley

Photo by Joshua Klabunde
How to Make the Route Shorter
This depends on your priorities:If you’re mountain-focused, skip the Oregon Coast and Silver Falls and focus on Rainier, North Cascades, and Baker.
If your route feels too mountain-heavy, cut one alpine day (like Colchuck Lake) or trim Mount Baker / North Cascades, then add a coastal rest day instead. The Columbia River Gorge is still worth including as it’s unique, compact, scenic, and easy to access.
Potential 10-Day Route
Days 1–2: Olympic National Park, WA
Day 3: Columbia River Gorge, OR
Days 4–5: Mount Rainier NP, WA
Day 6: Mount Pilchuck or Snoqualmie NF, WA
Day 7–8: North Cascades, WA
Day 9: Mount Baker, WA
Day 10: Seattle, WA

Final Thoughts
This was, without a doubt, one of the most incredible road trips we’ve ever done and a journey I would 1000% recommend. If you’re even remotely into landscapes, hiking, or just getting outdoors, you will not be disappointed. The sheer variety is what makes it so special: in just two weeks, we saw coasts, canyons, volcanoes, waterfalls, alpine lakes, jagged peaks. YOu can also see desert if you head further into Oregon.
It’s a landscape lover’s dream, constantly surprising you with what’s around the next bend. theres also an endless lis tof things to see and do, we packed a huge amount in and barely scratched the surface
Renting a campervan is the way to go. It amplifies the whole experience , gives you total flexibility, saves on accommodation, and lets you wake up in some pretty stunning places.
I’d highly recommend Roadsurfer and their Liberty Lodge model, which was perfect for the two of us. they offer unlimited mileage, a free second driver, have modern vans with awesome features, and great customer service. If you're booking your own trip, you can use the code ‘KNIGHT10’ for a discount on your van (no commission, just a genuine tip).
We were lucky with the weather and avoided major wildfire disruption, but if you’re planning your own adventure, I’d recommend going in early autumn. The fall colours are incredible and the crowds start to thin out. Visiting during larch season would have been even more spectacular, though you do run the risk of shorter days and more unpredictable weather.

My Trip Highlights
Favourite Hikes
Maple Pass Loop – The best overall hike for variety, views, and a rewarding loop.
Pinnacle Peak – A short but technical trail with epic sunset views over Mount Rainier.
Fremont Lookout – The best fire lookout hike, especially at golden hour.
Best Waterfall - Tamanawas Falls – Towering, quiet, and you can walk behind it. It had everything.
Best Lake - Colchuck Lake – Nothing else comes close. A close second was Bench Lake,
Favourite Places
Paradise, Mount Rainier – So much variety and easily one of the most scenic parts of the trip.
Columbia River Gorge – A concentrated corridor of some of the best waterfalls you’ll ever see.
Colchuck Lake – unforgettable, and I have hiked across British Columbia and Alberta.
Skippable Spot : Northern Oregon Coast – It’s beautiful, but I’m just not as wowed by coastlines as I am by mountains. The Olympic coastline had similar beauty but felt wilder and more dramatic. Missing Cannon Beach due to fog probably skewed my impression, but if time is tight, I’d prioritise the inland highlights.
Help support my website
Congratulation on getting to the deep end! If you’re planning a trip of your own, I hope this guide helps you dodge a few of the mistakes we made and inspires you to embark on your own Pacific Northwest adventure.
I created and run this free website in order to help inform, amaze, inspire people to get outside and explore the adventurous side of the UK.
I have limited ads in order to make your experience on this website far more enjoyable.
If you’d like to support this website, you can use the affiliate links below to book your accommodation or transport. These come at no extra cost to you, but help keep this site running.
Book your vehicle using Discover Cars
Book your accommodation using Booking.com
If you are feeling generous you can also Buy me a Coffee to say thank you, and give me a follow on social media.
Thank you, and if you have any questions, leave them in the comments below or drop me an email!
